background image

20

    S&C Instruction Sheet 695-545

Appendix A

Pad-Mounted Enclosure Finish

The responsibility for ensuring a finish protects the 
enclosure lies with both the manufacturer and the user. 
S&C Vista SD Underground Distribution Switchgear is 
fi nished with the S&C Ultradur® Finishing System, which 
provides lasting protection for the enclosure. To retain 
this protection, the user should take periodic corrective 
action as follows:

STEP  1.  

Touch up any penetration of the fi nish to bare 
metal, such as scratches and abrasions caused 
during shipping or by vandalism, to maintain the 
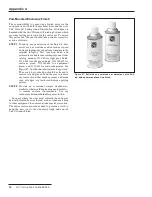
original integrity. S&C touch-up fi nish and 
primer are available in aerosol spray cans. Order 
catalog number 999-080 for light gray fi nish, 
9999-058 for olive green fi nish, 9991363-493 for 
seafoam green, 9991363-488 for equipment 
green, and 9999-061 for red-oxide primer. See 
Figure 27. No other fi nish or primer is approved. 
The area to be touched up should be cleaned to 
remove oil and grease. Sand the area to remove 
any traces of rust that may be present, and make 
sure all edges are feathered before applying 
primer.

STEP  2.  

Provide an occasional simple washdown—
similar to what would be given to an automobile—
to remove surface contaminants. Use any 
ordinary mild household detergent solution.

In cases where the user must refinish the enclosure 

before the finish has weathered, such as when matching 
to other equipment, the user must take special precaution. 
The entire surface must be sanded to provide a tooth to 
bond the new coat to the unusually tough and smooth 
S&C Ultradur Finish.

Figure 27. Refinish any scratches or abrasions with S&C 
red-oxide primer and touch-up finish.

Summary of Contents for Vista SD

Page 1: ...Instructions and Labels 4 Location of Safety Labels 5 Safety Precautions 6 Components 7 Operation Manually Opening or Closing Visi Gap Load Interrupter Switches and Visi Gap Fault Interrupters 9 Closi...

Page 2: ...ot intended to be a substitute for adequate training and experience in safety proce dures for this type of equipment Read this Instruction Sheet NOTICE Thoroughly and carefully read this instruction s...

Page 3: ...user s claim All other warranties whether express or implied or arising by operation of law course of dealing usage of trade or otherwise are excluded The only warranties are those stated in Price Sh...

Page 4: ...ecautions are not followed NOTICE NOTICE identifies important procedures or requirements that can result in prod uct or property damage if instructions are not followed Following Safety Instructions I...

Page 5: ...locked immediately call electric company G 6398 B DANGER Hazardous voltage more than 4000 volts Failure to follow these instructions will likely cause shock burns or death ALWAYS consider all circuits...

Page 6: ...a door The use of undue force may damage the door latching mechanism 7 Safety Labels Do not remove or obscure any of the DANGER WARNING CAUTION or NOTICE labels 8 ENERGIZED BUSHINGS Always assume the...

Page 7: ...of load interrupter switches and fault interrupters are optionally available They can be decoupled from the operating mechanisms to permit testing without changing the positions of the switches or fau...

Page 8: ...nit shown Catalog Number Suffix 924313 E11 Manual handle Fault indicator viewing window optional Potential indication feature optional Overcurrent control Operating mechanism Visible open gap isolatin...

Page 9: ...t wrench or tool a hex headsocketwrenchortoolwhencatalognumber suffix N is specified into the latching mechanism Rotate the wrench or tool 60 counterclockwise to unlatch the doors See Figure 3 NOTICE...

Page 10: ...ion of the manual operating handle STEP 5 Retrieve the manual operating handle from its storage location at the top left side of the switchgear assembly See Figure 5 STEP 6 Pull the knob forward at th...

Page 11: ...way to the stops See Figure 7 a To open the load interrupter switch or fault interrupter rotate the handle counterclockwise b To close the load interrupter switch or fault interrupter rotate the hand...

Page 12: ...door is closed To close a door equipped with the Penta Latch Mechanism place one hand at the midpoint of the door front near the edge and firmly push the door closed When the latch points are positive...

Page 13: ...EP 1 Check the POSITION indicators to confirm the fault interrupter has tripped See Figure 14 STEP 2 Retrieve the manual operating handle from its storage location Attach the handle to the shaft of th...

Page 14: ...TEP 8 Check the POSITION indicators to confirm the fault interrupter is closed See Figure 19 STEP 9 Confirm the position of the isolating disconnect using the large viewing window See Figure 20 STEP 1...

Page 15: ...of a load interrupter switch or fault interrupter insert a padlock through the operating mechanism and the center hole in the locking collar See Figure 21 Figure 21 The load interrupter switches or fa...

Page 16: ...etroleum based solvents should not be used on or around Vista SD Underground Distribution Switchgear STEP 2 Unscrew the aluminum cap covering the Potential Indication feature See Figure 22 STEP 3 Atta...

Page 17: ...be phased as follows a Set the voltmeter for volts ac b Connectoneofthetestprobesofthevoltmeterto the neutral jack of the way to be phased c Place the other test probe on each of the test jacks in tur...

Page 18: ...ng different phases of the two ways the voltage should be 1 7 to 2 times the phase to neutral voltage measured in Step 3 See Figure 25 b d Keep the test probe on Test Jack 1 of the first way and move...

Page 19: ...r sources including backfeed test for voltage and properly ground 4 Always assume the bushings are energized unless proved otherwise by test or by visual evidence of an Open Circuit condition at the i...

Page 20: ...ve green finish 9991363 493 for seafoam green 9991363 488 for equipment green and 9999 061 for red oxide primer See Figure 27 No other finish or primer is approved The area to be touched up should be...

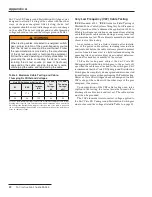
Page 21: ...withstand tests The presence of these values does not imply a dc withstand rating or performance requirements for the switchgear A dc withstand design test is speci fied for new equipment because the...

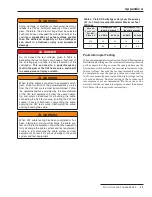
Page 22: ...tance test or a maintenance test The cable system must be taken out of service for this testing An acceptance test is a field test made after installa tion of the power cable system including terminat...

Page 23: ...cable applying the VLF test source discharging the cable and regrounding the cable WARNING When VLF cable testing has been completed or has been interrupted you must discharge the cable sys tem and t...

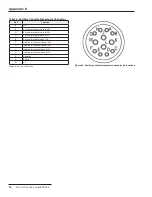
Page 24: ...ed NO C Vacuum interrupter closed NC D Vacuum interrupter open NO E Vacuum interrupter open NC F Isolating disconnect closed NO G Isolating disconnect closed NC H Isolating disconnect open NO J Isolat...

Reviews: