background image

Summary of Contents for ARTIC N GR Series

Page 1: ...ARTIC 255N GR ARTIC 305N GR ARTIC 405N GR o 1 2 Instrucciones de uso User instructions Notice d utilisation Instruções de utilização Gebruiksaanwijzing Инструкция по эксплуатации Istruzioni ...

Page 2: ......

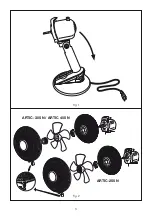
Page 3: ...3 Fig 1 Fig 2 ARTIC 255 N ARTIC 305 N ARTIC 405 N ...

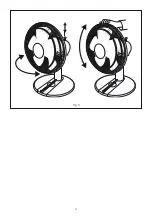
Page 4: ...4 Fig 3 o 1 2 o 1 2 ...

Page 5: ...o en agua No tire del cable para extraer la clavija del enchufe Si el cable de alimentación está dañado debe ser sustituído por un cable suministrado por S P o por el servicio postventa No toque la clavija con las manos mojadas Antes de enchufar o desenchufar el aparato asegúrese de que el interrup tor está en la posición 0 Desenchufe el aparato cuando no lo esté utilizando o cuando quiera pro ced...

Page 6: ...repita a partir del punto 1 8 Monte la rejilla de protección delantera introduciendo el gancho situado en la parte supe rior de la misma en la rejilla trasera Junte las dos rejillas y presione hasta que queden bien unidas en el aro de plástico 9 Cierre el clip de seguridad situado en la parte inferior de la rejilla delantera y fíjelo con el tornillo PUESTA EN MARCHA Una vez comprobada la tensión c...

Page 7: ... debidamente atendido Cualquier manipulación efectuada por personas ajenas a los Servicios Oficiales S P nos obligaría a cancelar su garantía Para aclarar cualquier duda con respecto a los productos S P diríjase a la Red de Servicios Post Venta si es en territorio español o a su distribuidor habitual en el resto del mundo Para su localización puede consultar la página WEB www solerpalau com PUESTA...

Page 8: ...hroom or a shower Do not sink the fan Do not unplug the fan by pulling out on the cable If the cable is damaged it must be replaced by an original spare part supplied by S P Before plugging or unplugging be sure that the main switch is placed at 0 position Unplug the fan when it is not going to be used for a long time or when you are going to do the cleaning procedures This appliance can be used b...

Page 9: ...s 1 to 3 8 Place the front protection grille by introducing the hook on the upper part into the rear grille Put the two grilles together and press them until they get well placed on the plastic frame 9 Close the security clamp on the bottom of the front grille and fix it with the screw OPERATION Once checked that the tension matches with the tension showed on the characteristics plate plug the fan...

Page 10: ...they will attend to your problem Any manipulation of the appliance by personnel not belonging to the Official S P Services will result in your guarantee being void For any queries regarding S P products please contact any branch of our After Sales Service network if you are in Spain or your regular dealer in the rest of the world To find your nearest dealer visit our website at www solerpalau com ...

Page 11: ... abîmé Si le câble électrique d alimentation est abimé il doit être remplacé par un câble identique S P qui vous sera fourni par votre distributeur Ne pas toucher la prise avec les mains humides ou mouillées Avant de brancher le ventilateur vérifier que l interrupteur de commande soit sur la position 0 Ne pas laisser l appareil branché quand on ne l utilise pas ou quand on veut le nettoyer Cet app...

Page 12: ...Monter la grille de protection avant introduisant le crochet situé en partie supérieure dans la grille arrière Unir les deux grilles en appuyant sur toute la périphérie pour bien encastrer la grille arrière dans l anneau en plastique 9 Fermer le clip de sécurité situé en partie inférieure de la grille avant et le fixer avec la vis MISE EN MARCHE Une fois vérifiée la tension brancher le vantilateur...

Page 13: ...x services officiels S P entraînera l annulation de votre garantie Pour toute précision ou répondre à toutes vos questions concernant les produits S P veuillez vous adresser à votre distributeur habituel Vous trouverez son adresse sur notre site www solerpalau com MISE HORS SERVICE ET RECYCLAGE En cas de mise hors service même temporaire il est conseillé de ranger l appareil dans un endroit sec et...

Page 14: ... aparelho em água Não puxe pelo cabo para retirar a ficha da tomada Se o cabo flexivel de alimentação estiver danificado debe ser substituido mas somente por outro fornecido por S P Não toque na ficha com as mãos molhadas Antes de ligar ou desligar o aparelho assegure se que o interruptor está na posição 0 Desligue o aparelho quando não está sendo utilizado ou quando queira proceder à sua limpeza ...

Page 15: ...te a hélice rodando a manualmente Assegure se que roda livremente mas em caso contrário repita tudo a partir do ponto 1 8 Monte a grelha de protecção dianteira introduzindo a gancho situado na parte superior da mesma na grelha traseira Junte as duas grelhas e pressione até que fiquem bem fixadas no aro de plástico 9 Feche o mola de segurança situada na parte inferior da grelha dianteira e aperte a...

Page 16: ...a neste aparelho por favor contacte qualquer dos nos sos serviços oficiais mencionados onde será devidamente atendido Qualquer manipulação efectuada por pessoas alheias aos Serviços Oficiais S P obrigaria ao cancelamento da sua garantia Para esclarecer qualquer dúvida relativa aos produtos S P dirija se à Rede de Serviços Pós Venda se estiver em território Espanhol ou ao seu distribuidor habitual ...

Page 17: ... of douche cabine Reinig de ventilator niet onder stromend water Trek niet aan het snoer indien u de ventilator wilt ontkoppelen Gebruik de ventilator niet indien de kabel stekker in slechte conditie is Verzeker u ervan dat de schakelaar op 0 staat voordat u de stekker uit het stopcontact haalt Haal de spanning van de ventilator indien u deze voor langere tijd niet ge bruikt of voordat u deze gaat...

Page 18: ...dan de vorige stap pen 8 Bevestig het voorste beschermrooster 9 Sluit de veiligheidsklem onderaan het voorste beschermrooster en bevestig het met de schroef WERKING Indien u zich ervan verzekerd heeft dat de spannings en frequentiewaarden van het voe dingsnet gelijk zijn aan de waarden zoals vermeld op het typeplaatje van de ventilator zet dan de spanning op de ventilator Het model 255 heeft een 3...

Page 19: ...ervalt zodra anderen dan het Erkende S P servicepersoneel bewerkingen aan het toestel uitvoeren Om vragen rond S P producten op te helderen wend u tothet netwerk van aftersales servi cediensten indien u zich in Spanje bevindt of tot uw vaste distributeur in de rest van de wereld Voor hun exacte locatie raadpleeg de website www solerpalau com BUITENBEDRIJFSTELLING EN HERGEBRUIK In geval van de buit...

Page 20: ...щениях с повышенной влажно стью например ванных комнатах душевых банях а также избе гайте попадания воды на вентилятор При выключении вентилятора из розетки необходимо потянуть за вилку а не за кабель Не используйте вентилятор с поврежденным кабелем питания Об ратитесь в сервисный центр для ремонта При включении и выключении вилки из розетки убедитесь что вы ключатель вентилятора находится в полож...

Page 21: ...чатка свободно прокручивается от руки Если вращению крыльчатки что то мешает повторите предыдущие шаги и устраните помеху 8 Совместите переднюю и заднюю решетки и наденьте на них фиксирующий хомут Фланцы решеток должны плотно войти в паз на фиксирующем хомуте 9 Закройте фиксатор на нижнем крае передней решетки и заверните шуруп ЭКСПЛУАТАЦИЯ Удостоверьтесь что электрические характеристики вентилято...

Page 22: ...скайте попадания влаги на двигатель вентилятора После чистки перед сборкой убедитесь что все детали вентилятора сухие ДОПОЛНИТЕЛЬНАЯ ИНФОРМАЦИЯ Если оборудование не эксплуатируется длительное время его необходимо упаковать в оригинальную упаковку и хранить в сухом месте защищенном от пыли Не рекомендуется устанавливать на вентилятор какие либо компоненты которые не входят в стандартную комплектаци...

Page 23: ... in acqua Non tirare il filo per estrarre la spina dalla presa ma impugnare la presa stessa Se il cavo d alimentazione è danneggiato potrà essere sostituito solo da S P o dal nostro servizio after market Non toccare la spina con le mani bagnate Prima di collegare o scollegare l apparecchio accertarsi che l interruptore sia in posizione 0 Spegnere l apparecchio quando non viene utilizzato o quando ...

Page 24: ...menti ripetere le operazioni a partire dil punto 1 8 Montare la griglia di protezione anteriore inserendo il gancio situato nella parte superiore de la griglia posteriore Unire le due griglie premendo fino a quando rimangono bene unite all interno del cerchio di plastica 9 Chiudere il clip di sicurezza situato nella parte inferiore della griglia anteriore e fissarlo con una vite MESSA IN FUNZIONE ...

Page 25: ...riceverà assistenza per qualsiasi problema Qualunque manipolazione del prodotto effettuata da persone estranee ai Centri di Assistenza Autorizzati S P ci obbligherà ad annullare la sua garanzia In caso di dubbi relativi ai prodotti S P potrà rivolgersi ai Centri di Assistenza Post Vendita se si trova in Spagna o al suo rivenditore di fiducia se si trova in qualsiasi altro Paese del mondo Per indiv...

Page 26: ......

Page 27: ......

Page 28: ...Ref 1431227 2 S P Sistemas de Ventilación S L U C Llevant 4 08150 Parets del Vallès Barcelona Tel 34 93 571 93 00 Fax 34 93 571 93 01 www solerpalau com ...

Reviews: