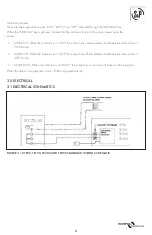
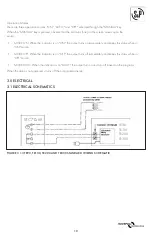
background image

4

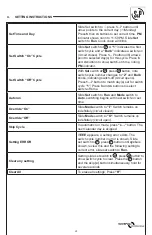
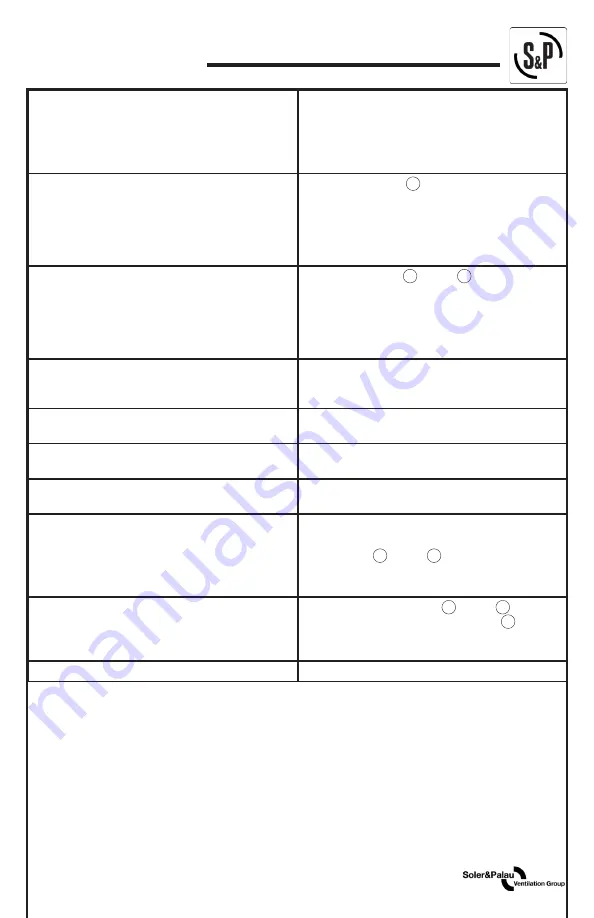
4.      SETTING INSTRUCTIONS

Set Time and Day

Slide Set switch to 

 press 

1…7

 button until 

arrow points to the correct day 

(1=Monday)

.

Press 

h

 then 

m

 buttons to set correct time.

 PM


indicator shows noon to 11:59 PM. Slide 

Set


switch to 

Run

. Clock colon will blink.

Set Switch “On” Cycle

Slide 

Set

 switch to  

P

 . A 

“1”

 indicates the first 

switch cycle and a 

“Bulb”

 indicates a switch-on 

(circuit closes). Press 

1…7

 button until arrows 

point to selected day(s) for this cycle. Press 

h


and 

m

 buttons to show switch-on time, noting 

PM

 indicator.

Set Switch “Off” Cycle

With 

Set

 switch at  

P

 , press  

P

  button, note 

switch cycle number changes to 

“2”

 and 

Bulb


blinks, indicating switch-off (circuit opens). 

Press 

1…7

 button to match day(s) set for switch 

cycle 

“1”

. Press 

h

 and 

m

 buttons to select 

switch-off time.

Autorun

Slide 

Set

 switch to 

Run

 and 

Mode

 switch to 

Auto

, switching begins with next switch-on set 

time.

Override “On”

Slide 

Mode

 switch to 

"I"

. Switch remains on 

indefinitely 

(circuit closed).

Override “Off”

Slide 

Mode

 switch to 

"O"

. Switch remains on 

indefinitely 

(circuit open).

Skip Cycle

In automatic run mode, press 

"x→"

 button. The 

next calendar day is skipped.

Setting ERROR

If 

EEE

 appears, a setting error exists. The 

switch cycle number in error is shown. Slide 

set switch to  

P

 , press  

P

  button until 

cycle

 is 

shown, review this and the following setting to 

correct error, slide set switch to 

Run.

Clear any setting

Setting slide set switch to  

P

 , press  

P

  button to 

show switch cycle to clear. Press the  

P

  button 

and the skip 

(x)

 button simultaneously, hold for 

several seconds.

Clear All

To erase all settings, Press 

"R"

.

Summary of Contents for STC7D-W

Page 1: ...he purpose of this manual is to aid in the proper installation and operation of fans manufactured by S P These instructions are intended to supplement good general practices and are not intended to co...

Page 2: ...it can be reached from a tub or shower 6 Intended for use with 24VAC Class 2 power supplies only 7 Do not connect loads that exceed the timer s switch rating 8 Confirm sufficient 24VAC power is availa...

Page 3: ...nnect loads that exceed the timer s switch rating 8 Confirm sufficient 24VAC power is available to operate the timer and the connected loads 2 SPECIFICATIONS Operating Voltage 24VAC 50 60Hz Switching...

Page 4: ...lay Coil Unit s 24VAC Power Supply Isolation Relay Coil The Normally Closed contacts of one or more additional Low V oltage Controls may be connected to E RV unit in parallel with the STC D W The Norm...

Page 5: ...to match day s set for switch cycle 1 Press h and m buttons to select switch off time Autorun Slide Set switch to Run and Mode switch to Auto switching begins with next switch on set time Override On...

Page 6: ...elay Coil Unit s 24VAC Power Supply Isolation Relay Coil The Normally Closed contacts of one or more additional Low V oltage Controls may be connected to E RV unit in parallel with the STC D W The Nor...

Page 7: ...to match day s set for switch cycle 1 Press h and m buttons to select switch off time Autorun Slide Set switch to Run and Mode switch to Auto switching begins with next switch on set time Override On...

Page 8: ...how 1 N __ set the time you want the unit to turn on by pressing the HOUR and MIN buttons respectively To set the turn off time press the TIMER key again and 10FF __ will show in the display Again set...

Page 9: ...diately and keeps this status while in ON mode MODE OFF When the indicator is on OFF the output turns off immediately and keeps this status while in OFF mode MODE AUTO When the indicator is on AUTO th...

Page 10: ...mally Closed contacts of one or more additional Low V oltage Controls may be connected to E RV unit in parallel with the STC D W The Normally Closed contacts of one or more additional Low V oltage Con...

Page 11: ...ediately and keeps this status while in ON mode MODE OFF When the indicator is on OFF the output turns off immediately and keeps this status while in OFF mode MODE AUTO When the indicator is on AUTO t...

Page 12: ...Powers Avenue Jacksonville FL 32217 T 904 731 4711 F 904 737 8322 www solerpalau usa com S P Canada Ventilation Products Inc 6710 Maritz Drive Unit 7 Mississauga ON L5W 0A1 Canada T 416 744 1217 F 41...

Reviews: