


7
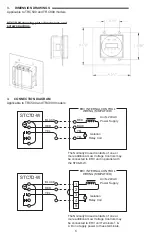
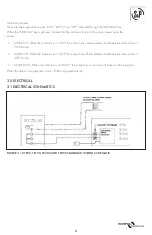
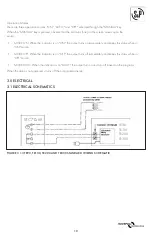
3. DIMENSION DRAWINGS
Applicable to TRC500 and TRC800 models
2.0 SETTINGS
2.1 SETTING INSTRUCTIONS
SETTING THE CLOCK:
• Press and hold the CL OCK button.
• Press the DAY key until the correct day is displayed.
• Do the same with the HOUR and MIN. Now the clock is set!
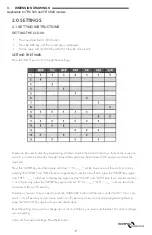
SETTING THE TIMER:
Press the "DAY" key to scroll through these settings.
These can be used to simplify programming. All times must be the same for the days chosen! Let us say you
want to run a device Monday through Friday at the same time. Scroll down to #9 and you will have the
days set!
Press the "TIMER" key and the display will show "1°N--:--__ " set the time you want the unit to turn on by
pressing the "HOUR" and "MIN" buttons respectively. To set the turn off time, press the "TIMER" key again
and "10FF --:--__ " will show in the display. Again, set the "HOUR" and "MIN" time. If you want more than
1 on/off per day, press the "TIMER" key again and set "2°N--:--__ ," "2°FF --:--__ " until you reach the
maximum of 8 on/off's per day.
The timer is now set, but you need to push the "MANUAL" button until the line is under "AUTO." If you only
want 1 on/off per day or if you have more on/off's per day, when you are done programming them in,
press the "CLOCK" key again and you are almost done.
Reset the setting: If you wish to change any or all on/off times, you must reset the timer. You cannot change
just one setting.
Clear all: To erase all settings, Press the® button.


