13
ENGLISH
3. INSTALLATION
• After carefully reading the safety warnings in the above paragraphs, secure the product us-
ing 4 metal chains of characteristics adequate to its weight.
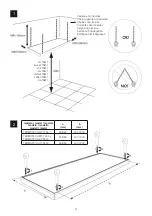
• Inside the packaging there is an envelope with 4 eyehooks for installation (Fig. 2):
– Screw the 4 eyehooks into the nuts on the interior of the rear frame of the product (Do not
tighten them excessively).
– Slide the hooks to the best position, respecting the limitations expressed in the table in
Fig. 2.
– Tighten the hooks firmly until they are secured in the desired position.
• Identify the 4 points where the chains are to be secured, respecting the minimum distances
indicated in Fig. 1.
• Place the 4 chains in the chosen points using raw plugs or other anchoring systems ad-
equate for the weight of the product and the type of support you wish to use for anchoring.
• Hang the product from the chains using adequate securing elements.
4. CONNECTING TO THE ELECTRICITY SUPPLY
• Before carrying out any operation, remember to disconnect the power supply and make
sure that it cannot be reconnected accidentally.
• All products in this range must be installed and used by people with sufficient qualifications
and training.
• The appliance must be installed in compliance with national regulations as well as the speci-
fications detailed in this manual. Before installing the appliance, make sure the electricity
supply is suitable for the specifications of the appliance. Electrical connection to the mains
must also include the use of a multiswitch with a gap of at least 3 mm between contacts.
• This range includes several models, differentiated by the number of heating elements or
their power consumption. To make the installation as flexible and compatible as possible
with your requirements, all the products have an external connection box. Inside the box
there is a multipin terminal strip for connecting ground, neutral and phases cables.
• For products with 2 or 3 resistances, all the phases are at the disposal of the terminal inde-
pendently, so that it is possible:
– To design power supply circuits enabling separate activation of the heating elements one
by one, enabling reduction of total energy consumption when less heating is needed.
– Connect the product to a three-phase electricity supply, distributing the loads between
the different phases to balance the system in an optimum manner.
• For correct installation and connection to the mains, it is necessary to:
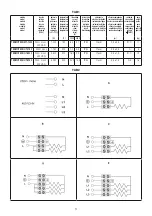
1. Opt for a single-phase or three-phase connection, according to the diagrams indicated
in table TAB 2 and then determine the amount of conductors needed.
2. Respect the minimum section of conductors.
3. You can choose a connection via a power cable or via a tube (rigid or flexible) and
choose the device to hold the cables or an adequate connection joint (Minimum degree
of protection: IP54).
4. Open the connection box (Fig. 3/a) to perforate it in the predefined point (Fig. 3/b) and
secure the device for holding the cables or connection joint (Fig. 3/c-d). The diameter


