14
ENGLISH
of the orifice to be made in the connection box will vary according to the device used
for holding the cable gland seal chosen and it must be made at the top of the box, cor-
responding to the predetermined point.
5. Make the necessary electrical connections (Fig. 3/e-f), stripping the cables no more than
8 mm, so as not to run the risk of them coming into contact with other cables. Do not
screw the terminal to the insulation.
6. Tighten the cable-holding device or connection joint adequately (Fig. 3/g).
7. Close the connection box with the screws supplied (Fig. 3/h).
• If you have chosen to use a power cable, you should:
– Select one of the H05RN-F or FROR 450/750V type.
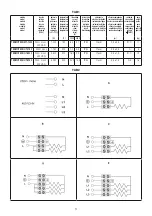
– Identify the most adequate cable gland according to cable diameter, using table TAB 3.
– Ensure that the cable, when connected, cannot come into contact with any metal parts of
the product.
Example:
You have purchased the TERMOTECH HT-5250 and wish to use a power cable for a three-
phase connection. Hence, you’ll have to:
1. Identify the necessary number of conductors: you choose connection type “E” (three-
phase), so you’ll get 5 conductors for earth, neutral, L1, L2 and L3.
2. Verify the minimum section diameter of the conductors as indicated in TAB 2: 2,5 mm
2
in this case.
3. Choose which type of wire you wish to use: type FROR 450/750V 5G2,5 (yellow/green
connector for earth) is necessary for the required needs.
4. Verify the exterior diameter of the wire by measuring or contacting the supplier: section
of the wire in this case is 12,4 mm.
5. Identify the strain relief, according to TAB 3: for 12,4 diameter wire you could choose
among strain relief with different threads: M20, PG16 and GAS
⅝
”. We choose
PG16.
6. Verify the hole diameter you will have to drill on the connection box according to the
strain relief you wish to use, according to TAB 3: for PG 16, hole diameter is 23 mm.
7. Drill the connection box on the marked spot with a hole diameter according to the previ-
ous point (Fig. 3/a-b).
8. Fix the strain relief to the connection box with the right nut (Fig. 3/c-d).
9. Insert the cable through the strain relief and connect the power wires (Fig. 3/e-f).
10. Tighten the strain relief (Fig. 3/g).
11. Lock the connection box with 4 proper screws (Fig. 3/h).
5. USE OF THE PRODUCT
• This product is not supplied with any switch or device for controlling temperature and must
be regulated by appropriate devices that should be contemplated in the plant construction
phase (E.g. differential switches and circuit breakers).
• In versions with 2 or 3 resistances there is the possibility of designing different power supply
circuits, so it is possible to activate the product partially when less heating is needed. In the
versions with 3 resistances, for example, it is recommended to have a circuit supplying the
central element (Phase L2) and another for the side elements (Phases L1 and L3) so it is


