background image

INSTALLATION

5

Location

When selecting a position for your unit you should make sure the floor is flat and firm, and the room 
is well ventilated with an average room temperature of between 16°C and 43°C. Avoid locating your 
unit near a heat source, e.g. cooker, boiler or radiator. Also avoid direct sunlight as it may increase the 
electrical consumption. Extreme cold ambient temperatures may also cause the unit not to perform 
properly. This unit is not designed for use in a garage or outdoor installation. Do not drape the unit 
with any covering.

When installing the unit, ensure that 100 mm of free space is left at both sides, 75 mm at the rear and 
100 mm at the top of the unit.

Levelling the Unit

To ensure the unit is level, adjust the two levelling feet at the 
front of the unit.

If the unit is not level, the doors and magnetic seal will not align 
properly.

Cleaning Before Use

Wipe the inside of the unit with a weak solution of bicarbonate soda. Then rinse with warm water using 
a ‘wrung-out’ sponge or cloth. Wipe completely dry before replacing the shelves, drawers and salad 
bins. Clean the exterior of the unit with a damp cloth.

If you require more information refer to the Cleaning section.

•  Before Plugging in YOU MUST

Check that you have a socket which is compatible with the plug supplied with the unit.

•  Before Turning On!

Do not turn on until six hours after moving the unit. The coolant fluid needs time to settle.

Before Using Your Unit

Before placing any food in your unit, turn it on and wait for 24 hours, to make sure it is working 
properly and to allow it time to fall to the correct temperature. Your unit should not be overfilled.

Interior Accessories

Various glass or plastic storage shelves are included with your appliance – different models have 
different combinations.

You should always slide one of the full size glass storage shelves into the lowest set of guides, above 
the fruit and vegetable containers, and keep it in this position. To do this, pull the storage shelf forward 
until it can be swivelled upwards or downwards and remove.

Please do the same in reverse to insert the shelf at a different height.

In order to make the most of the volume of the fresh food storage compartment and frozen-food 
storage compartment, the user can remove one or more shelves, or drawers, out of the appliance, 
according to daily use.

Summary of Contents for S3DRB12

Page 1: ...Instruction Manual Fridge Freezer S3DRB12...

Page 2: ......

Page 3: ...Holiday Function 9 Alarm 9 Fault Indication 9 Noises Inside the Unit 9 Shopping for Chilled Foods 9 Tips for Keeping Food in the Unit 10 Shopping for Frozen Foods 10 Preparations for Freezing 10 Defro...

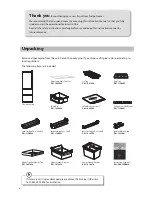
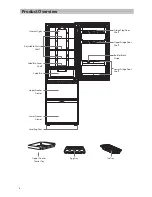
Page 4: ...Upper Freezer Drawer P N 1416812 Upper Freezer Drawer Tray P N 1427834 Bottles Block Stripe P N 1419601 Instruction Manual P N DSGS3DRB12 Ice Tray P N 1051965 Salad Bin P N 1422495 Fridge Door Shelf C...

Page 5: ...and salad bins Clean the exterior of the unit with a damp cloth If you require more information refer to the Cleaning section Before Plugging in YOU MUST Check that you have a socket which is compati...

Page 6: ...ray Egg Tray Ice Tray Adjustable Glass Shelf Internal Light Fridge Flap Door Shelf Upper Fridge Door Shelf Bottles Block Stripe Lower Fridge Door Shelf Lower Freezer Drawer Upper Freezer Drawer Salad...

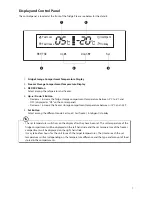
Page 7: ...as OF on the control panel Decrease increase the freezer storage compartment temperature between 14 C and 23 C 5 Set Button Select among the different mode Fast cool Fast freeze Intelligent Holiday T...

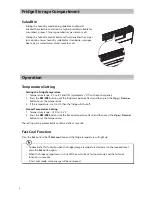
Page 8: ...ast Cool Function Press the Set button the Fast cool icon and the fridge temperature will light up Fridge Storage Compartment Salad Bin Sliding the humidity conditioning slide block rightward enables...

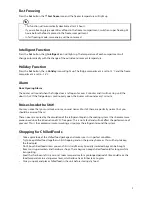
Page 9: ...t This is the compressor motor working as it pumps the refrigerant around the system Shopping for Chilled Foods Take a quick look at the chilled food package and make sure it is in perfect condition T...

Page 10: ...frozen Don t buy frozen food unless you can freeze it straight away Specially insulated bags can be bought from most supermarkets and hardware shops These bags can keep frozen food frozen longer Prepa...

Page 11: ...crystals in the food before cooking particularly with meat These crystals indicate that the food has not fully defrosted 4 Cook food as soon as possible after defrosting 5 Many microwaves and ovens ha...

Page 12: ...oor As the solid frost loosens scrape it away with the plastic scraper and remove 3 When defrosting is complete clean your unit s interior and exterior Cleaning the Interior and the Exterior of the Un...

Page 13: ...for Long Periods of Time When the unit is not in use for a long period of time disconnect it from the mains supply empty all food and clean the unit leaving the door ajar to prevent unpleasant smells...

Page 14: ...between 16 C and 43 C Storage Temperature Freezer 18 C Fridge 0 8 C average 4 C Energy Consumption 0 819 24 hours Energy consumption 298 kWh per year based on standard test results for 24 hours Actua...

Page 15: ...he unit Do not damage the refrigerant circuit applicable only for appliances with refrigeration circuits which are accessible to the user The unit must be maneuvered by a minimum of 2 persons This uni...

Page 16: ...of coldness Store food in an organised way If food is not stored in an organised way searching for an item will mean the door is open for longer Allow hot food and drinks to cool down before placing t...

Page 17: ...essories With over 1 million spares and accessories available we can deliver direct to your door the very next day Visit www partmaster co uk or call 0844 800 3456 UK customers only Calls charged at N...

Page 18: ......

Page 19: ......

Page 20: ......

Reviews: