12
Setting the Clock Automatically
The clock on this unit can automatically synchronize with the time transmitted by either
DAB or some FM radio stations, so there is no need to set it manually.
In order for the clock to synchronise to the current local time you may have to leave it on
one DAB station for a short period of time. Manual clock setting is not required.
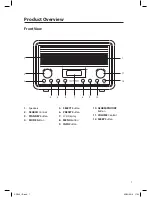
1. Press the MENU button to enter the menu.
2. Select “System” using the SEARCH control, then press SELECT to confirm.
3. Select “Time” using the SEARCH control, then press SELECT.
4. Select “Auto Update” using the SEARCH control, then press SELECT.
5. Choose “Update From DAB”, “Update From FM” or “Update From Any”.
6. Press SELECT to confirm your selection.
Setting the Clock and Date Manually
You can manually set the time and date if you wish. Make sure you have set AUTO UPDATE
to ‘NO UPDATE’. If you don’t do this the unit will automatically find the correct time from
a radio station and change the time you have set.
1. Press the MENU button to enter the menu.
2. Select “System” using the SEARCH control, then press SELECT to confirm.
3. Select “Time” using the SEARCH control, then press SELECT.
4. Select “Set Time/Date” then press SELECT to confirm. Set the time and date using the
SEARCH control.
5. Press SELECT to confirm your selection.
Changing the Time Format
You can set the time format to either a 12 hour clock or a 24 hour clock.
1. Press the MENU button to enter the menu.
2. Select “System” using the SEARCH control, then press SELECT to confirm.
3. Select “Time” using the SEARCH control, then press SELECT.
4. Select “Set 12/24 Hour” using the SEARCH control, then press SELECT.
5. Choose either “Set 12 Hour” or “Set 24 Hour” using the SEARCH control.
6. Press SELECT to confirm your selection.
Changing the Date Format
The way the date is displayed can be changed depending way you prefer. You can choose
“DD-MM-YYYY” or “MM-DD-YYYY”.
1. Press the MENU button to enter the menu.
2. Select “System” using the SEARCH control, then press SELECT to confirm.
3. Select “Time” using the SEARCH control, then press SELECT.
4. Select “Set Date Format”, then select the date format using the SEARCH control.
5. Select “DD-MM-YYYY or MM-DD-YYYY” using the SEARCH control, then press SELECT.
6. Press SELECT to confirm your selection.
SDR15_IB.indd 12
02/02/2016 17:53

