Summer Time.
Programmable room thermostats need a free flow of air
to sense the temperature, so they must not be covered
by curtains or blocked by furniture. Nearby electric fires,
televisions, wall or table lamps may prevent the thermo-
stat from working properly.
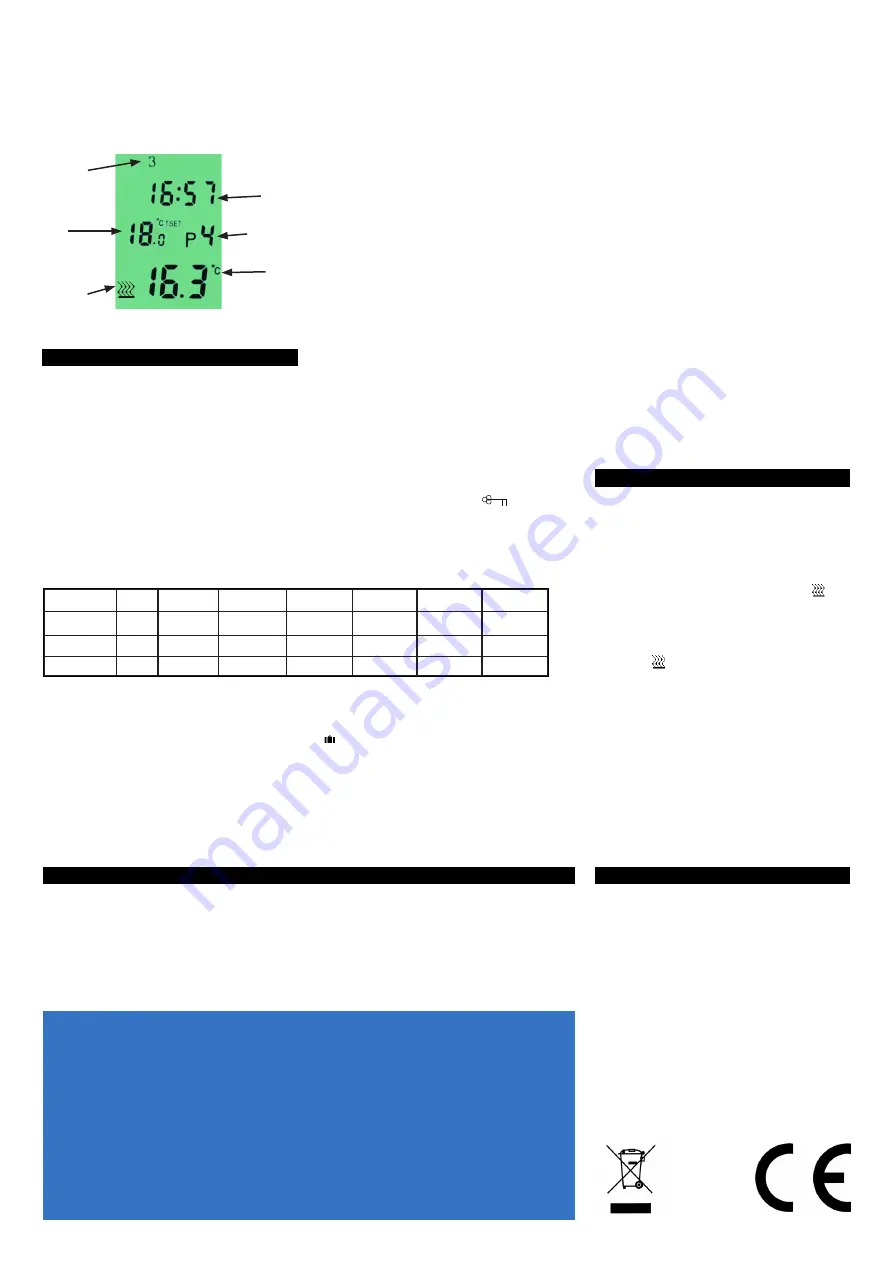
Set
Temperature
Day of The
Week
Heating On
Time of Day
Program
Period
Actual Room
Temperature
Programme Settings
Clock Setting
1. Press
CLOCK
button once, year flashes, press
+
or
-
buttons to set year.
2. Press
CLOCK
button again, month flashes, press
+
or
-
buttons to set month.
3. Press
CLOCK
button again, day flashes, press
+
or
-
buttons to set day.
4. Press
CLOCK
button again, hour flashes, press
+
or
-
buttons to set hour.
5. Press
CLOCK
button again, minute flashes, press
+
or
-
buttons to set minute.
6. Press
SET
button to confirm, or just wait 15 seconds,
it will be confirmed automatically.
Program Setting/Review
1. Default program values are:
4. Press
PROG
button once to display P1 and clock
flashes, press
+
or
-
buttons to set time (increment
10 minutes)
5. Press
PROG
button again and temperature flashes,
press
+
or
-
buttons to set temperature (increment
0.5°C)
6. Press
PROG
button again to display P2 and clock
flashes. Set P2–P6 same as P1
7. After setting P6, press
PROG
button and the current
day or day group (1-7) will flash again. Return to step 2
to program other days.
8. After setting all programs, press
SET
button to con-
firm or wait 15 seconds to confirm automatically.
9. In normal running status, you can press the
PROG
button to review program information for current day or
day group.
If current day only is shown initially (Unit is programmed
for 7 day cycle).
If day group (1-7) is shown (Unit is programmed for a
24 hour cycle).
Press
+
or
-
buttons to change the day to be reviewed.
Copy function
1. Hold
COPY
button for 3 seconds to display
COPY
and
day 1 flashes
2. Press
+
or
-
buttons to select the day which you want
to copy from, then press
COPY
button once, the day will
stop flashing.
3. Press
+
or
-
buttons to select the day which you want
to copy to, press
COPY
button once to complete.
4. Press
+
or
-
buttons to select next day you want to
copy to, press
COPY
button again to complete.
5. Repeat above steps to finish, then press
SET
button to
confirm, or you can wait 15 seconds, it will be confirmed
automatically.
Permanent Hold: Temperature is held indefinitely
until user cancels
Press
HOLD
button once to display
symbol,
Press
+
or
-
buttons to set the temperature, press
PROG
button once.
Then press
SET
button to confirm or you can wait 15
seconds to confirm automatically.
The setting will be kept until you exit by pressing
SET
button.
If 1-7 are all selected then the 24hour cycle option is
active– each days programs will be the same.
If either of 1,2,3,4,5,6,7 is selected then the 7 day cycle
option is active – each days programs can be different.
Dependant on your lifestyle, these default pro-
gram settings may be satisfactory.
2. Hold
SET
button, then press
PROG
button once , the
current day or day group (1– 7) will flash;
3. Press
+
or
-
buttons to change the day group (1-7) to
individual day to be set (1, 2, 3, 4, 5, 6, 7)
Day Group
Cycle
P1
P2
P3
P4
P5
P6
1-7 (default)
24hr
6:30 21°C
8:00 18°C
12:00 21°C
14:00 18°C
18:00 21°C
22:30 16°C
1,2,3,4 & 5
7 Day
6:30 21°C
8:00 18°C
12:00 21°C
14:00 18°C
18:00 21°C
22:30 16°C
6 & 7
7 Day
8:00 21°C
10:00 21°C
12:00 21°C
14:00 21°C
18:00 21°C
23:00 16°C
Hold Days: Temperature is held for a number of
days before returning to the programs
Hold
HOLD
button for 3 seconds to display
d:01
and
symbol.
Press
+
or
-
buttons to select holding days from
d:01
to
d:99
, then press
PROG
button once.
Then press
SET
to confirm or you can wait 15 seconds
to confirm automatically.
Press
+
or
-
buttons to set override temperature.
The setting will be kept until finished the holding days,
or you can press
SET
button to exit manually.
Hold Hours: Temperature is held for a number of
hours before returning to the programs
Press
+
or
-
buttons to set temperature,
Press
CLOCK
button, then
+
or
-
buttons to select time
range from 1 – 9 hours. Press
PROG
button.
Then press
SET
button to confirm or you can wait 15
seconds to confirm automatically.
The setting will be kept until finished the holding hours,
or you can press
SET
button to exit manually.
Hold until next program: Make a temporary
change to the temperature
Press
+
or
-
buttons to set temperature, press
PROG
button once.
Then press
SET
button to confirm or you can wait 15
seconds to confirm automatically. The setting will be
kept until next program, or you can press
SET
button to
exit manually.
Set Temporary Temperature Default Settings :
Temperatures initially offered when + or - buttons
are pressed
Default temperatures when first pressing the
+
or
-
buttons
Hold
SET
and press
+
button once to flash 22.0°, press
+
or
-
button to set temporary override temperature (7
- 35°C, default is 22°C).
Hold
SET
and press
-
button once to flash 18.0°C, press
+
or
-
button to set temporary override temperature (7
- 35°C, default is 18°C).
SET
button to confirm, or just wait 15 seconds, it will
be confirmed automatically
Additional Instructions
Switching Differential (on/off control) : The toler-
ance from the set temperature before the meas-
ured temperature signals the thermostat to switch
its output.
Press
CLOCK
button once, then press
COPY
button once
to display
S: 1
, press
+
or
-
buttons to change between
S:1
or
S: 2
, then press
SET
button to confirm.
S: 1:
differential is ±0.2°. When room temperature is
-0.2°C below setting temperature, it will display
sym-
bol and boiler will turn on. When room temperature is
+0.2°C above setting temperature, symbol will disap-
pear and relay will turn off.
S: 2:
differential is +0°C or -0.2°. When room
temperature is -0.2°C below setting temperature, it
will display
symbol and boiler will turn on. When
room temperature is reached, i.e. +0.0°C, symbol will
disappear and relay will turn off.
LCD Back-light Operation
Press
LIGHT
button to turn on back-light. It will turn off
without pressing in 15 seconds.
Reset
1. Reset software: Press
RESET
button to return to
default values.
2. Reset hardware: Press SW11 key on the PCB to reset
the thermostat. The program settings are retained.
Power supply: 2x AA 1.5v batteries
Battery lifespan: 1 year
Temperature display range: 5 - 40°C
(increment 0.1)
Temperature control range: 7 - 35°C
(increment 0.5)
Program time increment: 10 minutes
Temperature accuracy: +/-1°C
Operating temperature: 0 - 45°C
Clock accuracy: <1sec / day
Specification
Protection rating: IP30
Dimensions: 135 x 89 x 32mm
Mounting: Wall
Contact rating: 8(2), 250Vac (Volt free contact)
Insulation class: 2(double insulated)
Flexible wire size: 0.5 - 2.5mm
Rigid wire size: 0.5 - 2.5mm
Approval Standards
EN60730-1
EN60730-2-7
EN60730-2-9
SERVICE AND WARRANTY
Your product is not user serviceable.
PLEASE DO NOT TRY TO DISMANTLE THE UNIT.
This product is guaranteed by your supplier for 5 years from the date of manufacture. If it should become
defective please contact your installer or supplier for a replacement unit or visit www.sangamo.co.uk/returns
This product must meet Waste Electronic and Electrical Equipment Regulations (WEEE) for suitable environmental
recycling, recovery and/or disposal. End of life products should be handled in line with local regulations.
Alternatively return end of life product to Sangamo for correct disposal.
CUSTOMER CARE POLICY
As part of Sangamo’s continuous improvement program, the company operates a Customer Care policy. This
means we welcome your comments and complaints, as it can help us to improve our services to you, our
customer.
Due to our policy of continuous product improvement and development, the specifications in this guide may be
subject to change without prior notice.
Sangamo Limited
Industrial Estate, Port Glasgow,
Renfrewshire, PA14 5XG
Tel 01475 745131
Fax: 01475 744567
Email: enquiries@sangamo.co.uk
Web: www.sangamo.co.uk
WEE/JH0069TY
143761 Issue A
If you have a problem or require
any further information please
contact our technical team on:
01475 745131


