background image

2

10. Protect the power cord from being walked on or pinched
      particularly at plug, convenience receptacles, and the point
      where they exit from the apparatus.

11.  Only use attachments/accessories specified by the
      manufacturer.

12.  Use only with the cart, stand, tripod, bracket, or table specified
      by the manufacturer, or sold with the apparatus. When a cart is
      used, use caution when moving the cart/apparatus combination
      to avoid injury from tip-over.

13. Unplug this apparatus during lightning storms or when unused
      for long periods of time.

14. Refer all servicing to qualified service personnel. Servicing is
      required when the apparatus has been damaged in any way,
      such as power-supply cord or plug is damaged, liquid has been
      spilled or objects have fallen into the apparatus, the apparatus
      has been exposed to rain or moisture, does not operate
      normally, or has been dropped.

15. To reduce the risk of fire or electric shock, Do not expose this
      appliance to Rain or Moisture.

16. The Shock Hazard Marking and Associated Graphical Symbol
      is provided on the bottom panel of unit.

17. Apparatus shall not be exposed to dripping or splashing and no
      objects filled with liquids, shall be placed on the apparatus.

18. For outdoors use, to avoid electric shock, use battery only
      during a raining day or the weather is wet.

GB

Summary of Contents for LUNCHBOX

Page 1: ...LUNCHBOX GB Version 1...

Page 2: ...any heat sources such as radiators heat registers stoves or other apparatus including amplifiers that produce heat 9 Do not defect the safety purpose of the polarized or grounding type plug A polariz...

Page 3: ...icing to qualified service personnel Servicing is required when the apparatus has been damaged in any way such as power supply cord or plug is damaged liquid has been spilled or objects have fallen in...

Page 4: ...3...

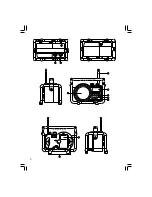
Page 5: ...Control FM antenna LCD display Power On Off Band Selection Preset Station Speaker Battery Compartment AC power cord storage LCD Display Band Indicator Frequency Preset Stations Low Battery Indicator...

Page 6: ...wn the battery cover Insert 4 x C size UM 2 battery into the compartment Ensure the battery is inserted in accordance with the diagram shown Close the battery cover and fasten the fixture by turning c...

Page 7: ...methods Manual tuning and Memory presets recall Manual Tuning 1 Press the Power button to turn on the radio 2 Select the required waveband by pressing the Band button 3 Be sure to screw in the rubber...

Page 8: ...stored under chosen preset button 4 Repeat this procedure for the remaining presets 5 Stations stored in preset memories can be overwritten by following above procedures Recalling stations from preset...

Page 9: ...rrent FM tuning step 50 kHz Rotate the Tuning Control you may adjust to 100 kHz Press Band button again to confirm the setting After FM tuning step is reset pressing Band button again display will sho...

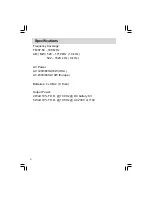
Page 10: ...ge FM 87 50 108 MHz AM MW 520 1710 kHz 10 kHz 522 1629 kHz 9 kHz AC Power AC 120V 60Hz 10W USA AC 230V 50Hz 10W Europe Batteries 4 x UM 2 C Size Output Power 2 Watt 10 T H D 100 Hz DC battery 6V 5 Wat...

Reviews: