04
GB
F
E
NL
D
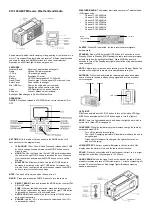
1
Page button
2
Preset 1
3
Preset 2
4
Preset 3 / Rewind button
5
Preset 4 / Play / Pause button
6
Preset 5 / Fast-forward button
7
Speaker
8
LCD display
9
Battery charging / Bluetooth LED indicator
10
Power / Standby / Sleep button
11
Tuning control knob / Select / Seek button
12
Scan / ATS button
13
Volume up button
14
Volume down button
15
Bluetooth pairing button
16
Source / Tuning step button
17
Clock / Time setting button
18
Buzzer alarm button
19
Radio alarm button
20
Battery compartment
21
NiMH / Alkaline batteries switch
22
USB socket for software upgrade
(for customer service only)
23
Telescopic antenna
24
Headphone socket
25
DC IN socket
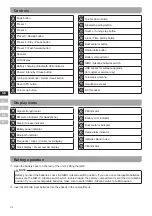
Controls
A
Signal strength meter
B
FM stereo indicator (for Headphone)
C
Sleep / Snooze indicator
D
Battery power indicator
E
Bluetooth indicator
F
Frequency / Clock / Volume level display
G
Clock display / Preset number display
H
PM indicator
I
Battery error indicator
J
Buzzer alarm indicator
K
Radio alarm indicator
L
Indicates Band in use
M
PM indicator
Display icons
Battery operation
1.
Open the battery cover on the rear of the unit by lifting the latch.
Before you insert the batteries, check the NiMH / Alkaline switch position. If you use non-rechargeable batteries,
make sure the NiMH / Alkaline switch which located inside the battery compartment is switched to Alkaline
position. If you use rechargeable batteries, make sure to switch NiMH / Alkaline switch to NiMH position.
NOTE
2.
Insert 4xLR6 (AA size) batteries into the spaces in the compartment.
Summary of Contents for PR-D12BT
Page 1: ...PR D12BT Version 1 GB...


