background image

IMPORTANT PLEASE READ 

All  products  manufactured  and  supplied  by  BAGNODESIGN  are  fit  for  purpose  as  long 
as  they  are  Installed,  used  correctly,  cleaned  and  receive  regular  maintenance  in 
accordance with these instructions ... 

Remove all packaging and check the product for damage or missing parts before commencing 
with the installation. 

Any  alterations  made  to  this  product  and  its  components  may  infringe  product  certification, 
infringe  water  regulations  and  invalidate  the  guarantee.  The  Installation  must  comply  with  all 
local/national  water  supply  authority  regulations/bylaws  and  building  and  plumbing 
regulations,  therefore  we  strongly  recommend  that  your  product  be  installed  by  a  reputable 
qualified trade's person. 

PRODUCT LIFECYCLE 

"The product LiveCycle/e is the collective stages that a product goes through from 

its 

conception 

and design through to its ultimate disposal." 

DISPOSAL GUIDANCE 

The best way to ensure your Product has a long life is to follow the Care and Maintenance guides 
set by the Manufacture after purchase. This document can be found at 

www.bagnodesignlondon.com. 

The  life  cycle  of  the  product  is 

not 

in correlation  to  the 

product  Guarantee;  the  standards the products  are  manufactured  or  certified  to  (e.g.  CE  & 
WRAS)  can  exceed  past  the Guarantee duration. After the life cycle of the product  is deemed 
complete by the end-user please follow the below to dispose of the items correctly ... 

Mixers (Shower Valves): 

If  the  mixers  are  no  longer  accepted  due  to  mechanical  use  or  aesthetic  style,  these  can  be 
disposed  of  at  a  registered  Local  Authority  waste  recycling  center  where  the  individual 
components can be sorted. 

CLEANING CARE GUIDE 

Only use a mild soap and water for cleaning. 

Rinse with water to remove the mild soap solution. 
We recommend the product is dried using a soft cloth after 
every use. 

Never 

use any abrasive or strong cleaning products containing, 

bleaches, acids (hydrochloric, formic, phosphorus, chlorine or 
acetic),  strong detergents, limescale remover, alcohol or dyes 
etc. 

Never 

use abrasive cleaning pads, wire wool or microfibre 

cloths. 

Never 

use cleaning equipment that may have been pre-

used and contaminated with the above substances. 

Never 

apply the cleaning product directly onto the finished 

surface. 

�� 

�� 

�� 

Summary of Contents for KOY

Page 1: ...KOY ZEPHYR THERMOSTATIC SHOWER MIXER www sanipexgroup com ...

Page 2: ......

Page 3: ... after purchase This document can be found at www bagnodesignlondon com The life cycle of the product is not in correlation to the product Guarantee the standards the products are manufactured or certified to e g CE WRAS can exceed past the Guarantee duration After the life cycle of the product is deemed complete by the end user please follow the below to dispose of the items correctly Mixers Show...

Page 4: ... ...

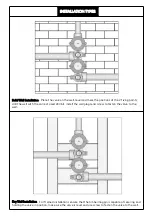
Page 5: ...s drill the wall with the correct sized drill bit install the wall plugs and screw to fasten the valve to the wall Dry Wall Installation For framed installations ensure that the timber noggin is capable of securing and holding the valve in position make sure the valve is level and use screw to fasten the valve to the wall ...

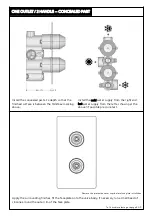
Page 6: ...ng finishes fit the faceplate onto the valve body if necessary run a small bead of silicone around the outer rim of the face plate Install the cold water supply from the right and hot water supply from the left as shown per the above if possible pressure test Remove the protective cover caps before face plate installation To fit handles please go to page 8 9 ...

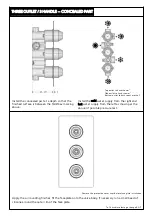
Page 7: ...ter supply from the right and hot water supply from the left as shown per the above if possible pressure test Apply the surrounding finishes fit the faceplate onto the valve body if necessary run a small bead of silicone around the outer rim of the face plate Remove the protective cover caps before face plate installation To fit handles please go to page 8 9 ...

Page 8: ... body if necessary run a small bead of silicone around the outer rim of the face plate Install the cold water supply from the right and hot water supply from the left as shown per the above if possible pressure test Remove the protective cover caps before face plate installation To fit handles please go to page 8 9 Top outlet to head shower Side outlet to hand shower Bottom outlet to bath spout or...

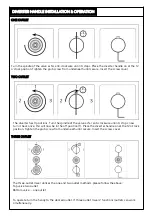
Page 9: ...e Insert the screw cover The three outlet mixer utilizes the one and two outlet methods please follow the above Top valve two outlet Bottom valve one outlet To operate turn the handy to the desired outlet If three outlet mixer 2 functions outlets can work simultaneously ONE OUTLET Turn the spindle of the valve as far anti clockwise until its stops Place the diverter handle on at the 12 o clock pos...

Page 10: ...erter handle in position Tighten the grub screw from underneath until secure Insert the screw cover To test function turn the handle clockwise then anti clockwise it should stop at the 12 o clock position press the button to turn When turning the handle back clockwise at the point the button comes to the 12 o clock position a click will sound and the button pop back up ...

Page 11: ... Take off the handle 2 Loosen the screw 3 0 ring 2 3 Take off the gear 1 and slightly rotate the gear in a small angle 4 Fix on the gear then test to fix on the handle 5 If the handle still couldn t fixed on correct position repeat above Step 3 6 Until the handle could be fixed on correctly Adjustment of diverter handle Thermostat handle commissioning steps 1 Take off the handle 2 Take off stop ri...

Page 12: ...er temperatures are within the valves operating range 2 The supply working pressures are within the valves operating range 3 The supply working pressures are balanced 4 Isolating valves and strainers preferred are provided With the temperature control handle in the 12 o clock position open a water outlet Using a thermometer measure the mixed water temperature at the outlet If 38 C is achieved the ...

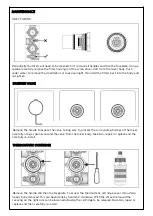
Page 13: ...ve the handle to expose the valve taking care to protect the surrounding finishes of the mixer carefully using a spanner unwind the valve from the mixer body Maintain repair or replace and the carefully re install THERMOSTATIC CARTRIDGE Remove the handle and then the faceplate To access the thermostatic cartridge cover shroud also needs to be removed this can been done by hand anti clockwise With ...

Page 14: ...Note ...

Page 15: ...Note ...

Page 16: ...INM KOY ZEP THERMO_MIXER 08 21 www sanipexgroup com ...

Reviews: