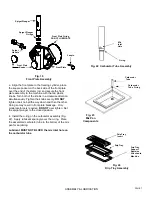
e. Insert the dasher assembly into the freezing cylinder
as far as possible (Fig. 15) being careful not to damage
the scraper blades. Damage will occur to the scraper
blades and the dispenser will not operate properly if the
scraper blades are installed facing in a clockwise
direction (Fig. 16).
Fig. 15
Dasher Installation
Fig. 16
Dasher Installation
Note: The stator rod has been deleted from Fig. 15
and Fig. 16 for clarity only. They must be installed
for proper machine operation.
f. While maintaining force against the dasher, rotate it
slowly until the tongue of the dasher engages the
groove in the drive system at the rear of the cylinder.
The outer most portion of the dasher should be
recessed approximately 1/4” to 3/8” inside the freezing
cylinder. No part of the dasher should extend outside
the cylinder. Scraper blades should be visible (Fig. 17)
extending approximately 1/8” beyond the dasher.
CORRECT
Fig. 17
Dasher with Blade (Front View)
2. Lubricate and assemble the front plate assembly in
the following manner:
a. Install the two o-rings on the spigot plunger by
rolling them onto the plunger. Seat the o-rings in
the grooves. Make certain that they are not twisted.
Smooth the lubricant into the grooves and over
the sides of the plunger assembly (Fig. 18).
Fig. 18
Spigot Plunger Lubrication
b. Slide the lubricated spigot plunger into the front
plate (Fig. 19) Align the spigot handle slot to the front.
c
.
Insert the spigot handle and secure with the faspin.
d. Install the front plate o-ring.
DO NOT LUBRICATE THE FRONT PLATE O-RING
LUBRICANT WILL MAKE THE FRONT PLATE LEAK
ASSEMBLY & LUBRICATION
Lubricate
Shaded Area
Approximately
1/8” Exposed
Blades Should Not Point
In A Clockwise Direction
INCORRECT
PAGE 6
CAUTION
Blades
Resting On Tabs
Blades Pointing In A
Counterclockwise
Direction


