1.
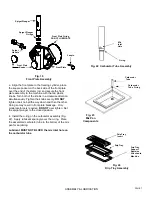
Lubricate and assemble the dasher assembly in the
following manner:
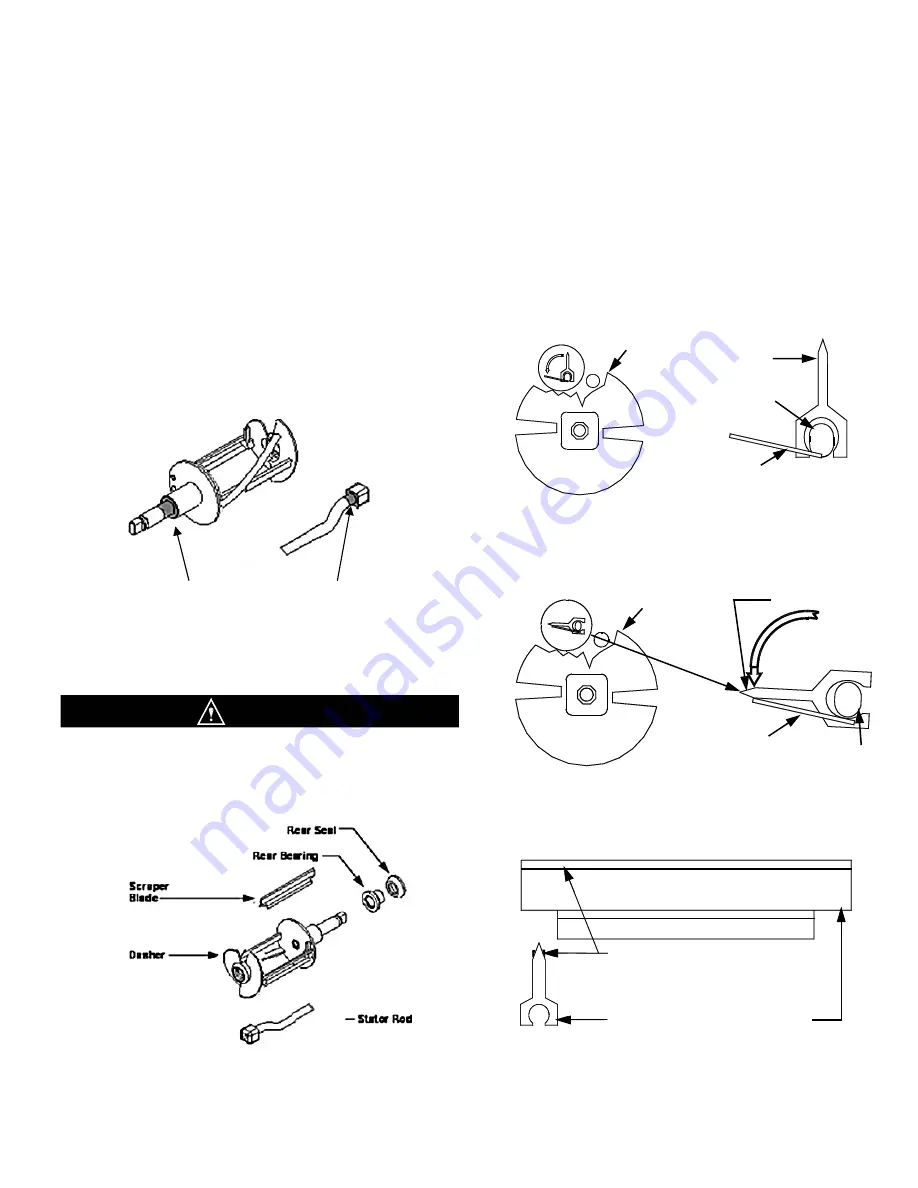
a. Apply a generous amount of lubricant to the shoulder
of the dasher and the area of the shaft where the white
plastic portion of the assembled rear seal contacts the
shaft (Fig. 12). This is easily performed by running a 1/4”
bead of lubricant around the shoulder of the dasher.
b. Lubricate the stator rod (Fig. 12) and slide the stator
rod into the dasher.
C.
Assemble and install the rear bearing and seal with the
rubber portion toward the rear of the freezing cylinder as
indicated in Fig. 13.
d. Install the scraper blades on the dasher assembly
by holding the blade perpendicular to the tabs
(Fig. 14a) and then snapping them over the flat area of
the support rod. Then rotate the blade downward in a
counterclockwise direction as viewed from the front of
the dasher (Fig. 14b).
Note:
Reverse the blades at each cleaning to maintain
sharpness. In addition, the blades are equipped
with a wear mark (Fig. 14c). When the blade is
worn to this wear mark, they must be replaced.
Assembly & Lubrication
Use only food approved lubricants. Sanigel (SaniServ part number 188490) is recommended and is available from your
local authorized SaniServ dealer or distributor.
Lubrication must be performed daily.
Blade Support
Tab
Support Rod
Dasher Front View
Scraper Blade
Dasher Front
View
Blade Support
Tab
Support Rod
Scraper Blade
Rotate Down
Counter
Clockwise
Scraper Blade Wear Mark
End
View
Side
View
ASSEMBLY & LUBRICATION
PAGE 5
Fig. 14c
Scraper Blade Wear Mark
Fig. 14a
Scraper Blade Installation
Fig. 14b
Scraper Blade Installation
Fig. 12
Stator Rod and Dasher Lubrication
CAUTION
Fig. 13
Dasher Assembly
DO NOT LUBRICATE THE BACK SIDE OF THE
RUBBER PORTION OF THE SEAL ASSEMBLY.
MACHINE COULD BE DAMAGED.
Lubricate Shaded Areas


