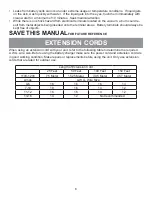
background image

5

SAFETY INSTRUCTIONS & WARNINGS

IMPORTANT SAFETY INSTRUCTIONS

READ AND UNDERSTAND ALL INSTRUCTIONS BEFORE USING THIS UNIT

Read and understand this owner’s manual and all labels on the unit before operating.  Safety is a 

combination of common sense,staying alert and knowing how your unit works.  Use this unit only as 

described in this manual.  Use only manufacturer’s recommended attachments.  To reduce the risk of 

personal injury or damage to your unit use only Sanitaire recommended accessories

Important Safety Advice

WARNING

TO REDUCE THE RISK OF FIRE, ELECTRICAL SHOCK OR INJURY:

• 

When using electrical equipment basic safety precautions should be followed.

• 

Read all instructions carefully before use.

• 

Please note that the safety information described in the manual supplements and does not re-

place local, state, and federal regulations or those standards in force in the country in which the 

machine is used.

• 

This machine is not intended for use by children or people with reduced physical, sensory or men-

tal capabilities, or lack of experience and knowledge, unless they have been given supervision or 

instruction concerning use of the machine by a person responsible for their safety.

• 

Keep children and unauthorized persons away from the machine when in use.

• 

Before using the appliance, check that the main power supply voltage corresponds with the volt-

age shown on the rating plate.

• 

All parts are to be positioned as indicated in the instructions before using the machine.

• 

Do not operate the machine if it malfunctions or is damaged in any way. Contact an authorized 

service agent for repair or adjustment.

• 

Do not operate switches or touch the power cord plug with wet hands as this may cause electric 

shock.

• 

When unplugging pull on the plug, not the power cord.

• 

Do not pull or carry by cord, use cord as a handle, close a door on cord, or pull cord around sharp 

edges or corners.

•  This scrubber creates suction and has a revolving brush.  Keep hair, loose clothing, fingers and all 

parts of body away from openings and moving parts.

• 

Keep cord away from heated surfaces.

• 

Do not use where hazardous dust is present.

• 

Do not use in an explosive atmosphere.

•  Do not pick up oil or other flammable material.

• 

Do not operate the machine while the charger is plugged in.

• 

The battery charging lead must be inspected regularly for signs of damage. If the lead is dam-

aged, it must be replaced by the manufacturer, its service agent or a similar qualified person in 

order to avoid a hazard.

•  Replace the supply cord only with the type specified in the instruction manual.

• 

Do not charge the machine with a damaged battery charging lead or plug, or after the machine 

malfunctions or is damaged in any way. Contact an authorized service agent for repair.

•  When re-charging ensure the area is sufficiently ventilated.

• 

Take care when using a machine near the top of stairs to avoid overbalancing

• 

Use only the battery charger provided to recharge the batteries

Summary of Contents for SC6200A

Page 1: ...____________ It is also important to keep your receipt as proof of date of purchase 2013 Electrolux Home Care Products Ltd IMPORTANT Do not return this product to the store Call 1 800 800 8975 Monday Friday 8 00 AM to 7 30 PM and Saturday 10 AM to 6 30 PM Central time or visit our web site www sanitairevac com for any of the following assembly problems replacement of broken or missing items to rev...

Page 2: ...PRODUCTS NORTH AMERICA WILL DO Electrolux Home Care Products North America will at its option repair or replace a defective cleaner or cleaner part that is covered by this warranty As a matter of warranty policy Electrolux Home Care Products North America will not refund the consumer s purchase price WARRANTY REGISTRATION Please fill out and return the warranty registration card accompanying your ...

Page 3: ... in connection with your purchase or use of the cleaner including any warranty of MERCHANTABILITY or any warranty for FITNESS FOR A PARTICULAR PURPOSE is limited to the duration of this warranty Some states do not allow limitations on how long an implied warranty lasts so the above limitations may not apply to you Your relief for the breach of this warranty is limited to the relief expressly provi...

Page 4: ...ion of the equipment grounding conductor can result in a risk of electric shock Check with a qualified electrician or service person if you are in doubt as to whether the outlet is properly grounded Do not modify the plug provided with the appliance if it will not fit the outlet have a proper outlet installed by a qualified electrician This appliance is for use on a nominal 120 volt circuit and ha...

Page 5: ...own on the rating plate All parts are to be positioned as indicated in the instructions before using the machine Do not operate the machine if it malfunctions or is damaged in any way Contact an authorized service agent for repair or adjustment Do not operate switches or touch the power cord plug with wet hands as this may cause electric shock When unplugging pull on the plug not the power cord Do...

Page 6: ...tion Make repairs or replacements before using the unit Only use extension cords that are rated for outdoor use EXTENSION CORDS SAVE THIS MANUALFOR FUTURE REFERENCE Leaks from battery cells can occur under extreme usage or temperature conditions If liquid gets on the skin wash quickly with water If the liquid gets into the eyes flush them immediately with clean water for a minimum of 10 minutes Se...

Page 7: ...ion Tank Filling Opening 15 Vacuum Hose 5 Solution Tank 16 Battery Charger Lead 6 Brush Guard 17 Battery Charger Indicator 7 Brush Pad 18 Solution Flow Adjustment Valve 8 Squeegee 19 Solution Filter 9 Wheels 10 Control Panel 11 Lever for Starting Brush Rotation and or Dispensing Solution 2 1 3 4 5 6 7 8 13 17 10 16 18 19 15 12 11 9 14 ...

Page 8: ...r C dry chemical powder extinguishers only Do NOT use water to put out the fire 1 3 Guidelines for the operator WARNING Operators must be fully trained in the use of the machine in accordance with these instructions able to perform user mainte nance and the correct selection of accessories Operators should be physically capable to maneuver transport and operate the machine Operators should be able...

Page 9: ...om the manufacturer or an authorized service agent WARNING THIS APPLIANCE MUST BE GROUNDED 2 Preparing for use 2 1 Connecting the batteries Unscrew the bolts that fasten the tank to the handle support Fig 1 Fig 1 Remove the recovery water tank Fig 2 Connect the battery connectors Fig 3 4 Replace the recovery water tank and screw into place WARNING Make sure that the building power supply is equipp...

Page 10: ...Fig 6 Attach the brush pad driver onto the clutch plate and rotate the brush pad driver until secure Fig 7 Return the machine in the upright position Fig 6 IMPORTANT Never allow the cleaning head to rest on the brush or pad when not in use 2 5 Filling the solution tank WARNING Only add clean water to the tank at a temperature no greater than 122º F Remove the filter from the solution tank opening ...

Page 11: ...t the brush rotating press the lever on the right hand side 4 Water dispensing button The solution is controlled by pressing both switch 3 and by pressing the lever used to dispense solution for scrubbing Button is illuminated when on 5 Fig 10 Fig 9 1 3 2 4 A C 5 Brush rotating and or water dispensing lever Pressing and holding lever 5 will start the rotation of the brush Cleaning solution will be...

Page 12: ... pad attached Set the handle set at a comfortable working height Start the machine and select the type of cycle Start the cleaning operation by pressing the levers and holding them pressed to start rotation of the brush or pad and to dispense cleaning solution then push the machine in a forward direction using handles on the handle bar Releasing the lever stops the rotation of the brush and the di...

Page 13: ...lifting lever and releasing it The lever remains in an upper position keeping the squeegee blades in the raised position WARNING always lift up the squeegee at the end of the cleaning in order to prevent the deformation of the rubber blades Remove brush or pad from machine and wash in warm soapy water Fig 17 5 2 Draining and cleaning the recovery tank At the end of the cleaning cycle or when the r...

Page 14: ... section 2 1 and follow in reverse order Charge the batteries once a month 7 Maintenance WARNING Before making adjustments or performing maintenance switch off the machine unplug from the power supply and disconnect the positive pole of the battery Do not rest tools and metal objects on the batteries danger of short circuits Do not use harsh detergents acid lye etc during cleaning and washing Take...

Page 15: ...eposition the blade loosen the screw 2 of the wheel 3 and move the wheel vertically in the slot lifting or lower ing the wheel to achieve the correct position C Fig 21 Fig 22 7 3 Changing the brush or pad driver Lift the machine up slightly at the front Press the brush rotation button 3 to enable the rotation of the brush then press lever 5 and release it the brush becomes disconnected Fig 23 7 4 ...

Page 16: ...ter filter Fig 25 Make sure that the solution tap is fully closed Refer to Fig 16 Unscrew the transparent filter cover 1 and remove the filter 2 Clean the filter 2 in running water If it is blocked replace it Replace all the components in reverse order Fig 25 ...

Page 17: ...tage Frequency 110 120 50 60 VAC Hz DC Voltage 24 V Charging Time 10 Hours Run Time 80 Minutes Brush Cleaning Width 14 Inches Squeegee Width 16 Inches Brush Pressure 35 g cm2 Brush Speed 130 RPM Working capacity Theoretical 11 945 Sqft Hour Solution Tank Capacity 4 5 Gallons Recovery Tank Capacity 5 8 Gallons Brush Motor Rating 260 Watts Vacuum Motor Rating 250 Watts Air Flow 59 Cfm Vacuum 28 Inch...

Page 18: ...2 Brush worn SOLUTION 1 See paragraph Warning signals while using the machine Section 5 2 Press the button SOLUTION 1 Start the vacuum 2 Check and if necessary clean the vacuum tube that connects the squeegee to the recovery tank 3 Correct squeegee position 4 Empty the recovery tank 5 Replace or tun over the squeegee blades SOLUTION 1 Fill the tank 2 Press the button 3 Turn on the tap located at t...

Reviews: