background image

38


Соблюдайте местные законодательные нормы по утилизации отходов.


Прибор следует утилизировать согласно Директиве ЕС по отходам электрического и 


электронного оборудования 

2002/96/EC – WEEE

 (Waste Electrical and Electronic Equipment).


В случае вопросов обращайтесь в местную коммунальную службу, ответственную за 


утилизацию отходов.

12. Что делать при возникновении каких-либо проблем?

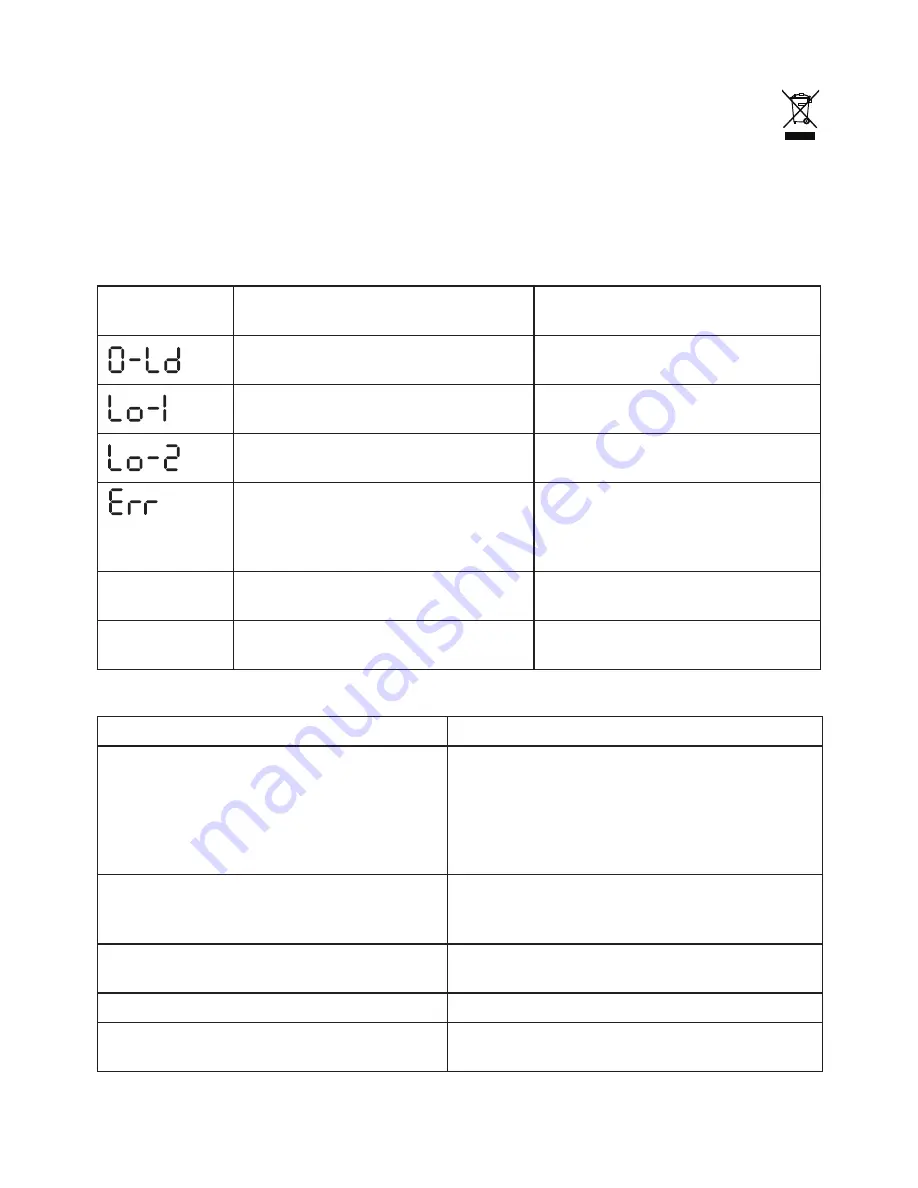
Если при взвешивании произошла ошибка, на дисплей выводится одно из следующих
сообщений.

Дисплейное
сообщение

Причина

Устранение

Был превышен макс. допустимый вес 
150 кг. 

Не превышать нагрузку 150 кг.

Батарейки весов почти разряжены. 

Замените батарейки весов.

Батарейки блока управления почти 
разряжены.

Замените батарейки блока 
управления.

Нет связи или плохая связь между 
платформой весов и блоком управления.

Установить весы на ровную поверхность 
и должным образом активировать 
(дождаться появления „0.0“) и 
повторить измерение (см. стр. 36).

Нет индикации

Батарейки в блоке управления 
полностью разряжены. 

Замените батарейки (см. стр. 37).

Батарейки в блоке управления вложены 
неверно. 

Проверьте полярность (см. стр. 35).

Весы не производят измерений

Возможные ошибки

Устранение

Весы не были активированы перед тем, как Вы 
на них встали. Если Вы становитесь на весы 
раньше, чем на дисплее появляется индикация 
„0.0”, весы не функционируют должным образом.

Должным образом активировать весы (дождаться 
появления „0.0“) и повторить измерение.
Перед измерением вначале включить блок 
управления и весы.
При необходимости, подождать 30 секунд, а затем 
повторить измерение.

Нарушена связь между весами и блоком 
управления.

Повторно вложите батарейки весов и блока 
управления или убедитесь в том, что блоки 
передачи и приема не перекрыты.

Блок управления находится на слишком 
большом расстоянии от весов.

Уменьшите расстояние между весами и блоком 
управления.

Батарейки в весах разряжены.

Замените батарейки (см. стр. 36).

Связь между блоком управления и весами 
прервана.

Не перекрывать блок передачи и приема.

Summary of Contents for SGS 43

Page 1: ...524 Uttenweiler GERMANY Tel 49 0 73 74 91 57 66 Fax 49 0 73 74 92 07 23 E mail service sanitas online de D Gebrauchsanweisung Glaswaage G Instruction for use Glass scale F Mode d emploi P se personne...

Page 2: ...das die Messwerte per Infrarot bertragung anzeigt Das Gewicht wird in 100 Gramm Schritten angezeigt Die Waage ist f r die Eigenanwendung im privaten Bereich bestimmt Au erdem verf gt die Waage ber fo...

Page 3: ...tteriefach mit einem trockenen Tuch Batterien k nnen Giftstoffe enthalten die die Gesundheit und die Umwelt sch digen Entsorgen Sie die Batterien deshalb unbedingt entsprechend der geltenden gesetzlic...

Page 4: ...chen Feldern z B Mobiltelefone aus Batterien Warnung Batterien k nnen bei Verschlucken lebensgef hrlich sein Bewahren Sie Batterien f r Kleinkinder unerreichbar auf Wurde eine Batterie verschluckt mus...

Page 5: ...Untergrund Eine feste Standfl che ist Voraussetzung f r eine korrekte Messung 6 Montage des Bedienteils Bedienteil aufbewahren Das Bedienteil kann wahlweise in der Hand gehalten werden in die Wandhal...

Page 6: ...essung erscheint Abb 3 Kurz darauf wird das Messergebnis angezeigt Abb 4 Wenn Sie die Trittfl che verlassen schaltet sich die Waage nach ca 10 Sekunden ab Solange bleibt das Messergebnis sichtbar Acht...

Page 7: ...und pflegen Von Zeit zu Zeit sollte das Ger t gereinigt werden Benutzen Sie zur Reinigung ein feuchtes Tuch auf das Sie bei Bedarf etwas Sp lmittel auftragen k nnen Benutzen Sie keine scharfen Reinigu...

Page 8: ...icht aktiviert Wenn Sie sich auf die Waage stellen bevor im Display 0 0 angezeigt wird funktioniert die Waage nicht korrekt Waage korrekt aktivieren auf 0 0 warten und Messung wiederholen Vor der Mess...

Page 9: ...el die dem Kunden bereits bei Kauf bekannt waren bei Eigenverschulden des Kunden Die gesetzlichen Gew hrleistungen des Kunden bleiben durch die Garantie unber hrt F r Geltendmachung eines Garantiefall...

Page 10: ...s displayed in 100 g graduations The scale is designed for private use This scale also has the following functions Switch between kilograms pounds LB and stone ST Automatic shutoff function Battery ch...

Page 11: ...te that technical tolerances mean that results may vary because the scale is not calibrated for profes sional medical use The scale can accept a maximum load of 150 kg 330 lb 23 st The weight measurem...

Page 12: ...is regulation shall void the warranty If you need to have the unit repaired contact customer service or an authorised dealer 4 Unit description Overview 1 Control panel with display 2 ON OFF button 3...

Page 13: ...he same time of day preferably in the morning after using the toi let on an empty stomach and unclothed in order to achieve comparable results Stand still and upright during the measurement 8 Operatio...

Page 14: ...on the scale first and wait for the display to show 0 0 Fig 2 before stepping on it Switching off the scale The scale and the control panel always switch off automatically after 10 seconds Press the...

Page 15: ...local regulations for material disposal Dispose of the unit in accordance with EC Directive 2002 96 EC WEEE Waste Electrical and Electronic Equipment If you have any questions please contact the loca...

Page 16: ...er are not covered The control panel is too far from the scale Reduce the distance between the scale and control panel The scale batteries are flat Replace the batteries see page 14 The connection bet...

Page 17: ...d emploi Lisez attentivement cette notice conservez la pour un usage ult rieur mettez la la disposition des au tres utilisateurs et suivez les consignes qui y figurent Ce p sepersonne imp dancem tre s...

Page 18: ...nt piles avec un chiffon sec Les piles peuvent contenir des produits toxiques qui sont nuisibles pour la sant et l environnement Eli minez les piles conform ment aux dispositions l gales en vigueur Ne...

Page 19: ...magn tiques p ex t l phones mobiles Piles Avertissement Les piles sont extr mement dangereuses si elles sont aval es Conservez les piles hors de port e des enfants en bas ge Si une pile a t aval e con...

Page 20: ...ne sur un support stable et plan Une surface d assise solide constitue la condition pr alable pour une mesure correcte 6 Montage de l l ment de commande Mise en place de l l ment de commande L l ment...

Page 21: ...e l cran indique fig 3 Le r sultat de la mesure s affiche presque aussit t fig 4 Quand vous quittez le plateau la balance s teint au bout de 10 secondes env En tre temps le r sultat de mesure reste vi...

Page 22: ...me capacit N utilisez pas d accumulateurs rechargeables Utilisez des piles sans m tal lourd 10 Nettoyage et entretien de l appareil Nettoyez de temps en temps l appareil Utilisez pour le nettoyage un...

Page 23: ...z la mesure voir page 21 Absence d affichage Les piles de l l ment de commande sont totalement d charg es Veuillez remplacer les piles voir page 22 Les piles de l l ment de commande ne sont pas bien i...

Page 24: ...1 Introducci n 25 2 Aclaraci n de las ilustraciones 25 3 Indicaciones de seguridad 25 4 Descripci n del aparato 27 5 Puesta en marcha 27 6 Montaje del panel de mando 27 7 Informaci n 28 8 Manejo 28 9...

Page 25: ...fuera del alcance de los ni os peque os En caso de tragarse una pila acuda de inme diato al m dico Cambie las pilas que tengan poca carga con la debida antelaci n Cambie siempre todas las pilas al mis...

Page 26: ...gua No la lave nunca con agua No coloque ning n objeto encima de la b scula si no la est utilizando Proteja el aparato contra los golpes la humedad el polvo los productos qu micos los cambios bruscos...

Page 27: ...4 1 5 V tipo AAA Si la b scula no muestra ninguna funci n retire las pilas por completo y col quelas de nuevo Para consultar las indicaciones relativas al cambio de pilas v ase la p gina 29 Cambio de...

Page 28: ...est n en contacto directo No cubra la unidad emisora ni la receptora La distancia m xima entre el elemento de mando y la b scula es de 2 m Posibilidad 1 encender el elemento de mando y luego la plata...

Page 29: ...ento de mando se apagan autom tica mente Para apagar manualmente el elemento de mando pulse el bot n ON OFF 9 Cambio de pilas El elemento de mando est provisto de un indicador de cambio de pilas Si la...

Page 30: ...te Electrical and Electronic Equipment Si tiene alguna duda o consulta le rogamos que se ponga en contacto con el organismo responsable de su municipio 12 Resoluci n de problemas Si la b scula encuent...

Page 31: ...est muy lejos de la b s cula Reduzca la distancia entre la b scula y el elemento de mando Las pilas de la b scula est n agotadas Cambie las pilas v ase la p gina 29 La conexi n entre el elemento de ma...

Page 32: ...32 1 32 2 33 3 33 4 34 5 35 6 35 7 35 8 36 9 37 10 37 11 37 12 38 13 39 13 39 C 4 x 1 5 AAA 2 CR2032 1 100 LB ST...

Page 33: ...33 2 3 150 330 lb 23 St 100 0 2 lb 0 2 lb 2004 108 EC...

Page 34: ...34 4 1 2 ON OFF 3 4 5 6 7 1 7 2 3 5 4 6...

Page 35: ...35 5 2 CR2032 4 x 1 5 AAA 37 LB ST 6 7 4 x 1 5 V Typ AAA C R 2032 3 V C R 2032 3 V 50 max 2m...

Page 36: ...36 8 2 1 ON OFF 8888 1 5 0 0 2 3 4 10 0 0 2 2 5 ON OFF 0 0 2 3 4 10 8888 0 0 kg fig 2 fig 1 fig 3 fig 4 50 max 2m...

Page 37: ...37 0 0 2 10 ON OFF 9 Lo 1 Lo 2 Lo 1 4 x 1 5 AAA Lo 2 2 CR2032 4 x 1 5 AAA 10 11 B Pb Cd Hg Pb Cd Hg...

Page 38: ...38 2002 96 EC WEEE Waste Electrical and Electronic Equipment 12 150 150 0 0 36 37 35 0 0 0 0 30 36...

Page 39: ...9077 88524 109451 62 2 495 658 54 90 ________________________ ______________________________________ ______________________________________________________________________________ ____________________...

Page 40: ...40 753 358 0509 Irrtum und nderungen vorbehalten...

Reviews: