21
・
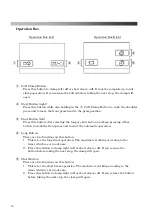
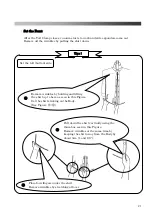
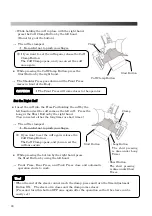
Set the Front
After the Tail Clamp closes, vacuum starts to work and side expanders come out.
Remove all the wrinkles by pulling the shirt down.
Remove wrinkles by holding and lifting
the shirt up to here as seen in this Figure.
Set the shirt sticking on the Body.
(See Figure
⑪・⑫
)
⑩
Set the left (button) side
Pull down the shirt vertically using the
thumb as seen in this Figure.
Remove wrinkles at the same time by
keeping the shirt away from the Body by
about 3cm (1 and 1/8”).
Place four fingers under the shirt.
Remove wrinkles by stretching all over
⑫
⑪
T
T
i
i
p
p
s
s
!
!
Summary of Contents for LP-570E-V2
Page 54: ...54 Motor Operation Diagram 1 Motor Operation Diagram REV 4...
Page 56: ...56 Air Piping 1 2 Air Piping 1 REV 3 3DLP570E V2 052 2...
Page 58: ...58 Air Piping 2 3 Air Piping 2 REV 3 3DLP550J V2 053 6...
Page 60: ...60 Air Piping 3 4 Air Piping 3 REV 3 3DLP550J V2 054 6...
Page 62: ...62 Steam Piping 5 Steam Piping REV 3 3DLP570E V2 055 1...
Page 64: ...64 Control Box Switch Diagram 6 Control Box Switch Diagram REV 3 3DLP550J V2 056 6...
Page 66: ...66 Cover Diagram 7 Cover Diagram REV 3 3DLP570E V2 057 3...
Page 69: ......
Page 70: ......
Page 71: ......
Page 72: ......
Page 73: ......
Page 74: ......
Page 75: ......
Page 76: ...LP 570E V2X Rev 6 2019 6 1 2 B...

