background image


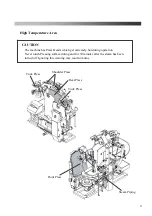
High Temperature Area 


CAUTION 

The machine has Press Heads which get extremely hot during operation. 
Never touch Pressing surface during and for 30 minutes after the steam has been 
turned off. Ignoring this warning may result in burns. 

Front Press 

Shoulder Press 

Steam Piping 

Tuck Press 

Tuck Press 

Rear Press 

Summary of Contents for LP-570E-V2

Page 1: ...afety please read this Instruction Manual carefully and understand all instructions before starting operating of the machine If at any time you have any questions please do not hesitate to contact us...

Page 2: ...Dimensions Width Depth Height 2110 1120 2000 mm 83 1 44 1 78 7 inch The number is based on our inspection and testing The number may vary depending on many variables including machine location electri...

Page 3: ...ter Operation Is Over 26 Other Operations 27 How to Reset Emergency Stop Safety Error 27 About the Cover Counter 27 How to Replace the Cover Padding 28 Tail Clamp 28 Body 29 Neck Clamp 32 How to Insta...

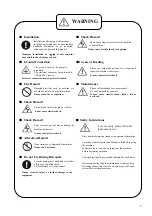
Page 4: ...rt the user to unspecified prohibition Shock Hazard This is to alert the user to a risk of electric shock in certain circumstances Prohibition of Dismantling This is to alert the user to a risk of inj...

Page 5: ...rsonnel Do not dismantle by yourself It may cause electric shock injury fire or accident Shock Hazard Do not touch the electric plug or switch It may cause electric shock Shock Hazard Parts must not g...

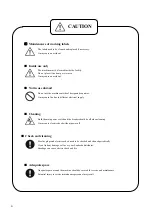
Page 6: ...e due to different electrical supply Cleaning Both the main power switch and the breaker should be off when cleaning It may cause electric shock without power off Check and cleaning Electric plugs and...

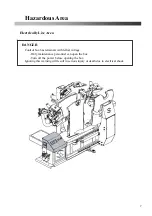
Page 7: ...ve Area DANGER Control box has terminals with lethal voltage Only maintenance personnel can open the box Turn off the power before opening the box Ignoring this warning will result in serious injury o...

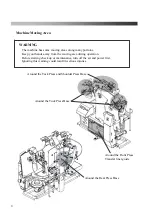
Page 8: ...om the moving area during operation Before starting check up or maintenance turn off the air and power first Ignoring this warning could result in serious injuries Around the Tuck Press Base Around th...

Page 9: ...Heads which get extremely hot during operation Never touch Pressing surface during and for 30 minutes after the steam has been turned off Ignoring this warning may result in burns Front Press Shoulde...

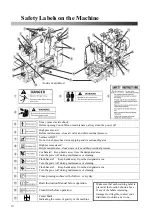
Page 10: ...urn the power off during maintenance or cleaning Pinch hazard Keep hands away from the designated area Turn the power off during maintenance or cleaning Pinch hazard Keep hands away from the designate...

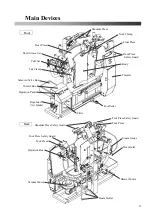
Page 11: ...Body Front Press Safety Guard Rear Press Shoulder Press Safety Guard Tuck Press Tuck Press Safety Guard Neck Clamp Regulator Air Intake Control Box Operation Panel Cuff Set Transfer Steam Outlet Shor...

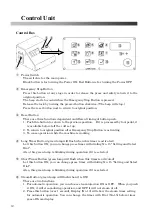
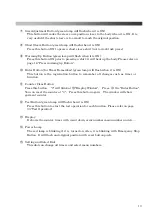
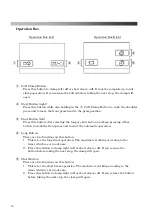
Page 12: ...ergency Stop Button is activating 3 To cease operation while the machine is working Long Timer Button green lamp will flash when this timer is activated Let this button ON you can change press timer w...

Page 13: ...ll flash when it is ON This button is the registration button to remember all changes such as timer or function Counter Clear Button Press this button 0 will blink at Display Window Press the Enter Bu...

Page 14: ...work the front press and to start the automatic operation Long Button There are two functions on this button 1 This is for the long timer operation The machine is working according to the timer which...

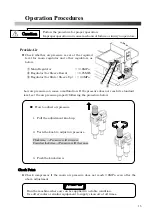
Page 15: ...ir pressure can cause a malfunction If the pressure does not reach its standard level set the air pressure properly following the procedure below Check Point Check compressor if the main air pressure...

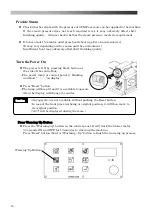
Page 16: ...ressing black button at the side of the control box The power lamp at control panel is blinking and show on display Press Reset button The lamp will keep lit and it is available to operate Also the di...

Page 17: ...imer the timer will be the same as the original However the changed timer will be effective as long as machine is ON It is set 20 seconds on short timer and 28 seconds on long timer as standard Max 99...

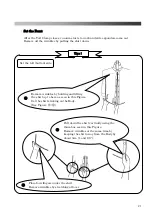
Page 18: ...them for daily operations Please also read the caution statements for the safety use of the machine Set the Shirt on the Body By finishing setting the shirt within 25 seconds this will prevent the shi...

Page 19: ...and you can set the neck once again In order to set the neck after the tail of shirt is set step on the Foot Pedal The Neck Clamp opens while stepping on the Foot Pedal The line of shirt should be alo...

Page 20: ...f you want to set the tail again press the Reset Button blue The Tail Clamp opens and you can set the tail once again Remove air by smoothing out from top to bottom with palms After removing the air c...

Page 21: ...lifting the shirt up to here as seen in this Figure Set the shirt sticking on the Body See Figure Set the left button side Pull down the shirt vertically using the thumb as seen in this Figure Remove...

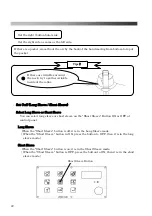
Page 22: ...t Sleeve button in ON press the button to OFF then it is in the long sleeve mode Short Sleeve When the Short Sleeve button is on it is in the Short Sleeve mode When the Short Sleeve button is OFF pres...

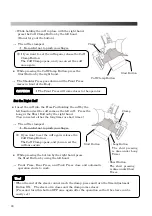
Page 23: ...e cuff over here Press Pad Put the tuck crease on the Press Pad Insert the cuff to the point where the cuff touches this line It is easy to insert when using the left hand as seen in this Figure Left...

Page 24: ...inch your finger While pressing the button by the right hand press the Start Button by using the left hand Front Press Rear Press and Tuck Press close and automatic operation starts to work When the e...

Page 25: ...Short Button by using the right hand You can select the long timer or the short timer The short sleeve is clamped While pressing the button press the Start Button by the right hand The Front Press and...

Page 26: ...er can be extended 5 seconds by every step Maximum 99 seconds All the presses open and complete when the setting time is over The Front Press moves to the right Remove the shirt after that and then se...

Page 27: ...nsure the proper finish quality If the cover counter exceeds 25 000 times there will be an error displayed EC1 when the power is turned on and the machine will not start THEREFORE AFTER CHANGING THE C...

Page 28: ...l Clamp Receiver Cover through the Tail Clamp Receiver sliding from left to right Figure C 2 Hook the cover edge at the four corners of the Tail Clamp Receiver Pull and tie the string Keep the rest of...

Page 29: ...r Body SH Silicone 10mm Body Spring Felt Pad 13mm 2 Install the Pad so that the seam line of each Pad matches to the ridge of Body Shoulder Make sure right and left are evenly set Body Spring Felt Pad...

Page 30: ...ront left and right Install shorter Stainless Steel Rod into the cover from the string in rear left and right Figure A 4 Face the cover shoulder seam line up and make it even left and right 5 Hook the...

Page 31: ...e Velcro of Front String and the Velcro of Front String and attach together at the front of the Body Make sure the entire string goes under the Metal Hook at every spot front and rear and right and le...

Page 32: ...g firmly Keep the rest of the string inside of the cover Make sure that there is a cover with same the shape on right left and the one with different shape This figure shows Tuck Left Neck Clamp Cover...

Page 33: ...is displayed with order of test number chart at page 34 Step 3 Press the Enter button Test mode is now ON and the function starts working The long timer button is blinking while the test is ON Press...

Page 34: ...after 0 2 seconds from open to close please adjust speed using buzzer o 8 Right Cuff Clamp Solenoid No 8 Buzzer sounds after 0 225 seconds from close to open and does after 0 2 seconds from open to c...

Page 35: ...input signal is On or OFF Test of Emergency Switch Safety Guards not available Cover Counter Body pressing time after changing the body cover After cover change be sure to reset the cover counter Refe...

Page 36: ...utton on service menu Long Timer Button It is used on Input Test 2 Button lamp is ON at input which is ON and the lamp is OFF at input which is OFF It is useful to check for possible wire disconnectio...

Page 37: ...it board No 1 It is shown on display 2 Dial with Setting Select knob No 5 and select the service menu 3 When you see the menu which you want to select press the Enter button No 4 4 Operate referring t...

Page 38: ...the input number is shown on display reference Chart 1 and the Long Timer button No 3 lights on in case of item of input is ON 3 out Output Test According to instructions 1 and 2 you will see on the d...

Page 39: ...Timer V 1 To control brake air supply timer for front press transfer to left 0 28 sec Max 1 3 sec V 2 To control brake air supply timer for front press transfer to right 0 25 sec Max 1 3 sec V 3 To c...

Page 40: ...OFF OFF First Foot Pedal d 2 Sleeve arm tension softening function for long sleeve operation ON does work ON OFF doesn t work d 3 Neck Clamp Opening Timing ON Same timing of body press open ON OFF af...

Page 41: ...g t 2 This timer is for counter reset button how long keep pushing t 3 This timer is for pushing time of vacuum timer button for confirmation when you change timer or any set up t 4 This timer is for...

Page 42: ...he machine will return to its original position 2 Even if it is not pressed button if it is showing E2 error it is a switch problem Please check whether switch is broken shape change of safety bar or...

Page 43: ...hange of safety bar or a wire connection is loose or disconnected 3 The switch is activated due to heavy shock of press head Adjust speed controller of shoulder press cylinder E 6 1 Front Press Left S...

Page 44: ...pressure Main Pressure 0 6MPa reference Page 15 E32 1 Reset Button Error 2 Reset Button keeps activated when the main power is ON or machine is at the original position 3 1 In the case of keep pushing...

Page 45: ...the case of a button being pushed by something error will be released if you release the button and push the reset button 2 Even if it is not a pressed button if it is showing E37 error it is a switc...

Page 46: ...ON 3 1 In the case of a button being pushed by something the error will be released if you release the button and push the reset button 2 Even if it is not a pressed button if it is showing E42 error...

Page 47: ...can t see it when it works In case of Thermal of Magnetic Contactor works it is considered overload by wire cutting or continuous motor running under the high temperature Fix the problem first and pre...

Page 48: ...aintenance on your Sankosha equipment please read and comprehend carefully this Daily Check Manual thoroughly before operation Keep this manual in a safe place for easy access at all times The Checkin...

Page 49: ...Pressure will decrease Pull the knob down 2 Regulator Mist Separator Figure 2 Check if the automatic drain function works properly at the Regulator Mist Separator The drain is automatically discharged...

Page 50: ...see if it is dirty tear or not Body Tuck Cuff clamp Short sleeve Tail clamp and Neck Dirt and any tear can affect pressing quality 6 Check and clean press surface Figure 4 Clean the pressing surface F...

Page 51: ...supply Figure 6 You need to supply with grease regularly Please fill with lithium grease Without grease connecting parts friction increase and can cause machine failure Use Grease gun to replenish gr...

Page 52: ...Blower filter No Item 16 17 18 19 20 21 22 23 24 25 26 27 28 29 30 31 1 Air Pressure 2 Regulator Mist Separator 3 Steam Pressure 4 Steam Trap 5 Cover 6 Press surface 7 Emergency stop 8 Blower filter...

Page 53: ...53 Spare Parts List Index 1 Motor Operation Diagram 2 Air Piping 1 3 Air Piping 2 4 Air Piping 3 5 Steam Piping Diagram 6 Control Box Switch Diagram 7 Cover Diagram...

Page 54: ...54 Motor Operation Diagram 1 Motor Operation Diagram REV 4...

Page 55: ...k Ball E5J004 2 109 Vacuum Flex Hose K1D003 1 Length 770mm 110 Vacuum Flex Hose Cuff K1D004 2 111 Motor G0E003 1 For Blower 112 Blower Fan G2B009 1 113 Motor G1A053 1 For Vacuum 114 Balance Spring Uni...

Page 56: ...56 Air Piping 1 2 Air Piping 1 REV 3 3DLP570E V2 052 2...

Page 57: ...B5A004 2 207 Speed Controller C1A024 3 208 Speed Controller C1A026 1 Cylinder B2C008 1 Rear Press 210 Cylinder B0U009 1 Shoulder Press 211 Cylinder Sensor B5A003 2 212 Speed Controller C1A012 2 213 K...

Page 58: ...58 Air Piping 2 3 Air Piping 2 REV 3 3DLP550J V2 053 6...

Page 59: ...p Down Cylinder B0C002 2 Sleeve Arm 307 Speed Controller C1A003 4 308 Link Ball E5J004 2 309 Spring H0D002 2 Cylinder B0A019 2 Tuck Press 311 Speed Controller C1A012 4 312 Knuckle Joint B6B003 2 Cylin...

Page 60: ...60 Air Piping 3 4 Air Piping 3 REV 3 3DLP550J V2 054 6...

Page 61: ...juster Left Solenoid Valve A0J012 1 No 8 Cuff Short Sleeve Clamp Cuff Adjuster Right Solenoid Valve A0J012 1 No 11 Tuck Press Solenoid Valve A0J012 1 No 18 Neck Clamp Solenoid Valve A0J012 1 No 15 Ste...

Page 62: ...62 Steam Piping 5 Steam Piping REV 3 3DLP570E V2 055 1...

Page 63: ...ose A6B018 2 503 Flex Hose A6B017 2 504 Steam Nozzle UNA013 2 505 Steam Gauge J0A003 1 506 Y Type Strainer J2M011 1 507 Ball Valve J6A007 1 508 Piston Valve A0G003 1 509 Lift Check J2J001 1 510 Radiat...

Page 64: ...64 Control Box Switch Diagram 6 Control Box Switch Diagram REV 3 3DLP550J V2 056 6...

Page 65: ...h Button Switch Cap 21I133 1 603 Push Button Switch 21I107 1 Emergency 604 Push Button Switch 21I085 6 Safety Guard 605 Push Button Switch 21I148 5 Start Foot Pedal Unit FP UNT 002 1 Micro Switch 21E0...

Page 66: ...66 Cover Diagram 7 Cover Diagram REV 3 3DLP570E V2 057 3...

Page 67: ...r Left S1B066 1 709 Rear Tuck Felt Pad Left 5mm S1B067 1 710 Rear Tuck SH Silicone 10mm S1B070 2 711 Cuff Clamp Cover S1B071 2 712 Rear Tuck Cover Right S1B068 1 713 Rear Tuck Felt Pad Right 5mm S1B06...

Page 68: ...68 Attached Diagram Sensor Diagram Electric Connection Diagram 1 4 4 4 Steam Piping Diagram Air Connection Diagram...

Page 69: ......

Page 70: ......

Page 71: ......

Page 72: ......

Page 73: ......

Page 74: ......

Page 75: ......

Page 76: ...LP 570E V2X Rev 6 2019 6 1 2 B...

Reviews: