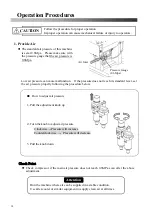
2. Provide steam
The standard steam pressure of this machine is set at 0.6Mpa. Please make sure that the
steam pressure is 0.6Mpa (85psi). If the steam pressure does not reach the required level,
it may adversely affect the shirt finishing quality.
It takes about 15 minutes until the machine heats up.
(It may vary depending on the season and the environment.)
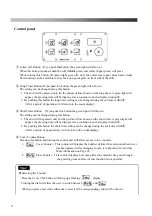
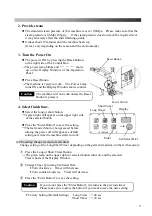
3. Turn the Power On
The power is ON by pressing the Black Button
at the right side of the Control Box.
→
The power lamp blinks and “
-
-
-
” shows
up on the Display Window of the Operation
Panel.
Press Reset Button
→
The machine is ready to work. The Power Lamp
turns ON and the Display Window shows counter.
The machine will not work unless the Reset
Button is pressed.
4. Select finish time.
Select the long or short button.
→
A green light will appear on the upper right side
of the selected button.
Press the "Enter Button" to save the setting.
→
The last mode (Short or Long) saved before
turning the power off will appear as default
setting next time the machine starts to work.
◎
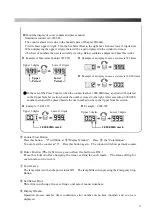
The setting change method of each timer
Change setting of the Long/Short Timer depending on the garment material or others if necessary.
①
Press the Long or Short Timer Button
→
The green lamp on the upper right of selected button turns on, and the selected
Timer shows at the Display Window.
②
Change Timer by turning Set/Select Dial.
*
Turn clockwise. Timer will increase.
*
Turn counterclockwise. Timer will decrease
③
Press the “Enter Button” to save the setting.
If you do not press the "Enter Button", it returns to the previous timer.
Please make sure to press the button if you want to save the new setting.
*
Factory Setting (Default Setting)
Long Timer
・・・
40 sec
Short Timer
・・・
30 sec
Power Switch
Caution
Reset Button
Long Timer
Short Timer
Display
Set/Select Dial
Enter
Caution
15
Summary of Contents for LP-660E-V2
Page 2: ......
Page 38: ...36...
Page 39: ...Spare Parts List Index 1 Front Diagram 2 Rear Diagram 3 Steam Piping 4 Cover Diagram 37...
Page 40: ...1 Front Diagram REV 1 38...
Page 44: ...3 Steam Piping REV 1 42...
Page 46: ...4 Cover Diagram REV 1 44...
Page 50: ......
Page 51: ......
Page 52: ......
Page 53: ......


