Application number: 184338
Page 46 of 48
Date of revision: August 18, 2011
s-a Version 2.1 dated August 26, 2011
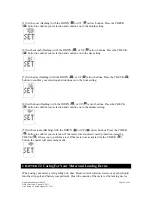
[1] Set the year (flashing) with the DOWN (
) or UP (
) arrow buttons. Press the CHECK
(
) button to confirm your selection and continue on to the month setting.
[2] Set the month (flashing) with the DOWN (
) or UP (
) arrow buttons. Press the CHECK
(
) button to confirm your selection and continue on to the day setting.
[3] Set the day (flashing) with the DOWN (
) or UP (
) arrow buttons. Press the CHECK (
)
button to confirm your selection and continue on to the hour setting.
[4] Set the hour (flashing) with the DOWN (
) or UP (
) arrow buttons. Press the CHECK
(
) button to confirm your selection and continue on to the minute setting.
[5] Set the minute (flashing) with the DOWN (
) or UP (
) arrow buttons. Press the CHECK
(
) button to confirm your selection. If the meter was activated via strip insertion, pressing
CHECK (
) allows you to perform a test. If the meter was activated via the CHECK (
)
button, the meter will enter menu mode.
CHAPTER
22 Caring For Your Meter and Lancing Device
When using your meter, avoid getting dirt, dust, blood, control solution, water or any other liquid
into the strip port and battery compartment. Clean the outside of the meter or the lancing device


