background image


Sanosil Q-Jet Advanced


25 


7.  Troubleshooting 

To determine and search for anomalies it is essential to have this Operation and Maintenance Manual at hand.
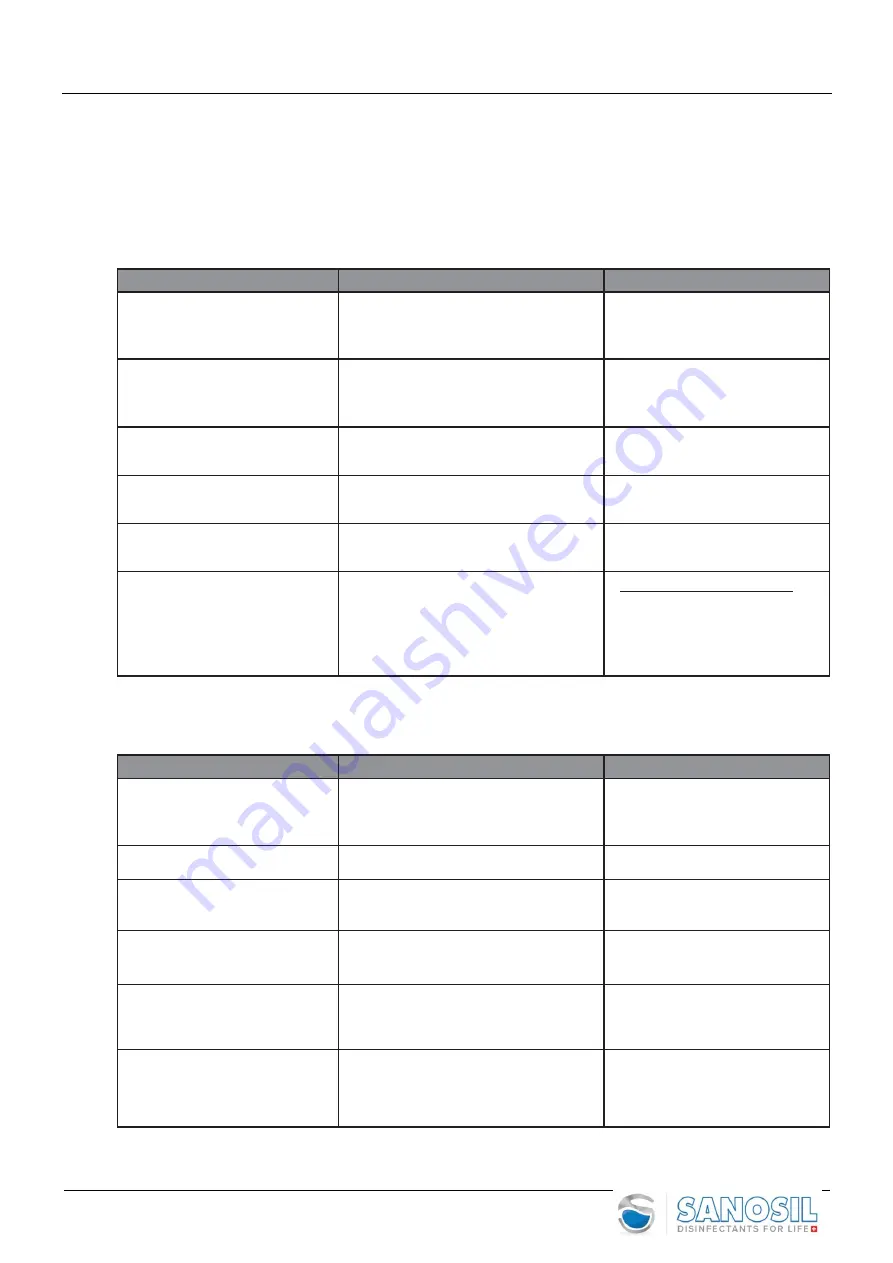


7.1  Table


Anomaly


Possible Cause


Remedy


Device does not work / does not


respond


Check power supply


Check fuses


Check correct insertion of cable


Ensure power supply to device


Fan does not work


Thermal motor sensor stops engine 
(too high engine temperature)


Air-intake filter too dirty


Check engine, switch off and on


Set-up device once more 


Clean or change filter


Liquid is not sprayed


Tank is empty


Nozzle is clogged


Fill liquid


Remove obstruction


Device does not start or stops


before finishing program


Cycle has been terminated abnormally 
(e.g. power cuts)


Switch off and on again


Set-up device once more


Device emits loud noises


Possible internal damages


Presence of foreign bodies in the fan


Switch off and unplug device, call 
service technician


Device leaks liquid


Possible internal damages


Internal piping rupture or connections 
leaking


Device was tipped on its side without 
completely empty. 


Switch off and unplug device, 
open device and remove water. 
Let device completely dry. If 
device still leaks call service 
technician


7.2  Warning on Display


Warning


Possible Cause


Remedy


LIQUID LEVEL


Liquid  level monitor determines 
too low liquid level. Device stops 
(LED flashes).


Fill liquid


Set-up device once more and start 
again


FUSE DEFECT


Fuse blown / defect


Check / change fuse on print plate


CYCLE INTERRUPTED


Automatic cycle has been 
interrupted early


Switch off and on again


Set-up device once more 


!!! SERVICE !!!


Maximal running time since last 
Service has been reached or exceeded


Switch off and unplug device, call 
service technician


TIMER NOT OK


System is in automatic mode but 
Timer is not set or activated


Check Timer’s

 settings


MAX. TIME EXCEEDED


Inputted volume (m

3

) and/or 

concentration (ml) are too high,


hence calculated time exceeds 

device’s 

capacities.


Check and adapt settings


Summary of Contents for Q-Jet Advanced 2 Series

Page 1: ...Sanosil Q Jet Advanced 1 Operation and Maintenance Manual Sanosil Q Jet Advanced Series 2 Des M 56en Advanced V2 English...

Page 2: ...Instructions 9 4 1 Warning 9 4 2 Room preparation positioning 9 4 3 Power Connection 10 4 4 Filling 10 4 5 Gun Nozzle 11 4 6 Switch on 11 5 Operation 12 5 1 Programs 13 5 2 Room Preparation 13 5 3 Ma...

Page 3: ...ries Low risk Disregard can lead to medium or light injuries Disregard can damage thedevice Gives good advice for operating thedevice Further symbols will be explained thereafter 2 Safety DANGER Instr...

Page 4: ...ble liquids Do always and only use Sanosil disinfection liquids 2 3 Danger and Caution Warnings The device must be used in full compliance with this Operation and Maintenance Manual It is strictly for...

Page 5: ...n as needed basis depending on the volume of traffic and use Users should familiarize themselves with Q Jet operation by reading the Q Jet User Manual prior to first use It is essential that Q Jet use...

Page 6: ...rical plug or parts are wet 8 Use only a Sanosil supplied electrical power cord 9 Take care to prevent water or other fluid from entering the device Should this occur allow to completely dry before us...

Page 7: ...kg Weight filled 18 7 kg Noise level 84 dB 1m 3 2 Parts and Functions 1 Device 2 Power cord 3 ON OFF switch 4 Display 5 Air filter 6 Tank cap 7 Support for Gun Nozzle 8 Gun Nozzle 9 Service Flap 10 R...

Page 8: ...place the device on top of trolley secure the device with the screw on the trolley CAUTION Risk of crushing Hands and fingers can be crushed between device and trolley Do always wear device on handle...

Page 9: ...humidity the humidity must be lowered before start up or a lower dosage of the active substance must be selected Check temperature of the room to be between 15 to 35 C Affix warning board on entrance...

Page 10: ...aplate Insert power cord 2 in IEC power socket 4 4 Filling Remove tank cap 6 Fill disinfection liquid max 4 2 liter Wipe up any spills with a clean paper towel or rag Do not tip the device on its side...

Page 11: ...Advanced 11 Wind tank cap 6 until shut liquid level could be checked on the display 4 5 Gun Nozzle Remove cap from gun support 7 Insert gun 8 Gun must lock click 4 6 Switch on Tip ON OFF 3 to switch...

Page 12: ...press i button Or button on remote control Display i button Return ENTER Number Arrow buttons buttons After switching on the device following is shown on thedisplay Tosee actual software version date...

Page 13: ...om Preparation Close windows Pull back and secure all room dividing curtains If possible turn off then cover and seal all air handling units heaters and smokedetectors Check relative humidity of the r...

Page 14: ...time Consumption in ml 10 3 min 99 ml 5 min 165 ml 6 min 198 ml 20 5 min 165 ml 8 min 264 ml 10 min 330 ml 30 7 min 231 ml 7 min 231 ml 14 min 462 ml 40 10 min 330 ml 11 min 363 ml 20 min 660 ml 50 1...

Page 15: ...nseal HVAC vents and restart HVAC system to allow increasedairflow circulation in the room Once a safe ppm level is reached room can be re used again Shortening of waiting time after a minimal waiting...

Page 16: ...filledsquares Toprogram days press ENTER For each day input starting time and confirm withENTER Toactivate day press I button square is filled when day is activated Device will start at the times pro...

Page 17: ...proper personal equipment PPE including wraparound style goggles respirator mask filter class ABE1 filtering hydrogen peroxide for example 3M 4277 or 3M 7500 mask with 6057 filter and gloves should be...

Page 18: ...Toget to the different cycles press every time ENTER Each cycle has an ON and an OFF time Please input for each cycle the desired time between 0 and 59 minutes and confirm with ENTER Enter 0 on cycle...

Page 19: ...ase refer to the Sanosil test reports T319 T320 and T321 Room Size Fogging time consumption according the norm Afnor T72 281 2014 valid for Sanosil S015 for bacteria s yeasts molds 28ml m3 Fogging tim...

Page 20: ...that the H2 O2 Level is below 1ppm Open windows and doors for min 15 minutes unseal HVAC vents and restart HVAC system to allow increasedairflow circulation in the room Once a safe ppm level is reache...

Page 21: ...ime is displayed operating hours counter 5 9 Setup Language Chose mode SETUP LANGUAGE and confirm by pressing ENTER Tochoose language press respective number button 0 1 2 or 3 and confirm by pressing...

Page 22: ...rrect on the display this calibration procedure should be done for initial use and frequently depending on the usage time by an authorized person 1 Place the device on a work bench 2 Do only use disti...

Page 23: ...the filter will guarantee the proper functioning and lifetime of the Q Jet only Standard environment every 20 hours of operating Dusty risky environment every 10 hours of operating NOTE Any defects n...

Page 24: ...on for the device is updated and available yearly Hydraulic Circuit Nozzle Visual status check cracks points of rupture bruising occlusions deposits daily Hydraulic Circuit Peristaltic pump tubing che...

Page 25: ...ug device call service technician Device leaks liquid Possible internal damages Internal piping rupture or connections leaking Device was tipped on its side without completely empty Switch off and unp...

Page 26: ...and fill it carefully Send complaint form with additional info and pictures if helpful to info sanosil com Sanosil Ltd forwards the complaint to the manufacturer The manufacturer decides whether the...

Page 27: ...Sanosil Q Jet Advanced 27 10 CE Declaration of Conformity...

Page 28: ...Sanosil Q Jet Advanced 28 Sanosil Ltd Eichtalstrasse 49 CH 8634 Hombrechtikon e mail info sanosil com www sanosil com Tel 41 55 254 00 54 Fax 41 55 254 00 59...

Reviews: