background image

DEUTSCH 

– DEUTSCH – DEUTSCH – DEUTSCH – DEUTSCH – DEUTSCH – DEUTSCH - DEUTSCH 

  1/16 


Sanotechnik Handelsgesellschaft m.b.H. 
Industriestrasse 5 
A-2752 Wöllersdorf 
Tel.: 0043/2622/421 93-0 
Fax. 0043/2622/421 93-6 
Email: 

office@sanotechnik.at


www.sanotechnik.com


11/2014 

Art.Nr.: 
D60700 

Summary of Contents for D60700

Page 1: ...CH DEUTSCH DEUTSCH DEUTSCH DEUTSCH 1 16 Sanotechnik Handelsgesellschaft m b H Industriestrasse 5 A 2752 Wöllersdorf Tel 0043 2622 421 93 0 Fax 0043 2622 421 93 6 Email office sanotechnik at www sanotechnik com 11 2014 Art Nr D60700 ...

Page 2: ...ohne vorherige Dusche aus um festzustellen was Sie bevorzugen Wenn Sie vorher duschen trocknen Sie sich vollständig ab da das Wasser das Holz beschädigen kann 9 Essen Sie mindestens eine Stunde vor der Benutzung nichts Am besten ist eine Benutzung mit nüchternem Magen da ein voller Magen Unbehagen erzeugen kann 10 Sie können auch von der entspannenden Wirkung der Infrarotkabine profitieren indem S...

Page 3: ...rung 1 Setzen Sie die Kabine während des Transports keinem Regen Schnee oder heftigen Kollisionen aus 2 Lagern Sie sie nicht in einer feuchten Umgebung Schimmelbildung ELEKTROINSTALLATION Bauseits Der Elektro Anschluss darf nur von einem behördlich konzessionierten Elektroinstallationsunternehmen durchgeführt werden Die Installationsvorschriften der örtlichen Energieversorgungsunternehmen sowie di...

Page 4: ...durch unbefugtes Personal Transportschäden zurückzuführen sind wie z B Sicherungen dekorative Elemente usw Durch mangelhafte Einhaltung der Bedienungsanleitung lehnt der Hersteller jegliche direkte und indirekte Haftung auf Personen oder Sachschäden ab Durch indirekte Schäden w z B Folgeschäden durch mangelnden Gebrauch oder allfällige Entfernung haftet der Hersteller nicht Bei Reparaturen nach Ab...

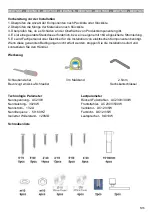
Page 5: ...tromleitung 5 Es wird Fachpersonal oder Elektriker für die Installation von elektrischen Komponenten benötigt Wenn diese genannten Bedingungen nicht erfüllt werden stoppen Sie die Installation sofort und kontaktieren Sie den Händler Werkzeug Schraubenzieher 3m Maßband 2 5mm Bevorzugt ein Akku Schrauber Sechskantschlüssel Technologie Parameter Nennspannung AC230V Nennleistung 3020W Nennstrom 13 2A ...

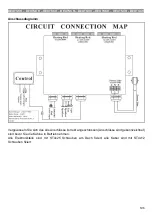
Page 6: ...16 Anschlussdiagramm Vergewissern Sie sich das alle Anschlüsse korrekt angeschlossen Anschlüsse sind gekennzeichnet sind bevor Sie die Kabine in Betrieb nehmen Alle Elektronikteile sind mit ST4x25 Schrauben am Dach fixiert alle Kabel sind mit ST4x12 Schrauben fixiert ...

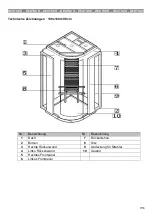
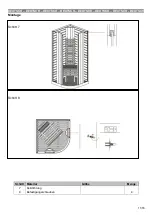
Page 7: ...TSCH DEUTSCH DEUTSCH 7 16 Technische Zeichnungen 100x100x198 cm Nr Bezeichnung Nr Bezeichnung 1 Dach 7 Rückenlehne 2 Boden 8 Sitz 3 Rechte Rückenwand 9 Abdeckung für Strahler 4 Linke Rückenwand 10 Glastür 5 Rechtes Frontpanel 6 Linkes Frontpanel ...

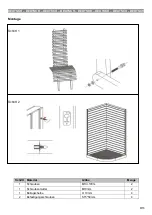
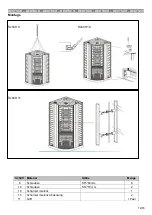
Page 8: ...DEUTSCH DEUTSCH DEUTSCH DEUTSCH DEUTSCH DEUTSCH 8 16 Montage Schritt 1 Schritt 2 Schritt Material Größe Menge 1 Schrauben M10 100m 2 1 Schraubenmutter M10mm 2 1 Beilagscheibe O 10mm 4 2 Befestigungsschrauben ST5 50mm 4 ...

Page 9: ...DEUTSCH DEUTSCH DEUTSCH DEUTSCH DEUTSCH DEUTSCH DEUTSCH DEUTSCH 9 16 Montage Schritt 3 Schritt 4 Montage Schritt Material Größe Menge 3 Schrauben ST4 35mm 4 4 Schrauben ST4 35 mm 6 ...

Page 10: ...DEUTSCH DEUTSCH DEUTSCH DEUTSCH DEUTSCH DEUTSCH DEUTSCH DEUTSCH 10 16 Schritt 5 Schritt 6 Schritt Material Größe Menge 5 Schrauben ST5 60mm 2 6 Dichtleiste U Form 2 ...

Page 11: ...DEUTSCH DEUTSCH DEUTSCH DEUTSCH DEUTSCH DEUTSCH DEUTSCH DEUTSCH 11 16 Montage Schritt 7 Schritt 8 Schritt Material Größe Menge 7 8 Keildichtung Befestigungsschrauben 4 ...

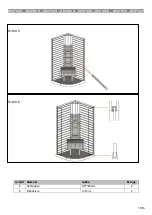
Page 12: ...TSCH DEUTSCH DEUTSCH DEUTSCH DEUTSCH 12 16 Montage Schritt 9 Schritt 10 Schritt 11 Schritt Material Größe Menge 9 Schrauben ST5 60mm 8 10 Schrauben ST4 18 mm 2 10 Scharnier Gelenk 1 10 11 Scharnier Gelenk Abdeckung Griff 2 1 Paar ...

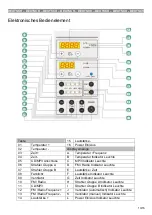
Page 13: ...ss C MP3 Indikator Leuchte 06 Strahler Gruppe A D FM Radio Indikator Leuchte 07 Strahler Gruppe B E Lautstärke Zeit 08 Farblicht F Lautstärke Indikator Leuchte 09 Ventilator G Zeit Indikator Leuchte 10 FM Radio H Strahler Gruppe A Indikator Leuchte 11 CD MP3 I Strahler Gruppe B Indikator Leuchte 12 FM Radio Frequenz J Ventilator automatisch Indikator Leuchte 13 FM Radio Frequenz K Ventilator manue...

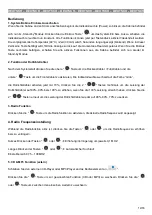
Page 14: ...strahler Fußstrahler und die untere Taste um die Frontstrahler zu aktivieren Die Indikatorleuchte wechselt auf die Farbe Grün die Rotlichtstrahler arbeiten jetzt mit 70 drücken Sie die 2 Tasten mehrmals um die Leistung der Rotlichtstrahler auf 80 90 bzw 100 zu erhöhen wenn Sie die 100 Leistung erreicht haben drücken Sie die 2 Tasten erneut um die Leistung der Rotlichtstrahler wieder auf 90 80 70 z...

Page 15: ...atur 2 C unter dem eingestellten Wert fällt schaltet sich der Ventilator automatisch aus 9 Zeit Temperatur Einstellung Drücken Sie die Tasten um die Zeit um jeweils 1 Minute zu erhöhen bzw zu verringern System muss aktiv sein Langes Drücken Schnelles Erhöhen Verringern Der Einstellbereich geht von 5 99 Minuten Drücken Sie die Tasten um die Temperatur um jeweils 1 C zu erhöhen bzw zu verringern Sys...

Page 16: ...usschalten der Kabine warten Sie immer ca 30 Sekunden bevor Sie die Kabine wieder in Betrieb nehmen Wartung 1 Benutzen Sie keine starken bzw chemische Putzmittel wie zb Alkohol Verdünner Ammoniak Aceton ect 2 Putzen Sie verchromte beschichtete Teile nicht mit rauen Fetzen Fehlermeldungen Fehlerbehebung Problem Ursache Mögliche Behebung Kein Strom 1 falsch angeschlossen locker 2 Kabel Kontaktfehler...

Page 17: ...Englisch 1 Item No D60700 11 2014 ...

Page 18: ...at you prefer If you take a shower before please dry off completely because the water can damage the wood 9 Eat at least one hour before using It is best to use with an empty stomach because a full stomach may cause discomfort 10 You can also benefit from the relaxing effect of the infrared cabin by going to bed after use The relaxed state after use will help calm and better sleep 11 At the first ...

Page 19: ...s of local utility companies and the provisions of DIN 57100 and OVE VDE 0100 Part 701 must be strictly complied with The cable sheathed cable H05VV f3G2 5 YMM J 3x2 5 mm up to 3500 watts shall have a residual current device at least 25 A guided 230 400 V release current I 0 03 A and with an interlock switch IN 16 A or 25 A U Type in Austria IN 13 A or 16 A C Type will be protected Similarly this ...

Page 20: ... any direct or indirect liability to persons or property By indirect damage such as damage caused by lack of use or removal of any manufacturer is not liable For repairs after the warranty period the parts replaced and the process and the trip charges filed after the applicable rates charged The current rates of fees you can ask for service Wood is a natural product Wood is a popular building mate...

Page 21: ...he leakage protection switch 5 A professional personnel or electricians is needed when installing electrical components If can not satisfy above conditions please stop installing immediately and contact the dealer Tool Screwdriver 3m Tape Measure 2 5mm Hexagon Wrench Technology parameters Rated Voltage AC230V Rated Power 2100W Rated Current 8A Rated frequency 50 60HZ Insulated Resistance 20MΩ Load...

Page 22: ...Englisch 6 Scrw pack list 5 70 5 60 4 40 4 18 5 50 4 20 10 80mm 8pcs 8pcs 14pcs 13pcs 8pcs 6pcs 4pcs m10 m10 3pcs 6pcs 2pcs 8pcs 4pcs ...

Page 23: ...00x198cm No Parts name qty No Parts name qty 1 Top board 1 7 Seat board 1 2 Bottom board 1 8 Seat 1 3 Right back 1 9 Install shelf for heating 1 4 Left back 1 10 The glass for the door 1 5 Right front 1 11 6 Left front 1 12 ...

Page 24: ...Englisch 8 Mounting Step 1 Step 2 Step Material Size Qty 1 Screw M10 80mm 4 1 Hexagon nut M10mm 4 1 Flat gasket 10mm 8 2 Screw ST5 50mm 4 ...

Page 25: ...Englisch 9 Mounting Step 3 Step4 Step Material Size Qty 3 Screw ST4 40mm 4 4 Screw ST4 40mm 6 ...

Page 26: ...Englisch 10 Mounting Step 5 Step 6 Step Material Size Qty 5 Screw ST5 50mm 2 6 Screw ST5 50mm 2 ...

Page 27: ...Englisch 11 Mounting Step 7 Step 8 Step Material Size Qty 7 Screw ST5 70mm 8 7 Screw ST4 40mm 4 8 Screw ST4 20mm 6 ...

Page 28: ...Englisch 12 Mounting Step 9 Step 10 Step Material Size Qty 9 Screw ST5 60mm 8 10 Screw St4 18mm 4 10 Magnetic strip 2 ...

Page 29: ... FM tune indicator light 06 Infrared sauna group A D Volume time 07 Infrared sauna groub B E Volume adjust indicator light 08 Colour light F Time setting indicator light 09 Fan G Infrared sauna group A light 10 FM H Infrared sauna group B light 11 CD MP3 I Automatic fan indicator light 12 FM frequency J Fan by hand indicator light 13 FM frequency K Power on off indicator light 14 Volume ...

Page 30: ...press the down key to activate the front heathers The indicator light changes to the colour green The red glass heather now works with 70 press the two key several times to increase the power of the red light emitter by 10 maximum 100 or if you have the 100 achieved power press the 2 key again in order to reduce the power of the red light emitters by 10 minimum 70 3 Radio function Press the Radio ...

Page 31: ... light is Green 8 Ventilator function Press the button first time to open the ventilator function Press the button again to shut down the ventilator If the indoor temperature is 2 lower than the set temperature the ventilator will shut down automatically 9 Time Temperature setting Press the button to raise the temperature for always 1 minute or to reduce The system has to be on working status keep...

Page 32: ...al ignant or with new wound Other symptoms or patients please use t by doctor s permition 4 Be sure of power off when clean the cabin replace parts or remove operating faults Please turn off the power when cleaning the cabin replacing accessory or damage parts Notice 1 The ideal using time is 20 30 minutes control system set time is 30 minutes 2 The suitable temperature is 35 50 please adjust heat...

Page 33: ... 1 Connect well the power socket 2 Reconnect the leakage switch 3 Replace fuse No Infrared 1 Up to permanent temperature temperature detector off 2 Heater supply plug not connect well 3 Damage of infrared tube board 1 Temperature off and automatically recover 2 Connect well the plug 3 Replace infrared tube board No Sound 1 Low volume setted 2 Speaker supply cord is loose 3 Damage of speaker 1 Ajdu...

Reviews: