background image


Sauna Manual 


●●●Dear Customer, 


Congratulations  on  your  purchase  of  the  sauna,  the  new  generation  Sauna  in  the  world.  We  are 

confident that you will enjoy many benefits of using the sauna for years to come. 


Carefully and thoroughly read this manual in its entirety before using the sauna for the first time. 

We recommend keeping this manual for regular review and future reference. 

Summary of Contents for Fresh

Page 1: ...eration Sauna in the world We are confident that you will enjoy many benefits of using the sauna for years to come Carefully and thoroughly read this manual in its entirety before using the sauna for the first time We recommend keeping this manual for regular review and future reference ...

Page 2: ...ity and a difference in attitude of our team service and support The whole team is looking forward to serving your needs TABLE OF CONTENTS General Technical Characteristics 1 Packaging and Individual Panel Information 2 Installation Instructions 4 Operating Instructions of Control Panel Version 1 10 Operating Instructions of Control Panel Version 2 13 Tips for Use 15 Warnings Safety Instructions 1...

Page 3: ...Y 2 person corner models 3 person saunas and above will be packed in 3 boxes PLEASE FIND OUT THE SAME NUMBER OF THE CARTON BOX FOR EXAMPLE NO 001 1 OF 3 FIT NO 001 2 OF 3 FIT NO 001 3 OF 3 ON CARTON PACKAGE THEN YOU CAN ASSEMBLE OUR SET VERY EASILY NOTE PLS DO NOT MIX PACKAGE MEANS PARTS FROM DIFFERENT BOXES CAN NOT BE INSTALLED TOGETHER OR EXCHANGED Below are pictures of individual panels for the...

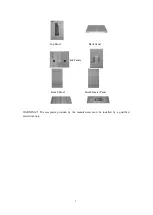
Page 4: ...3 Top Panel Back Panel Side Panels Left Right Bench Panel Bench Heater Panel WARNING The receptacle provided by the manufacturer must be installed by a qualified electrician only ...

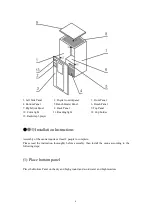
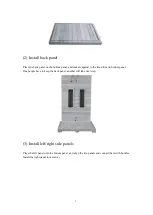
Page 5: ...r light 11 Reading light 12 Cup holder 13 Radio mp3 player Installation Instructions Assembly of the sauna requires at least 2 people to complete Please read the instruction thoroughly before assembly then install the sauna according to the following steps 1 Place bottom panel Place the Bottom Panel on the dry and high ground and avoid water and high moisture ...

Page 6: ... against to the fixed trim on bottom panel One people have to keep the back panel another will take next step 3 Install left right side panels Place the left panel onto the bottom panel and align the two panels and connect them with buckles Install the right panel in same way ...

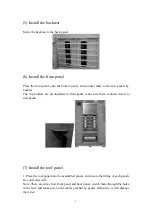
Page 7: ...ttom panel make it connected well to side panels 2 Connect the bench heater cables 3 Install bench panel so that it will slide over the horizontal bench heater panel push the bench all the way until it touching the back panel and make sure all panels are connected tightly ...

Page 8: ...lders are pre installed in front panel make sure them connected well to side panels 7 Install the roof panel 1 Place the roof panel onto the assembled panels and ensure the fitting of each panels are connected well Note There are wires from front panel and back panel stretch them through the holes in the roof and make sure no the cables pinched by panels Otherwise it will damage the wires ...

Page 9: ...8 2 Screw the dust cover on the roof 8 Connect the cables in roof 1 Connect the heater cables like this 2 Connect the control cables like this ...

Page 10: ... Connect the wires and antenna of MP3 player power cable red and black color left speaker cable blue and blue black color right speaker cable green and green black color antenna cable 9 Install the handle ...

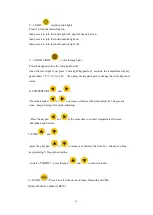
Page 11: ...fault B SET THE TEMPERATURE AND TIME 1 Press SET button again SET INDICATOR turns on 2 Press the TEMPERATURE TEMPERATURE buttons to adjust the temperature Temperature value will increase or decrease by 1 degree at a time By holding down the keys you can speed up the rate of change Repress SET key again and now the temperature window displays the present temperature Temperature buttons Adjust the t...

Page 12: ...w displays the count down time until heating stops C TURN OFF THE SAUNA Press POWER button again to turn off the sauna D SWITCHING BETWEEN AND When in the state of non setting mode press button you can alternate between double digit Centigrade and three figure Fahrenheit The indicators will be lit accordingly E READING LIGHT Press LIGHT button to turn on or off interior light ...

Page 13: ... or an SD card the music can be stopped and restarted 6 NAVIGATION BUTTONS In radio mode Use these buttons to search for stations automatically when you press the button briefly Press and hold the button for about 2 seconds to adjust the frequency manually In music mode via Bluetooth a USB flash drive the AUX port or an SD card you can use the navigation buttons to toggle forward and backward Pres...

Page 14: ...ay windows Left panel Real time temperture Right panel Time remaining 3 LED indicator lights Power indicator Heating indicator on when heating and off when no heating F indicator on for Fahrenheit degree and off for centigrade degree 7 keypads 1 POWER sauna on off ...

Page 15: ...ure display panel shows LX X for 1 9 then press the keypad again to change the color light and status 4 TEMPERTURE and Press the keypad or to increase or discress the temperature by 1 degree at a time keep pressing it for quick adjusting Press the keypad and at the same time to convert temperatures between Fahrenheit and Celsius 5 TIME and press they keypad or to increase or discress the time by 1...

Page 16: ...e setting level the heaters will turn off and on periodically to maintain the desired temperature level inside of the sauna 5 The front door window and or ceiling vent can be opened at any time to introduce fresh air into the sauna 6 Infrared s unique property of direct penetration into the body without heating the intervening air in between allows sauna users to enjoy all of its benefits while th...

Page 17: ...se the sauna if you have any of the following conditions 1 Open wounds 2 Eye diseases 3 Severity sunburns 4 Elderly weak people especially those suffering from a disease pregnant women and infants are prohibited Children over the age of 6 years of age may use the sauna under the supervision of adults 5 If suffering from a disease directly related to temperature seek the advice of a doctor before u...

Page 18: ...es resulting from mishandling of the product by the owner We shall not be liable for the loss of use of the sauna or other incidental or consequential damages Under no circumstances shall we or any of its representatives be held liable for injury to any persons or damages to any properties Some states do not allow exclusion or limitation of incidental or consequential damages so the above limitati...

Page 19: ...k and reconnect the cable of light blub change a new light Push down the bulb together with the cover from the top panel and then pull down the plug Take off the metal pin around the bulb while also take down the broken bulb next put a new bulb into the original place put on pin and install onto the top ...

Page 20: ...screws of the out cover and displace it 2 Screw the ceramic hat of the tube take away ceramic protect screwing the metal screw inter of it moving lines away 3 Do the same process as 2 and than dismantling the bottom fixing tube steel wire away When you assembling it please do the process from 3 to 1 Finally close the web cover ...

Page 21: ... wet cotton towel and then dry with a clean dry towel Do not use benzene alcohol or strong cleaning chemicals on sauna NOTE Any chemicals that can damage the wood materials will damage the sauna and the protection layer that is on the wood Transportation and storage 1 Avoid exposure to rain snow or strong collisions during transport 2 Do not store in damp environments ...

Page 22: ...ides locate on the front and back panel Slide the bench all the way until it touches the side panel and is securely in place Front panel must be installed prior to installing bench heater panels and benches for 4 Person models Corner Model only 1 Place the bottom panel on the ground ...

Page 23: ... in place 4 Connect the side panels Left Right to the back panel using sliding hinges Each side panel has a white label to identify which side it is The panel with LEFT label should be placed on the left side when facing the sauna from the front The panel with RIGHT label should be placed on the right side when facing the sauna from the front 5 Install the right heater bench first by sliding it ov...

Page 24: ...in the front left corner right above the CD Player 2 Gently place the top panel onto the rest of the assembled panels When all corners are in place gently push down the top panel from the outside corners until it is snuggly fit over the rest of the panels 3 Make sure that the cables in the front left corners do not get pinched between the panels EXTERIOR LAMP SWITCH To enjoy the deluxe exterior la...

Page 25: ...24 Two persons model as the below one 3 persons model as the below one ...

Page 26: ...25 4 persons model as the below one 3 persons Corner model as the below one ...

Reviews: