background image

Step 5  Once the installation is completed, insert the tray back into the unit and firmly  
   

push the handle to lock it in place (Fig.2).

Step 6  Connect all cables to the corresponding jacks. Then connect the power cord.

Step 7  Enclosure hardware installation is complete. You can power on the unit and  
   

continue to Page 5 for the eSATA PCIe Card installation. 

Installing a Hard Drive in the Removable Tray Module:

After verifying that the product body and related accessories are not missing or damaged, 
please follow the steps below to install a hard drive in the removable tray module.

Step 1  Place the unit on a flat, stable surface. Make sure that the fan is not blocked and  
   

there is appropriate space for heat dissipation. (Do not place the product near  


water or any environment that may cause damage to the product).

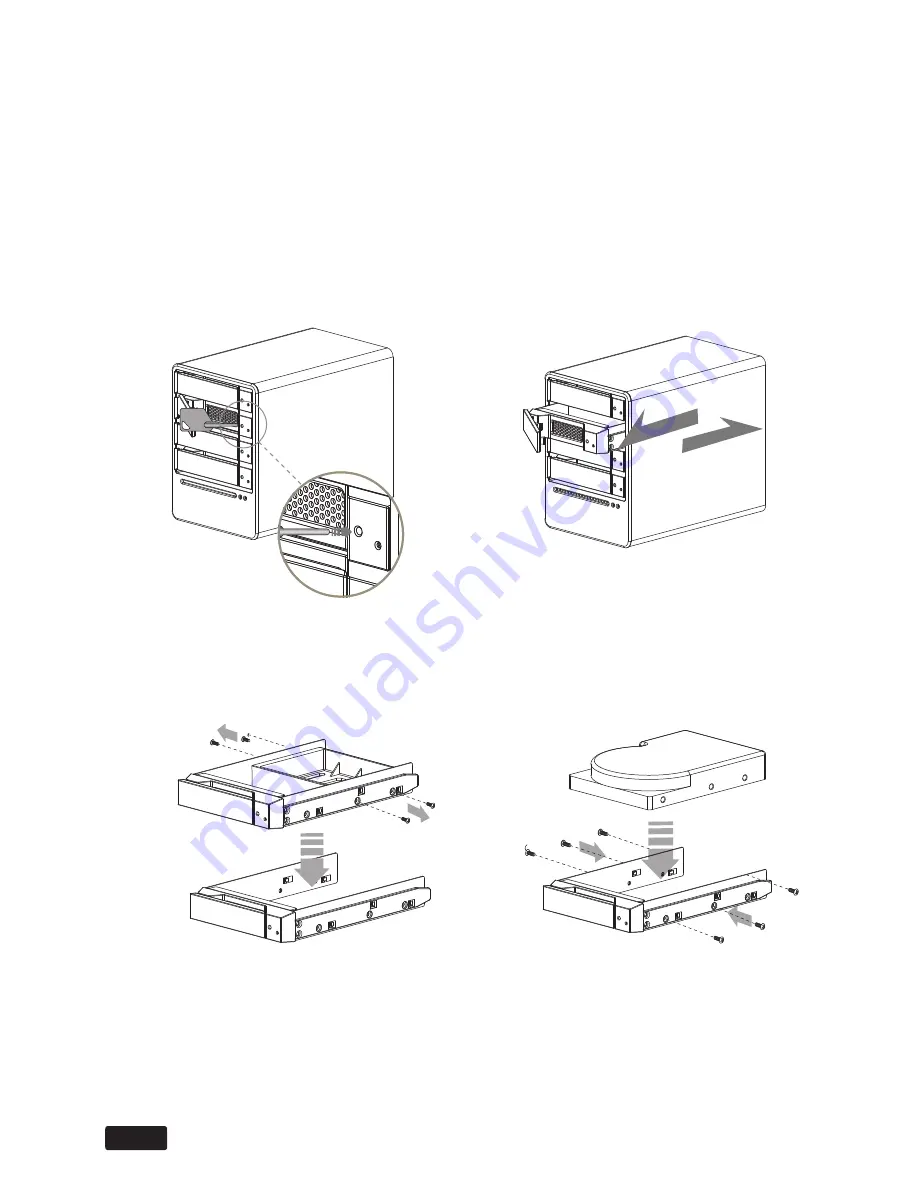
Step 2    Press the key (included with this unit) into the lock hole located at the front of the  
    

  unit (Fig.1).   Pull handle and remove tray (Fig.2).

Step 3    Unmount the plastic tray protector by removing the screws as illustrated (Fig.3).

Step 4    Fasten the Hard Drive with the screws (included with this unit) in the correspond 
   

  ing locations (Fig.4). Place the tray with the mounted HDD back into the case.

Fig.4

Fig.2

Fig.3

Fig.1

If you only need to install 1 to 3 hard disks, one hard disk must be inserted into HDD-1 location or the system will not work properly. 

Page 4

NOTE:

Summary of Contents for MobileStor MS4UM

Page 1: ......

Page 2: ... subject to change without prior notice Please refer to www sansdigital com for product specifications or the most recent information regarding Sans Digital products If you have any questions regarding Sans Digital products or need the latest product information user manual or firmware please contact us at 1 800 980 1988 or support sansdigital com and we will get back to you as soon as possible Al...

Page 3: ...llation 3 Installing a Hard Drive in the Removable Tray Module 4 USB Connection Support eSATA Port Multiplier Support 5 Windows System Installation 5 Mac System Installation 6 Connecting the MS4UM to your computer 6 Formatting the HD 7 Product Family 8 Page 2 ...

Page 4: ...s Included 1 1 1 2 4 1 1 1 QUCIK INSTALLATION MANUAL Hardware Installation MS4UM FRONT MS4UM BACK HDD Access LED will flash purple when data is accesed from the hard drive only when HD is installed otherwise it will remain blue Power LED will light blue when the power is on Fail LED will light red when the internal temperature is higher than 60 C or when the fan fails NOTE 3 5 Fan eSATA Port USB 2...

Page 5: ... 1 Place the unit on a flat stable surface Make sure that the fan is not blocked and there is appropriate space for heat dissipation Do not place the product near water or any environment that may cause damage to the product Step 2 Press the key included with this unit into the lock hole located at the front of the unit Fig 1 Pull handle and remove tray Fig 2 Step 3 Unmount the plastic tray protec...

Page 6: ... card installation is completed the SATA card will be ready for use Point the cursor to Mass Storage Controller right click and select Update Driver Step 2 For eSATA Port Multiplier Support Installing the PCIe Adapter Card to a Computer For USB Connection Support Please see Page 6 Connecting the MS4UM to your computer Fig 3 1 Insert the PCIe Card into an available PCIe slot on your computer Fig 3 ...

Page 7: ......

Page 8: ......

Page 9: ......

Reviews: