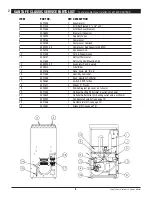
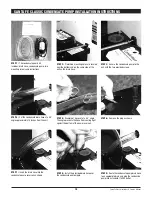
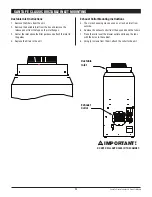
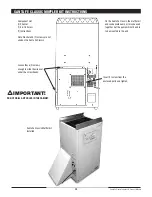
background image

1-800-533-7533

www.Santa-Fe-Products.com

Summary of Contents for Clasic 4029700

Page 1: ...llation operating and safety instructions warranty information and all ancillary products n Read and save these instructions For small usage 420l Lien Rd Madison WI 53704 TOLL FREE 1 800 533 7533 www...

Page 2: ...5 CFM 0 0 WG Power 700 watts 80 F and 60 RH Supply Voltage 115 volt 1 phase 60 Hz Current Draw 6 4 amps Operating Temp 56 F Min 95 F Max Sized for 2 500 Sq Ft Typical Minimum Performance at 80 F and 6...

Page 3: ...o the Santa Fe Classic room Third a slight negative pressure is created in the room with the Santa Fe Classic which could back draft open combustion devices located there If such devices are present c...

Page 4: ...ted If a warranty repair is required call the factory first at 1 800 533 7533 Ext 8459 for warranty claim authorization and technical assistance 5 2 Technical Description The Santa Fe Classic uses a r...

Page 5: ...connection in the compressor circuit Test each component for continuity see the appropriate section if a defect is suspected 3 Unplug the unit then disconnect the red and yellow wires from compressor...

Page 6: ...ternate method of removing moisture and non condensibles from the system requires evacuation to 29 Hg vacuum Then break the vacuum with 35 to 50 PSIG refrigerant vapor charge Leave the vapor charge in...

Page 7: ...6 Wiring Diagram SANTA FE CLASSIC WIRING DIAGRAM 7 Santa Fe Classic Installer s Owner s Manual Figure 2 Electrical Schematic of the Santa Fe Classic Dehumidifier...

Page 8: ...1 1 Defrost Thermostat 4021648 1 Defrost Control Mounting Clip 12 4033925 02 1 Evaporator Coil E Coated 13 4029510 1 Filter Drier 14 4021626 1 Hose Drain 56 ID x 8 15 4021469 1 Humidity Controller 16...

Page 9: ...o be used to connect to the remote dehumidistat through the connector 6 Disconnect the dehumidistat leads and reconnect with the new wires 7 Replace the wiring box and screws Replace the front cover a...

Page 10: ...are located near the bottom and on the same side of the unit as the drain hose STEP 5 Example of hose cut at a 45 angle The angle prevents the hose from sealing tight against the bottom of the pump re...

Page 11: ...des 4 Replace the filters in the unit Exhaust Collar Mounting Instructions 5 The six inch opening may be used as a fresh air inlet from outside 6 Remove the exhaust collar from the box and bend the ta...

Page 12: ...ed on the Santa Fe Classic Loosen these 2 screws enough to slide the silencer under the screw heads Insert 1 screw from the enclosed parts and tighten Santa Fe Classic Muffler Kit Installed On the San...

Page 13: ...er s Owner s Manual Instructions To prevent damaging the foam filter place it grid side up on top of the pleated filter and slide them both into the filter slot Foam filter with plastic grid up Pleate...

Page 14: ...ent that may be required by any codes laws or regulations that may become effective after initial purchase of the Product by Customer Customer Responsibilities As a further condition to obtaining warr...

Page 15: ...1 800 533 7533 www Santa Fe Products com...

Page 16: ...1 800 533 7533 www Santa Fe Products com...

Reviews: