background image


User manual SanStore-4EM / SanStore-8EM 

_________________________________________________________________________________ 


- 58 - 


8.2 Log list search, alarm, motion detection 


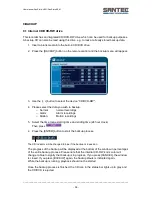
The logs can be used to search and review a point in time of the recorded data. Alarm, 
motion, video loss and system related logs can be searched and played back directly from 
the time of the incident.   


.


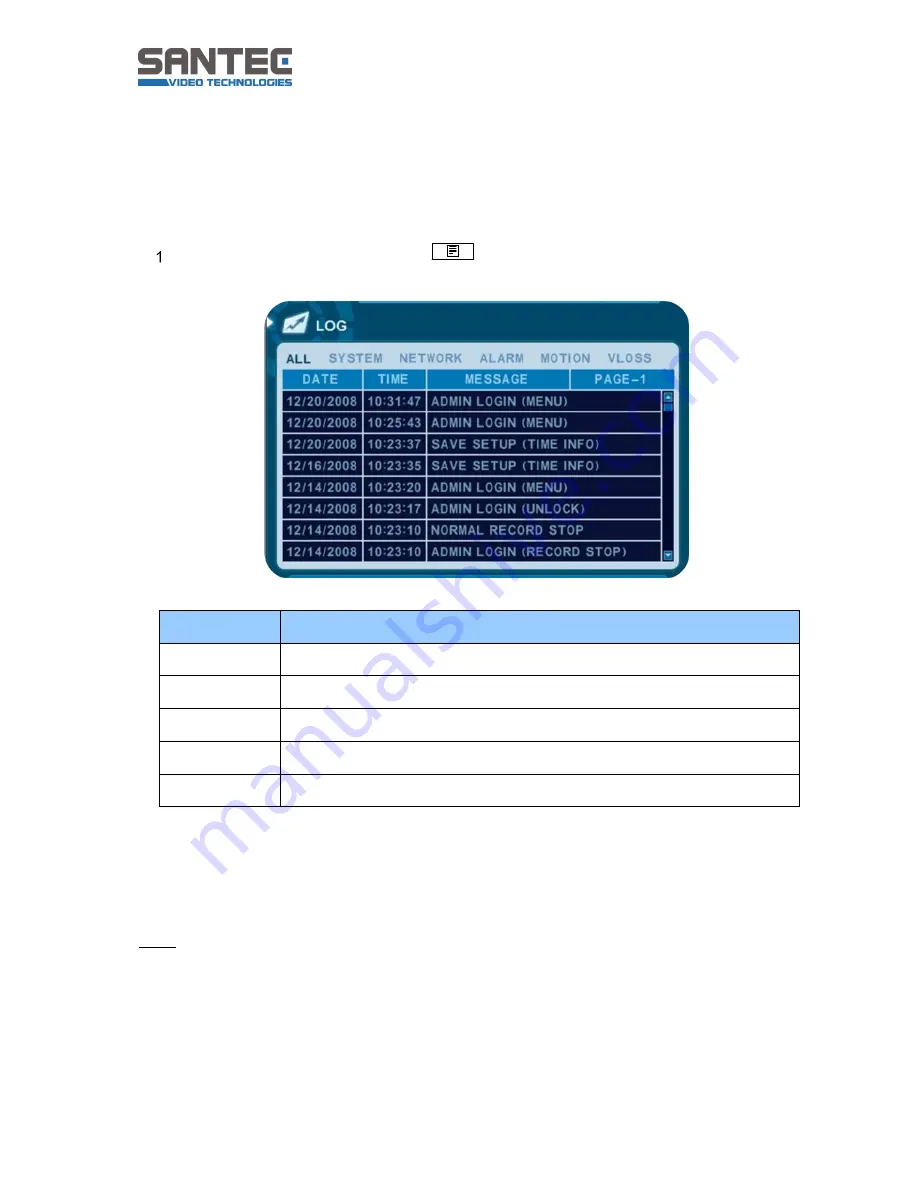
To start the event search, press the 

 [Log] button on the remote control. The log 

list menu pops up, as shown below. 


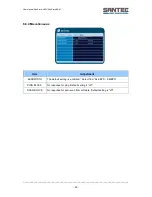
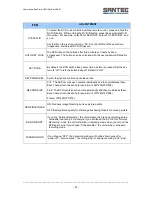
MENU TAP


CONDITION


ALL 

It has a list of all events since the initial power on of the DVR. 

SYSTEM 

It shows all events except for alarm, motion and video loss. 

ALARM 

It shows all alarm lists. 

MOTION 

It shows all motion lists. 

VIDEO LOSS 

It shows all video loss lists. 


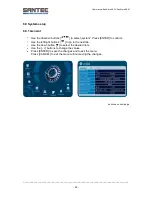
2. 

Use the up/down buttons [



] to 

go to “Time”. 

Use the left/right buttons [



] to move to the next page. 


3. Press the [ENTER]


button to start the playback.  


Note: 
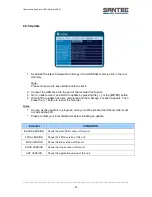
The log lists are saved on the HDD. 
You may also save the log lists on a USB stick. Stick it into the USB port and press the 
[MENU] button  


Summary of Contents for SanStore-4EM

Page 1: ...Version 1 1sfi 0511 engl A5 USER MANUAL SanStore digital video recorder Models SanStore 4EM SanStore 8EM...

Page 2: ...em or transmitted in any form or by any means electronic mechanical photocopying recording or otherwise without the written prior permission of Sanyo Video Vertrieb AG No reproduction of any part or e...

Page 3: ...rm sensor and power cord 15 3 2 HDD connection 16 3 3 PC system requirements for network connection 16 4 QUICK START 17 5 LIVE VIEWING 18 5 1 Display overview 18 5 2 Multi screen display and sequencin...

Page 4: ...ount 49 6 9 4 Disk 50 6 9 5 Update 51 6 9 6 Info 52 7 PAN TILT ZOOM PTZ CONTROL 53 7 1 PTZ menu 53 7 2 Preset and tour 54 7 3 Custom functions 54 7 4 PTZ camera model 55 8 SEARCH PLAYBACK 57 9 1 Time...

Page 5: ...scription of symbols Caution Danger to life In the text this sign symbolises life threatening voltages which may lead to damages to humans and to material Attention Important note In the text this sig...

Page 6: ...t circuit or fire Note This equipment has been tested and found to comply with the limits for a Class A digital device pursuant to part 15 of the FCC Rules These limits are designed to provide reasona...

Page 7: ...d on the nameplate Please consult your electrician if you are unsure whether the power supply on site is appropriate Only use the supplied power cables or power adapters or the specified recommended p...

Page 8: ...Attention Attrition of mechanical parts We explicitely point out that any type of recording device no matter if it is an analogue or digital device is subject to natural attrition Every recording dev...

Page 9: ...roducts mentioned in this publication are trademarks registered trademarks or brands of the respective company They are not connected in any way with SANYO VIDEO Vertrieb AG Proprietary rights are wit...

Page 10: ...y of the alert icons on the corner of the screen AL VL and PL This button is also used to turn off the alarm buzzer Still or Playback This button is used to still or 1 x playback during playback mode...

Page 11: ...lay Press this button to display the cameras in multi screen mode 4 Channel Numeric Buttons These buttons have a number of functions to enter data and to make selections They are used to enter numeric...

Page 12: ...ctors 2 Spot out connector 3 Composite Monitor Output BNC standard composite video output connector 4 AUDIO Input Output connectors RCA 5 VGA out connector 6 RJ 45 Ethernet Port Lan For connecting to...

Page 13: ...______________________ 13 2 3 Remote control Note Ext search is not supported by this model STOP PLAY BACK UP DVR ID MENU LOG FAST FORWARD DISPLAY MODE SCHEDULE REC ON OFF ENTER INFORMATION CANCEL OSD...

Page 14: ...DVR provides a virtual on screen keyboard to perform the control by mouse Connect a mouse via USB port before use If you click right button of your mouse in live mode and playback mode you will see f...

Page 15: ...____________________________________________ 15 3 INSTALLATION AND CONNECTIONS 3 1 Camera monitor microphone alarm sensor and power cord Up to 4 cameras CAMERA 1 MIC SENSOR PAN TILT CAMERA PC MONITOR...

Page 16: ...network connection Intel DualCore 2 2 GHz 2 GB RAM 256 MB memory DirectX 9 compatible Monitor XGA resolution 1024 x 768 100 Mbit sec network card 50 MB HDD for installation Windows Vista Home Basic 3...

Page 17: ...t 30 seconds Before starting the quick setup make sure to stop all recordings While the DVR is recording the time and recording menu are not active When prompted for a password enter it using the nume...

Page 18: ...r the CLR button on the remote control to hide the video loss indicator Status bar 1 Indicates that the built in Cd RW is connected It changes to blue while in backup mode 2 Indicates that a USB devic...

Page 19: ...the multiscreen display It changes the order as defined in the SPLIT MODE If you are in 16 screen display press the DISPLAY button for 1 second to begin full screen sequencing The sequence mode and d...

Page 20: ...e eight channel view mode will be displayed Note 4 6 8 10 13 split mode must be checked on Spit mode to use this function 2 Repositioning It is possible to reposition the camera from the bigger window...

Page 21: ...ew of the screen Procedure To activate the digital zoom select the full screen display of the camera you wish to zoom Then press the ZOOM button on remote control A zoom area box pops up Move the box...

Page 22: ...enables the user to monitor specific channels independently from the main monitor Procedure Press the SPOT button on the remote control and then the numeric button of the camera you wish to see in ful...

Page 23: ...keys on the recorder front panel default factory password 000000 Once the correct password is entered the main menu appears Note The factory default password is 000000 It is recommended to change the...

Page 24: ...r hide to define whether the below status bar should be displayed on the main monitor or not CAMERA Select on screen display information for the camera number and title BORDER LINE Select the colour o...

Page 25: ...25 6 2 2 Sequential setup auto sequence Item Default Description DWELL TIME 5 sec Select the dwell time for each camera or how long the multi screen mode should be displayed Use the buttons 1 30 sec S...

Page 26: ...Screen saver ITEM DEFAULT ADJUSTMENT USE OFF if you want to use Screen Saver function set it to ON TIME 00 00 00 00 Set the beginning time and ending time for the screen saver function for today WAIT...

Page 27: ...are viewable after changing the setting to NO BRIGHTNESS 50 The brightness of each camera can be adjusted by pressing the buttons CONTRAST 50 The contrast of each camera can be adjusted by pressing th...

Page 28: ...___________________________________ 28 Enter letters via the numeric buttons of the remote control No 1x press 2x press 3x press No 1x press 2x press 3x press 1 A B 1 9 Q R 9 2 C D 2 10 0 S T 10 3 E F...

Page 29: ...e direction buttons to select the MOTION menu Then press the ENTER button to display MOTION 2 Use the left right buttons or the numeric buttons to select the camera you wish to configure 3 Use the dow...

Page 30: ...tivity MOTION GRID Use this menu to setup zones for the motion detection The screen shown below will overlay the current video image It is divided into 16 grids and selected by the numeric buttons on...

Page 31: ...rding to the configured recording quality and the frame rate when a motion is detected It will be back to stand by mode after the motion recording time has ended The camera does not record under norma...

Page 32: ...he buttons to change the values ITEM ADJUSTMENT USE Enable or disable the recording per camera QUALITY Specify the picture quality for each camera ULTRA SUPER HIGH MIDDLE LOW RATE Select the recording...

Page 33: ...the remote control or press REC again at the recorder front panel Note The estimated recording time varies due to picture quality and capture rate and is updated every 10 seconds due to variation of...

Page 34: ...cord Setup 2 Use the left right buttons to select a tab menu 3 Use the direction buttons to select the camera you wish to configure 4 Use the button to change the value ITEM ADJUSTMENT USE Enable or d...

Page 35: ...an alarm is triggered The buzzer will sound for the duration of the recording time OFF Disables the alarm buzzer function Note Press the button to stop the buzzer immediately Stopping the buzzer doesn...

Page 36: ...rding mode 1 4 Example 1 RECORD Alarm Resulting Actions Normal Motion USE Normal OFF OFF ON ON Press the REC button to start the alarm recording according to the set configurations recording quality s...

Page 37: ...th super picture quality at 15fps with audio It will be back to normal recording after the alarm recording duration time has ended Example 3 RECORD Alarm Resulting Actions Normal Motion USE Normal ON...

Page 38: ...rection buttons to select schedule Press the ENTER button to confirm Use the left right buttons to go to the next tab Use the down button to select the day you wish to configure The days of the week a...

Page 39: ...to set 2 days Example DAY BEGIN END MODE MON 18 00 23 59 MODE 1 TUE 00 00 08 59 MODE 1 The recording doesn t work if the end time is before or identical to the start time DAY BEGIN END MODE MON 18 00...

Page 40: ...MOTION USE Normal Mode 1 4 MODE 1 4 CAMERA USE Continuous RECORD ON OFF OFF OFF OFF OFF Motion RECORD ON ON OFF OFF OFF OFF Alarm ALARM OFF OFF ON ON OFF OFF Schedule SCHEDULE OFF OFF OFF OFF OFF ON...

Page 41: ...to configure the DVR for the networking purposes 6 8 1 IP settings Procedure Use the direction buttons to select network Press ENTER to confirm Use the down button to select an item Use the buttons t...

Page 42: ...anual SanStore 4EM SanStore 8EM _________________________________________________________________________________ 42 How to connect the recorder to the network using DHCP Dynamic IP Router Recorder Re...

Page 43: ...ng is supported by the manufacturer You do not need to set up a SMTP server SMTP Select the mail server In the following line define the SMTP server SMTP SERVER Select the SMTP server and then press t...

Page 44: ...______________________ 44 6 8 3 DDNS ITEM ADJUSTMENT USE OFF No use of DDNS DEFAULT Not supported DYNDNS For use of Dyndns com domain DOMAIN NAME Enter the domain name if you use Dyndns USER ID Enter...

Page 45: ...________________________________________ 45 6 8 4 Miscellaneous Item Adjustment BANDWIDTH The default setting is unlimited Select from 64 KBPS 8 MBPS PING BLOCK No response for ping Default setting is...

Page 46: ...9 1 General Use the direction buttons to select system Press ENTER to confirm Use the left right buttons to go to the next tab Use the down button to select the desired item Use the buttons to change...

Page 47: ...is ON KEYPAD MODEL Select the joystick control and the Baud rate RECORD SIZE CIF The DVR records each camera individually and then multiplexes them Each channel records at a field resolution of 360 24...

Page 48: ...via network one of the DVRs or PC may be set as the master clock This unit will control the date and time for all of the other units ON It is set as the slave clock OFF Default it is set as the maste...

Page 49: ...then set the activation level to on or off When enabled it will be possible to check the user settings on an individual basis Monitoring playback backup network configuration main menu setup shutdown...

Page 50: ...n and the progress will be displayed at the bottom of the window Please note that it takes 10 30 seconds to format a HDD 5 When the formatting is finished it will display SUCCESS at the bottom of the...

Page 51: ...sing the or the ENTER button 4 Wail until the update has been completed and the message success appears Then press the button to reboot the recorder Notes As long as the update is in progress no keys...

Page 52: ...t entries can be made here Indicator CONDITION MODEL Displays the channel number and data compression HOSTNAME Displays the hostname and Mac address LANGUAGE Displays the language of this unit NETWORK...

Page 53: ...ress the PTZ button The following window pops up INDICATOR RESULTING ACTIONS ENTER Button Press this button to display the help menu Press the ENTER utton again or the CANCEL button to cancel the help...

Page 54: ...m 1 will illuminate d Set the number for the preset position e Press the Enter button to save the presets and to exit the menu Go to the preset position Press the INFO button on remote the control a P...

Page 55: ...o 9 LG LPT A100L P T Z o 10 HONEYWELL GCC 655N 11 WONWOO PT 101 o 12 14 PELCO D 2400 9600 o o o o o o o o 15 C B TECH AN200 o o o 16 CANON VC C4 o o o 17 19 PELCO P 2400 9600 o o o o o o o o 20 22 PE...

Page 56: ...________________________________________________________________________ 56 Note The pan tilt speed can be set from 0 8 1 slow 8 fast If the speed is set to 0 and you press and hold the button the spe...

Page 57: ...splayed Use the left right button to enter the month year display Note If there are not stored recordings in the previous or the next month they will not be displayed either The recording date is colo...

Page 58: ...tton on the remote control The log list menu pops up as shown below MENU TAP CONDITION ALL It has a list of all events since the initial power on of the DVR SYSTEM It shows all events except for alarm...

Page 59: ...normal recordings o Alarm Alarm recordings o Motion Motion recordings 5 Select the time range starting time and ending time 24 hour clock Then press 6 Press the ENTER button to start the backup proce...

Page 60: ...sert a new CD DVD the process is continued Note During backup there should be no recording running The playback software will simply auto run and does not require the installation of software on you P...

Page 61: ...61 9 3 Backup range setup It is possible to run a backup over a specific time range Go to the time search chart menu Press the button to set the backup start time Press the button to set the end The s...

Page 62: ...er channel Recording mode Manual schedule alarm motion Recording method 5 levels of compression rate record frame rate adjustment Recording adjustments Pre Alarm 3 sec Post Alarm 10 sec 300 sec Motion...

Page 63: ...User manual SanStore 4EM SanStore 8EM _________________________________________________________________________________ 63 NOTES...

Page 64: ...__________________________________________________________________________ www santec video com Your local distributor...

Reviews: