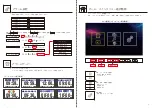
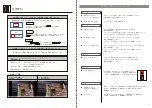
background image

33

34

Selecting [Video]

Playing video

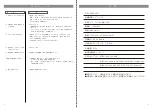
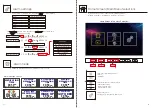
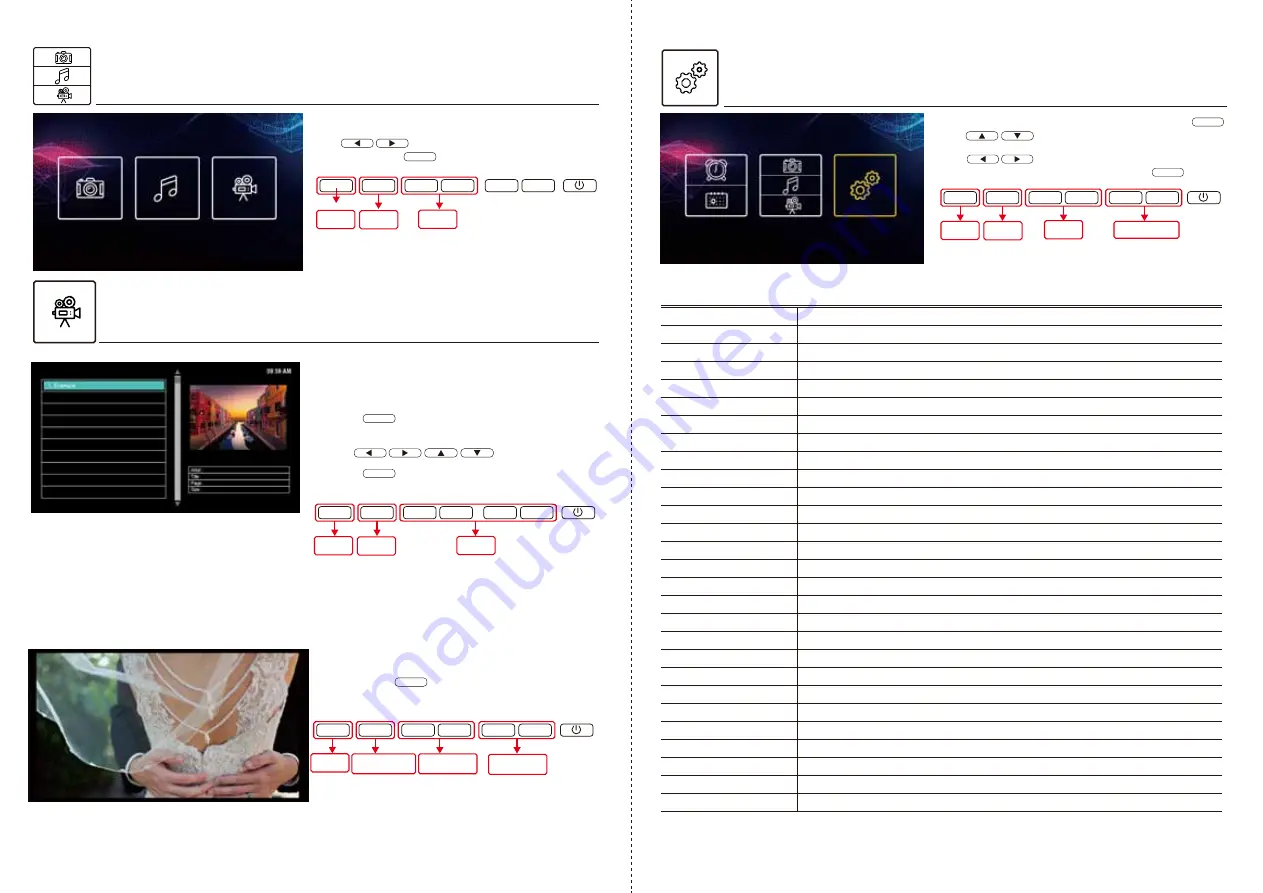
Selecting in Setting Menu

Slect Setting Icon in Home Screen then press 
Use                     to select settings.
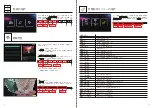
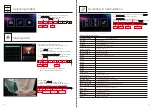
Language Setting          

Select display language

Set Time              

Set current time

Format          

Set time format (12 hours /24 hours)

Set Date              

Set Year/Month/Date

Display Format        

Set sequence of Year/Month/Date

Volume Setting       

Set music volume (0-10)

Auto Power On           

Set auto power-on time

Auto Power Off           

Set auto power-off time

Alarm1                  

Set alarm time, frequency, messages

Alarm2
Alarm3
Alarm4
Alarm5
Alarm6
Alarm7
Alarm8
Alarm Sound         

Set alarm sound

Alarm Volume          

Set alarm volume (0-10)

Background Color      

Set background color (white/ black)

Auto Dimming            

Set to auto-adjust brightness in preset time

Brightness Setting            

Set brightness (1-10)

Photo Size Setting            

Set display photo size(original/ automatic adjustment)

Auto Slideshow Setting     

Set slide show frequency

Video Size              

Set video size (original/ auto-adjustment)

Video Repeat               

Select video repeat setting

BGM                          

Set BGM (ON/OFF)

Music Repeat                  

Select music repeat settings

Reset                           

Reset to factory setting

OK

OK

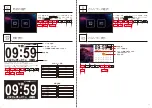
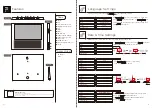
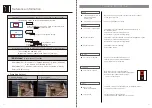
① Insert SD card/ USB memory stick.
② Press           button 
    and then available videos will show as in photo.

OK

OK

OK

Play videos (in supported format) 

from loaded SD card and USB memory stick.

※ HD/ FHD resolution are not supported, 
  adjust video resolution before use.

During video play
※ When press           , video will stop.
※ When video is being played, even BGM mode
    is on, background music will not be played.

③ Use                                          to select video.

④ Press           button and then video will play.

Select display language

OK

MENU

OK

MENU

Detail Select

OK

MENU

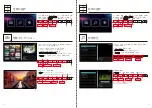
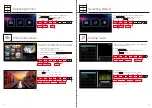
After entering [Photo]/ [Music]/ [Video] menu, 
use                      to choose [Video] icon 
and then press            to confirm.

OK

OK

MENU

Return

(Cancel)

Confirm

Return

(Cancel)

Confirm

Select

Select

Return

(Cancel)

Select

Enter

Adjust 

Video Volume

Select Video

Return

(Cancel)

.

Use                     to select options 
for corresponding settings, then press          to confirm.

Resume/Stop

()

Summary of Contents for SACO700

Page 1: ...ome Screen Main Menu Selection Selecting Clock Clock features Selecting Calendar Calendar featrues Selecting Photo Photo slide shows Selecting Music Playing music Selecting Playing Video Selecting in...

Page 2: ...1 2 AC OA AC AC AC AC DC AC Q A AC AC AC AC AC...

Page 3: ...3 4 AC SD SD AC AC AC AC AC AC PVC AC AC 15 AC...

Page 4: ...5 6 OK OK ON OFF 00 00 ON OFF ON OFF 2020 01 01 ON OFF ON OFF 12 24 OK OK MENU OK OK SD USB USB AC AC OK 00 00 09 00 09 30 OK OK 0000 00 00 OK 2020 00 00 2020 01 00 2020 01 01 OK...

Page 5: ...GM OK OK MENU 00 00 ON 00 00 ON 00 00 ON 00 00 ON 00 00 ON ON OFF 1 09 59 09 59 12 00 09 00 2020 01 01 09 30 08 00 10 00 2020 01 01 6 09 00 2020 01 01 2020 01 01 2020 01 01 2020 01 01 2020 01 01 2020...

Page 6: ...9 10 AM PM 24 6 BGM ALARM 10 00 09 59 1 1 2020 01 01 ALARM 10 00 09 59 2020 01 01 OK OK BGM OK MENU OK MENU OK MENU BGM OK MENU...

Page 7: ...11 12 OK OK OK SD USB SD USB OK SD USB OK OK OK MENU OK MENU OK MENU OK MENU OK MENU OK MENU BGM BGM 9P USB...

Page 8: ...13 14 OK 12 24 ON OFF BGM BGM OK SD SD OK OK OK SD USB HD FHD BGM OK MENU OK MENU OK MENU OK MENU...

Page 9: ...15 16 ON ON OFF OFF 12 00 BGM BGM BGM STEP 1 SD SD ON SD SD USB USB WVGA 800x480 VGA 640x480 SD SD SD STEP 3 OK STEP 2 9 USB USB...

Page 10: ...P3 mp3 AAC m4a PCM wav P18 A P15 A SD SD Class2 SDHC A A OFF Q A 7 00am 20 59pm 21 00pm 6 59am A SAC0700 TFT LCD IPS 1024x600 280 cd 100 240V 50 60Hz 0 5 MAX DC 5V 3A MIN 178 151 13 5 mm 270g 0 40 JPE...

Page 11: ...19 20 1 2 3 4 5 650 0004 1 16 www santekshop jp s shop santekshop jp...

Page 12: ...Instruction Manual Please read this instruction manual carefully before use and use it properly Please pay special attention to Safety Precautions in P1 to P4...

Page 13: ...suffer minor injury or physical damage if handled incorrectly Setting Storage Location Use Environment Warning AC Adapter Outlet Socket Connector S a f e t y P r e c a u t i o n s Do not use other AC...

Page 14: ...ion Attention Setting Storage Location Use Environment S a f e t y P r e c a u t i o n s Do not use the plug when it is damaged or the outlet is loose Do not cover the product or AC adapter with cloth...

Page 15: ...ower On Auto Power Off Date 2020 01 01 Language Time Time Format Date Date Format Volume Auto Power On Auto Power Off Date format Language Time Time Format Date Date Format Volume Auto Power On Auto P...

Page 16: ...0 ON Daily MESSAGE 00 00 ON Daily MESSAGE ON OFF Weekday Daily Once Weekend MESSAGE Regarding time date setting please refer to P 6 09 00 Reset Medication time Morning medication time Afternoon medica...

Page 17: ...ndar icon and then press to con rm OK Calendar features OK OK MENU Adjust Music Volume OK MENU OK MENU BGM mode setting Background Color setting Select Month OK MENU Default picture Cannot be changed...

Page 18: ...in with Press and then slide show will start OK Play songs in supported format from loaded SD card USB memory stick OK Playing music During slide show OK OK MENU OK MENU OK MENU Resume Stop Slide Show...

Page 19: ...lide show frequency Video Size Set video size original auto adjustment Video Repeat Select video repeat setting BGM Set BGM ON OFF Music Repeat Select music repeat settings Reset Reset to factory sett...

Page 20: ...o Cannot play music SD card not recognized Blank Screen Buttons stop working System error Power Display SD Card USB is not recognized USB Port Other Make sure the plug is plugged into the outlet Press...

Page 21: ...not recognized even if inserted correctly the product or media may be defective Support Status SD Speed Class class2 SDHC A Check the Auto Power OFF setting Q Is it radio controlled clock A Make sure...

Page 22: ...s warranty does not apply to products damaged by misuse accident or normal wear and tear Please contact San Technology Customer Support for further assistance Disposal The separate collection and recy...

Reviews: