background image

SANTOS: Instruction and Maintenance Manual   


98112 EN 2.2 - 05 2014  

 9 / 16 

www.santos.fr


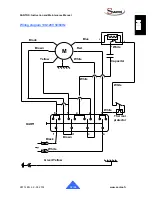
If servicing is necessary to replace any parts such as the electrical components, seals or 

any others, refer to the list of components (see the exploded view at the end of the 

manual).  

note: gearbox (the worm and wheel must be replaced at the same time. You are advised 

to also replace the seals of the reducing gear).  


For 

all spare part orders

 (see references in the exploded view at the end of the manual), 

state: 


the


type,  


the machine serial number and 


the electrical specifications 

recorded under the machine. 
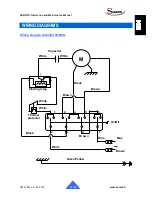


FAULT FINDING 


Carefully determine the reason for the appliance stopping. 


The appliance will not start: 

  Check: the mains power supply and the condition of the power supply cord (12). 

  Check the condition of the capacitor. 

  Check the condition of the starting relay. 

  Check that the thermal protective device has not tripped due to an overload (Fig. 8). 


If the problem persists, switch off the power supply to the appliance (unplug the cord from 

the mains socket (12)) and call in the maintenance service or contact a SANTOS-approved 

dealer. 


The appliance does not grind the meat properly: 

  Check the state of wear of the disc and blade. 

  Check the blade is in the correct position on the feed screw (the sharp part of the 

blade must be the disc end). 


The appliance stops because of an overload:  


1.  In the event of the motor blocking, switch the on/off switch (14) to 

« reverse 

operation » “R” to overcome the blocking

, if after a few attempts the blocking 

persists, switch the on/off switch (14) to the stop position 

« 0 »

, then unplug the 

power supply cord from its socket (12). Take down the body of the mincer and 

clean. 

2.  The motor is protected by a thermal overload ampere metric device underneath the 

appliance. In the event of an overload, this circuit-breaker trips, stops the motor and 

cuts out the electrical power supply.  

It must be reset manually to be able to start up again (Fig. 8). 


Summary of Contents for 12-12

Page 1: ...mixers Cheese graters Ice crushers Mincers Vegetable slicers Dough mixer Moulins caf Presse fruits Mixers Blenders Distributeurs de boissons Batteurs m langeurs P trin R pes fromage Broyeurs gla ons H...

Page 2: ...ING THE PRODUCT AT THE END OF ITS SERVICE LIFE 5 DESCRIPTION OF THE APPLIANCE 6 USING THE MACHINE 7 USING FOR THE 1ST TIME 7 Preparation and use 7 STOPPING THE APPLIANCE 7 DISMANTLING AFTER USE 8 CLEA...

Page 3: ...th the essential requirements of the above mentioned directives NF EN 12331 A1 2010 Machines for food products Mincers Safety and hygiene regulations This European standard is a type C standard as def...

Page 4: ...tervention on it cleaning general care maintenance 9 It is forbidden to operate the appliance on a surface with a slope in excess of 10 with respect to the horizontal plane The feet of the machine mus...

Page 5: ...connecting the power cable plug to your mains electric power socket PREPARING THE APPLIANCE FOR USE FOR THE 1st TIME Fig A Carefully clean the parts in contact with the food Fig 2 The body of the minc...

Page 6: ...upplied with 3 stainless still discs 62 mm drilled with the following holes 3 4 5 and 8 mm 1 stainless steel self sharpening blade The following is available as an option a set made up of three sausag...

Page 7: ...f the motor 8 and tighten the locking screw 2 Fig 5 Fig 6 6 Fit the meat pan 10 centred in the insertion chute of the body of the mincer 1 and applied against the stops 13 Fig 7 7 Prepare the products...

Page 8: ...Fig 2 CLEANING IMPORTANT Stop the appliance and unplug the power supply cable Cleaning in a jet of water or a high pressure spray is prohibited The motor unit 9 must not be immersed in water You are a...

Page 9: ...protective device has not tripped due to an overload Fig 8 If the problem persists switch off the power supply to the appliance unplug the cord from the mains socket 12 and call in the maintenance ser...

Page 10: ...218 wide x 306 long Dimensions of Discs used mm 62 70 Weight Net weight kg 17 19 Packaged weight kg 18 20 Noise 2 dBA 63 63 1 These ratings are provided as a rough guide The exact electrical specific...

Page 11: ...EN 2 2 05 2014 11 16 www santos fr WIRING DIAGRAMS Wiring diagram 220 240V 50 60Hz 4 3 2 Starting relay Brown On Off White White Black Brown Capacitor c Thermal protector Black Green Yellow White Whit...

Page 12: ...ce Manual 98112 EN 2 2 05 2014 12 16 www santos fr Wiring diagram 100 120V 50 60Hz On Off White Black Brown Thermal protector Green Yellow 4 White White 4 3 2 Blue White Capacitor M Yellow White Black...

Page 13: ...SANTOS Instruction and Maintenance Manual 98112 EN 2 2 05 2014 13 16 www santos fr FIGURES Figure 1 14 12 Figure 2 1 7 3 4 5 6 Figure 3 7 3 1...

Page 14: ...SANTOS Instruction and Maintenance Manual 98112 EN 2 2 05 2014 14 16 www santos fr Figure 6 2 Figure 4 b 15 Figure 4 a 15 5 1 Figure 5 8...

Page 15: ...SANTOS Instruction and Maintenance Manual 98112 EN 2 2 05 2014 15 16 www santos fr Figure 7 11 2 13 10 1 9 Figure 8...

Page 16: ...a duplicate exists in the conformity statement serial number manufacturing date electrical characteristics In case of serious damage judged repairable only in our workshops and after prior consent fro...

Reviews: