background image

SANTOS: User and maintenance manual


98162 EN 1.5 - 02 2014 

 17 / 23 

www.santos.fr


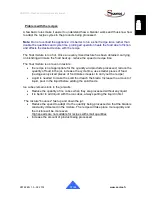
Problem with the recipes  


A few basic rules make it easier to understand how a blender works and thus know how 

to adapt the recipe cycles to the products being processed. 


Note:

 Do not overload the appliance: it is better to run a short recipe twice rather than 

double the quantities and cycle time: prolonged operation heats the food due to friction 

and affects the desired texture with the recipe.   


The final mixture is too hot. Once an evenly mixed texture has been obtained, carrying 

on blending will make the food heat up: 

reduce the speed or recipe time.


The final mixture is not even in texture:  

  the recipe is not appropriate for the quantity and products processed; reduce the 

quantity of food in the jar, increase the cycle time, use smaller pieces of food 

(having evenly sized pieces of food makes it easier to carry out the recipe).  

  Liquid is needed to make the solid food reach the blade. Increase the amount of 

liquid, pour in the liquid before adding the solid foods.  


Ice cubes remain stuck to the jar walls: 

  Reduce the quantity of ice cubes when they are processed without any liquid 

  It is better to add liquid with the ice cubes, always putting the liquid in first.  


 The mixture "bounces" fast up and down the jar: 

  Reduce the speed to adapt it to the quantity being processed so that the blade is 

constantly immersed in the mixture. The recipe will take place more quickly and 

the mixture will be more even.  

High speeds are not suitable for recipes with small quantities 

  Increase the amount of product being processed.  


Summary of Contents for BRUSHLESS BLENDER 62

Page 1: ... use before unpacking the appliance Coffee grinders Fruit squeezers Mixers Blenders Drinks dispensers Mixer beaters Dough mixer Cheese graters Ice crushers Mincers Vegetable cutters INTERNATIONALLY PATENTED MODELS SANTOS SAS 140 150 AVENUE ROGER SALENGRO 69120 VAULX EN VELIN LYON FRANCE TÉL 33 0 472 37 35 29 FAX 33 0 478 26 58 21 E Mail santos santos fr www santos fr BRUSHLESS BLENDER N 62 ...

Page 2: ...stom recipes 10 CLEANING 11 Cleaning the jar 11 Sanitizing the jar 11 HOOD SAFETY FEATURE 12 Modifying the safety mode connected with the hood lid 12 MAINTENANCE 12 Spare parts 12 Changing the drive system 12 Changing the blade 13 FAULT FINDING 15 The appliance will not start 15 The blade does not rotate 16 The appliance stops as a result of an overload 16 The appliance stops further to an overloa...

Page 3: ...quirements of the above mentioned directives NF EN 12852 A1 2010 Food processing machinery Food preparation equipment and blenders Safety and hygiene requirements This European standard is a type C standard as defined in EN ISO 12100 When the provisions of this type C standard differ from those stated in the type A or B standards the provisions of the type C standard override the provisions of the...

Page 4: ...NTOS company or by similarly qualified persons in order to avoid a hazard 9 The appliance must be unplugged before any intervention on it cleaning general care maintenance 10 Use a hose nor a pressure hose for cleaning this is forbidden 11 Use an abrasive sponge to clean the plastic jar 1 12 Insert or store kitchen utensils in the jar 13 Operate the appliance if the jar or a blade is chipped crack...

Page 5: ...ue is shown either on the identification plate under the appliance or on the identification plate on the last page of this manual TAKE CARE Check that the on off switch 4 is in position 0 Off before plugging the power cord in to the mains power socket 1st TIME USE Thoroughly clean all parts in contact with the food jar 1 lid 2 See the cleaning chapter RECYCLING THE PRODUCT AT THE END OF ITS SERVIC...

Page 6: ...sists of a blender jar a motor base fitted with an On Off switch an electronic module a control panel and a sound proofing hood Some thirty recipes show how to prepare most of the desired preparations The appliance has a USB Host connection allowing 6 custom recipes to be updated along with the appliance s Firmware INSTALLATION AND HANDLING Check that the power outlet plug is always easily accessi...

Page 7: ...ree space above must measure at least 495mm The minimum clearance to the rear must be 102mm distance between the cut out and the wall The minimum clearance sideways must be 30mm Multiple cut outs It is recommended to leave a distance of 100mm between 2 cut outs Adapting the appliance to use it as a built in version Disconnect the appliance from the mains Remove the jar 1 and hood lid 8 Tip the app...

Page 8: ...heck it is correctly positioned 4 Make sure the motor is turned off then install the jar on the jar mat 9 5 Close the sound proofing hood by lowering the lid 8 The LCD screen should show READY 6 Press one of the 6 keys 23 to start the cycle for the corresponding recipe 7 The lamp for the key activated will remain lit while the cycle is in progress 8 Wait for the cycle to end Stopping the appliance...

Page 9: ...most recipes usually needed to be carried out Coffee shop menu which is more suited to coffee shops Juice bar menu which is more suited to juice bars Note Each menu has 6 recipes A recipe consists of several sequences speed time here is an example of a recipe Selecting a pre recorded menu The menus are selected using the following key combinations Universal menu press the following keys in quick s...

Page 10: ... the following sequence 3 1 P Select the key to be programmed Press key n 2 Enter the code for the desired recipe see the table of 30 pre recorded recipes Type code 34 on the keys Press key 1 to validate or one of the other keys to cancel Once the custom menu has been set up the standard menus can be activated using the appropriate code without deleting the custom menu Use the code 2 5 4 to reacti...

Page 11: ...g scraps of food to dry The motor surround 6 can be cleaned using a soft wet sponge Cleaning the jar Note Although the jar and lid can be washed in a dishwasher it is recommended not to do so in order to make them last longer 1 Empty the contents out of the jar and rinse with running water to remove as must solid residue as possible 2 Fill the jar with 600 ml warm water 40 to 45 C add 2 drops of h...

Page 12: ...hing from one mode to the other MAINTENANCE Prior to carrying out any intervention on the appliance it must be disconnected from the mains without fail Spare parts This appliance requires no specific maintenance The bearings are lubricated for life If any intervention is necessary to replace parts subject to wear such as the bearing blade electrical or other components please refer to the parts li...

Page 13: ... see previous section Dismantling the blade Hold the blade coupling 24 in position with multiple slip joint pliers and unscrew the fixing nut 13 using a size 12 hexagon wrench anticlockwise Fitting the blade Take care to comply with the order given for assembly of the various components 1 lipped seal 15 be sure to install correctly with lip downwards 2 thrust washer 14 3 blade 11 recesses upwards ...

Page 14: ...ng the bearing on the jar Place the bearing seal 16 on the bearing 12 Place the locking ring seal 18 on the locking ring 17 Place the bearing 12 inside the jar 1 Screw down the locking ring take care that the locking ring seal remains in its seating Tighten well by hand or with a lever ...

Page 15: ...load Switch the appliance off then on again After powering up the 6 key diodes should light up quickly and the screen display READY If not check on the condition of the wiring and connections in the switch 4 the component support module and the control panel this operation must be carried out by a qualified person The LCD screen shows NOT READY This message indicates that one of the keys was alrea...

Page 16: ...urn off the electric power supply unplug the mains power cord 10 Move the On Off switch 4 to the 0 position Under the appliance fig O press the button 25 to reset the excess current protection If the button does not remain in the reset position allow the appliance to cool down before repeating the operation The appliance stops further to an overload OVERLOAD A motor overload can occur if there is ...

Page 17: ...opriate for the quantity and products processed reduce the quantity of food in the jar increase the cycle time use smaller pieces of food having evenly sized pieces of food makes it easier to carry out the recipe Liquid is needed to make the solid food reach the blade Increase the amount of liquid pour in the liquid before adding the solid foods Ice cubes remain stuck to the jar walls Reduce the q...

Page 18: ...tor overheating safety feature Yes Excess voltage safety feature Yes Intermittent operation 60 seconds on and 60 seconds off Dimensions Height mm 441 Width mm 201 Depth mm 247 Weight Net weight kg 8 3 Weight including packing kg 9 8 Noise 2 LpA uncertainty K pA 2 5dB dBA 73 1 These ratings are given for your guidance The exact electrical specifications of your appliance can be found on the rating ...

Page 19: ...iring diagram 110 120V 50 60Hz and 220 240V 50 60Hz Ammeter protection Black Black Motor White White Green yellow Black White Black Control panel LCD Bundle Keys Electronic card 2 4 5 1 On Off Red Green yellow Blue Brown N G L Blanc Fan option P9 P2 Black Th option Motor filter ...

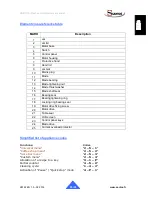
Page 20: ...eaning cycle 1 4 2 Activation of Pause Quick stop mode 4 P 1 MARK Description 1 Jar 2 Jar lid 3 Motor base 4 Switch 5 Control panel 6 Motor housing 7 Protective hood 8 Hood lid 9 Jar mat 10 Mains plug 11 Blade 12 Blade bearing 13 Blade tightening nut 14 Blade thrust washer 15 Blade shaft seal 16 Bearing seal 17 Bearing tightening ring 18 Locking ring bearing seal 19 Motor drive fixing screw 20 Mot...

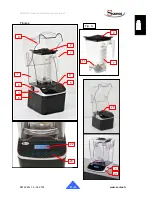
Page 21: ...SANTOS User and maintenance manual 98162 EN 1 5 02 2014 21 23 www santos fr Figures Fig A 2 9 5 8 7 3 4 6 1 1 2 11 21 22 23 20 3 ...

Page 22: ...SANTOS User and maintenance manual 98162 EN 1 5 02 2014 22 23 www santos fr 10 Fig B 11 13 14 12 16 14 15 18 17 ...

Page 23: ...duplicate exists in the conformity statement serial number manufacturing date electrical characteristics In case of serious damage judged repairable only in our workshops and after prior consent from our departments any appliance under guarantee is sent by the Distributor carriage paid In case of repairs or reconditioning of appliances not under guarantee the round trip transport is payable by the...

Reviews: