background image

9

3

4

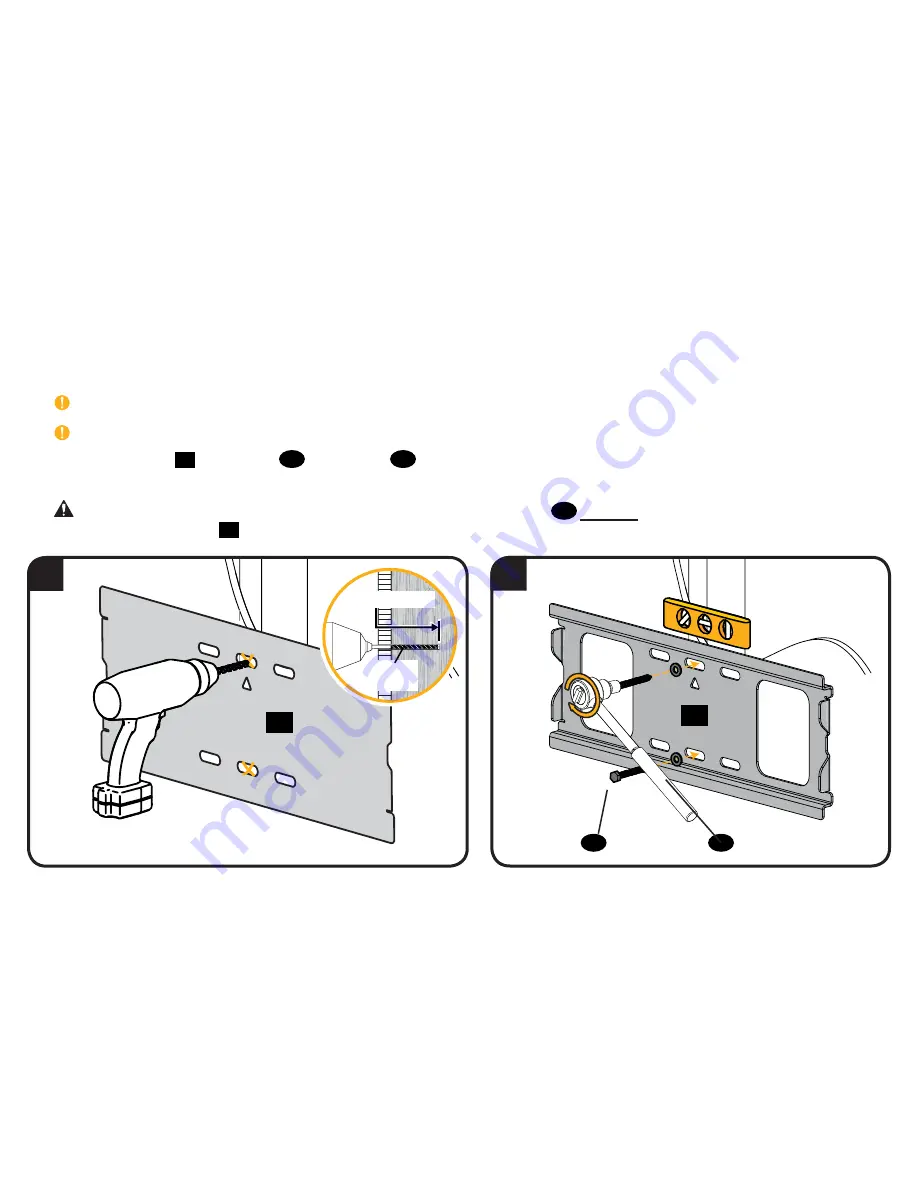
3.  Drill pilot holes using a 5.5 mm (7/32 in.) diameter drill bit. Remove wall plate template.


IMPORTANT

: Be sure to drill into the center of the stud.


IMPORTANT

: Pilot holes must be drilled to a depth of 75 mm (3 in.). 

4.  Install the wall plate 

15

 using lag bolt 

16

  and washers 

18

. Tighten the lag bolts and washers only until they are pulled firmly against the 

wall plate.


CAUTION:

 Avoid potential personal injury or property damage! Both lag bolts 

16

 MUST BE firmly tightened to prevent unwanted 

movement of the wall plate 

15

. Ensure the wall plate is securely fastened to the wall before continuing on to the next step.

15

16

18

14

75 mm (3 in.)

5.5 mm 

(7/32 in.)

Summary of Contents for SAN22BB

Page 1: ...SAN22BB INSTRUCTION MANUAL Scan for easy install video san us 391 We ll Make It Stress Free If you have any questions along the way just give us a call 1 800 359 5520 We re ready to help ...

Page 2: ... is your wall made of Unsure Drywall with wood studs Solid concrete or concrete block 80 lbs 36 3 kg CAUTION Avoid potential personal injuries and property damage This product includes directions and hardware for use with wood stud solid concrete and concrete block walls DO NOT install into drywall alone The wall must be capable of supporting five times the weight of the TV and mount combined Do no...

Page 3: ...and undamaged If any parts are missing or damaged do not return the damaged item to your dealer contact Customer Service Never use damaged parts Supplied Parts and Hardware STEP 1 Parts and Hardware 02 01 TV Brackets TV Screws M4 M5 M6 M8 M4 x 12mm M8 x 16mm M4 x 35mm M8 x 35mm M6 x 12mm M6 x 35mm M5 x 12mm M5 x 35mm 03 04 05 06 07 4 4 4 4 4 08 09 10 4 4 4 Washers 13 4 Spacers 4 11 4 12 ...

Page 4: ...4 STEP 2 Parts and Hardware 5 16 x 2 in Lag Bolts Anchors 16 17 3 3 14 Wall Plate Template Wall Plate 5 16 in Washers 18 3 15 ...

Page 5: ...upplied to accommodate irregular round back TVs TVs with inset mounting holes extra space needed for cables Hand thread screws into the threaded inserts on the back of your TV to determine which screw diameter M4 M5 M6 or M8 to use STEP 1 Attach TV Bracket to TV Too Short Correct Too Long CAUTION Verify adequate thread engagment with the screw or screw spacer combination Too short will not hold th...

Page 6: ...el on the back of the TV Install using either the short screw and washer or long screw spacer and washer combination you selected for your TV 12 13 11 03 04 05 06 01 01 02 02 11 12 07 08 09 10 Short Screw and Washer Long Screw Spacer and Washer L L R R ...

Page 7: ...7 1 4 Adjust Straps For ease of access straps should be level with the bottom of the TV 01 02 ...

Page 8: ... 1 1 2 x 3 1 2 in Stud center must be verified 1 Locate your stud Verify the center of the stud by finding the stud edges using an awl a thin nail or an edge to edge stud finder 2 Position the wall template 14 at your desired height and line up the holes with your stud center line Level the template and tape in place 1 2 14 16 mm 5 8 in NOTE For assistance in determining wall plate location see He...

Page 9: ...the wall plate 15 using lag bolt 16 and washers 18 Tighten the lag bolts and washers only until they are pulled firmly against the wall plate CAUTION Avoid potential personal injury or property damage Both lag bolts 16 MUST BE firmly tightened to prevent unwanted movement of the wall plate 15 Ensure the wall plate is securely fastened to the wall before continuing on to the next step 15 16 18 14 7...

Page 10: ...tween fasteners 121 mm 4 3 4 in 1 Level the wall plate template 14 and tape in place 2 Drill pilot holes into solid concrete using a 10 mm 3 8 in diameter drill bit Never drill into the mortar between blocks IMPORTANT Pilot holes must be drilled to a depth of 75 mm 3 in STEP 2B Attach Wall Plate Solid Concrete or Concrete Block Option 14 14 NOTE For assistance in determining wall plate location se...

Page 11: ... bolts 16 and washers 18 Tighten the lag bolts and washers only until they are pulled firmly against the wall plate CAUTION Avoid potential personal injury or property damage All three lag bolts 16 MUST BE firmly tightened to prevent unwanted movement of the wall plate 15 Ensure the wall plate is securely fastened to the wall before continuing on to the next step 17 18 16 15 ...

Page 12: ...1 2 3 02 01 15 IMPORTANT There is an audible click when the brackets are securely latched to the wall plate CAUTION Avoid potential personal injury or property damage Always make sure your TV brackets 01 and 02 are in the locked position so the TV is securely fastened to the wall plate 15 ...

Page 13: ...13 Adjust Level If needed adjust the screws on the TV brackets to level the TV ...

Page 14: ...14 Removing the TV HEAVY You may need assistance with this step To remove the TV from the wall plate simultaneously pull release cords down and TV out and then lift the TV up and out away from the wall ...

Page 15: ...15 in mm Dimensions 17 24 437 9 15 94 405 0 UP TO 15 75 400 0 15 50 393 7 6 00 152 4 3 75 95 3 4 75 120 7 3 28 83 4 OFFSET 0 95 24 2 ...

Page 16: ...or y del soporte juntos No utilice este producto para ningún otro propósito que no sea el explícitamente especificado por el fabricante El fabricante no se responsabiliza por ningún daño o lesión resultante del montaje incorrecto o de uso indebido Piezas suministradas Ver página 3 ADVERTENCIA Este producto contiene piezas pequeñas que si fuesen tragadas podrían producir asfixia Antes de iniciar el...

Page 17: ...Se deben verificar las partes centrales de los montantes de madera 1 Localice un montante Busque los bordes del montante para revisar el centro con un punzón o un clavo delgado o bien utilice un detector de bordes de montantes 2 Coloque la plantilla mural 14 a la altura deseada y alinee los orificios con la línea central del montante Nivele la plantilla y fíjela con cinta adhesiva en el lugar 3 Re...

Page 18: ...rfore el cemento que une los bloques IMPORTANTE Los orificios guía deben realizarse hasta una profundidad de 75 mm 3 3 Inserte los anclajes para hormigón 17 PRECAUCIÓN Cerciórese de que los anclajes queden nivelados respecto de la superficie de hormigón 4 Instale la placa mural 15 usando los tornillos tirafondo 16 y las arandelas 18 Ajuste los tornillos tirafondo y las arandelas solo hasta que que...

Page 19: ... 15 Ajustar el televisor Ver página 13 Ajustar la inclinación Afloje las perillas que se encuentra en la placa de sujeción del televisor a fin de ajustar la inclinación de su televisor Ajuste las perillas cuando su televisor tenga la inclinación deseada Ajustar el nivel Si es necesario ajuste un tornillo de las placas de sujeción del televisor al nivel del televisor Retirar el televisor Ver página...

Page 20: ...ny kind Milestone makes no representation of warranty expressed or implied regarding the information contained herein Milestone assumes no responsibility for accuracy completeness or sufficiency of the information contained in this document 2014 Milestone AV Technologies All rights reserved Sanus is a division of Milestone All other brand names or marks are used for identification purposes and are ...

Reviews: