background image

8

Instruction Manual for SABER MAGNET 24V

1-888-726-8869

www.sanuvox.com

ULTRAVIOLETS: UVC

The UVC (254 nm) light produced by Sanuvox UV units and systems are the same UV wavelength produced by the Sun. The 

UVC wavelength attacks the micro-organisms on a molecular level deactivating and destroying the contaminants.

 CAUTION: Never expose eyes or skin to ultraviolet light from any source.

ELECTRICAL RATINGS, POWER CONSUMPTION & AVAILABLE VOLTAGE

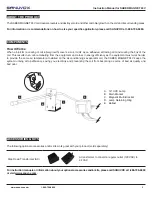
The product is rated at 24 VAC.

See product label to confirm power consumption of your specific unit or system.

 CAUTION:

 The user that changes or modifies the device without being not expressly approved by the party responsible for compliance 

couId void the user’s authority to operate the equipment.

NOTE: IF YOU EXPERIENCE A PROBLEM, PLEASE CONTACT CUSTOMER SERVICE FIRST OR SEE YOUR WARRANTY. 

DO NOT RETURN THE PRODUCT TO THE ORIGINAL PLACE OF PURCHASE. DO NOT ATTEMPT TO OPEN THE 

PRODUCT OR TAMPER WITH ITS COMPONENTS WITHOUT CONTACTING CUSTOMER SERVICE FIRST. DOING SO 

MAY VOID YOUR WARRANTY AND CAUSE PERSONAL INJURY OR DAMAGE TO THE PRODUCT.

TROUBLESHOOTING

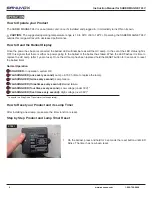
If your product is not working properly, refer to the following.

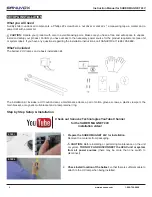
What you will need

A flat head screwdriver and an ohmmeter.

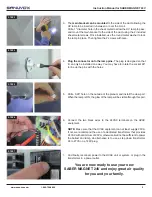
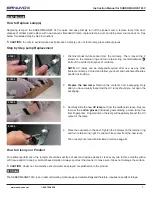
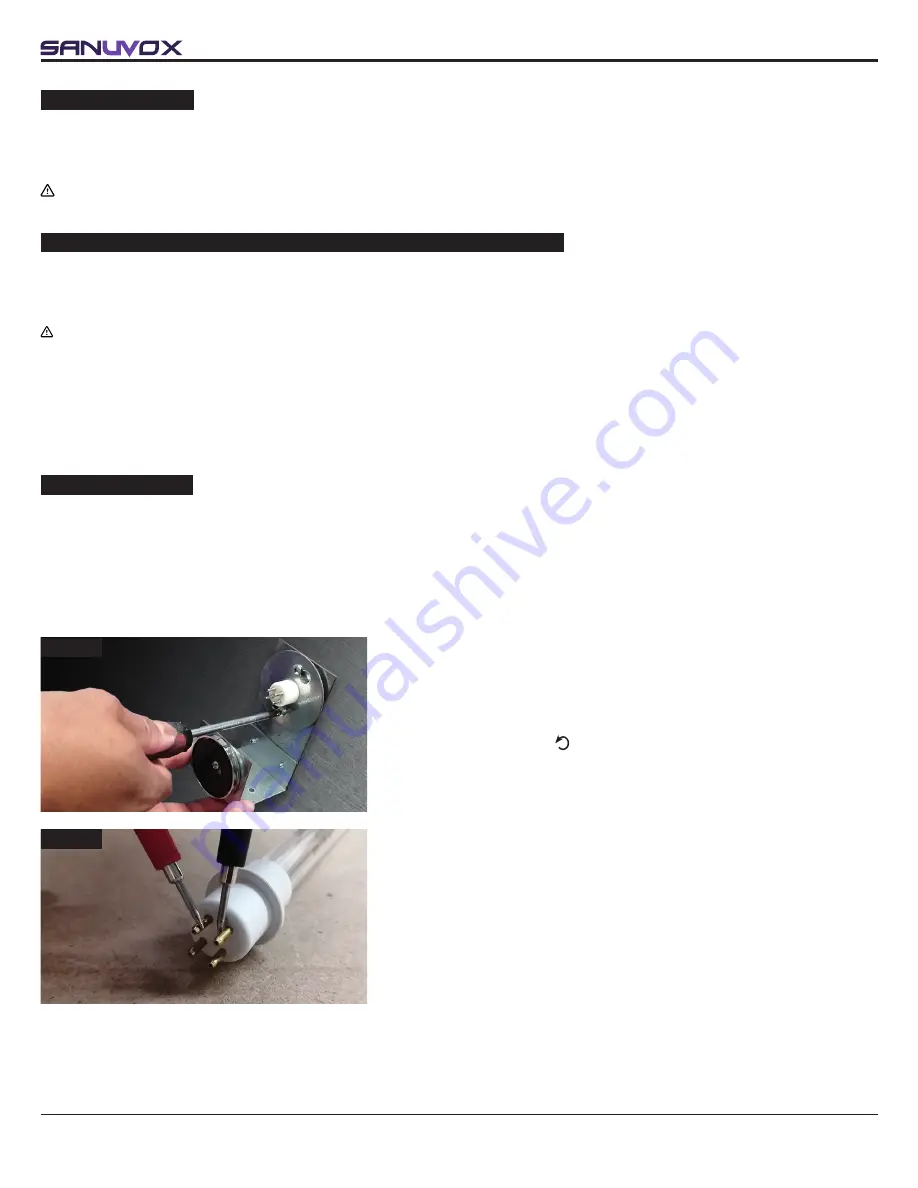
Step by Step UV Lamp Continuity Test

STEP 1

STEP 2

1. 

Take the lamp out of the duct.

 First disconnect white socket from the 

lamp. Then, loosen the 2 screws on the retainer ring and turn retainer 

ring counterclockwise  . Pull out the lamp.

2. 

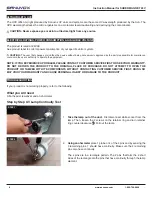
Using an ohmmeter

 place 1 probe on 1 of the 4 pins and by sensing the 

3 remaining pins, 1 should have continuity. Make sure the 2 remaining 

pins also have continuity.


The 4 pins are in a rectangle pattern. The 2 pins that form the 2 short 

sides of the rectangle are the pins that have continuity through the lamp 

element.

Summary of Contents for SABER MAGNET 24V

Page 1: ...ollow all the safety instructions outlined in this document and respect all local and national codes applicable 6 Never expose eyes or skin to ultraviolet light from any source Therefore before installing or performing maintenance on the unit or system TURN OFF AND DISCONNECT the unit or system from all power sources there may be more than one switch to disconnect CAUTION Electrical shock may caus...

Page 2: ...lation 4 OPERATION 6 How to Operate your Product 6 How to Read the Ballast Display 6 How to Reset your Product and its Lamp Timer 6 Step by Step Product and Lamp Timer Reset 6 MAINTENANCE 7 How to Replace Lamp s 7 Step by Step Lamp Replacement 7 How to Clean your Product 7 STORAGE 7 ULTRAVIOLETS UVC 8 ELECTRICAL RATINGS POWER CONSUMPTION AVAILABLE VOLTAGE 8 TROUBLESHOOTING 8 What you will need 8 S...

Page 3: ...nt and a loss in energy efficiency as the equipment must work harder to provide the same air temperature Installed on the air conditioning s evaporator coil the SABER MAGNET 24V keeps the system running at top efficiency saving you electricity and preventing the coil from becoming a source of bad air quality and bad odor A 16 UVC Lamp B Main Bracket C Magnetic Multi Bracket D Lamp Retaining Ring E...

Page 4: ...88 726 8869 What s included The ballast 2 UV lamps and a basic installation kit The installation kit includes a UV caution decal a maintenance decal a pair of cotton gloves screws a plastic view port the main bracket a magnetic multi bracket and a lamp retainer ring Step by Step Setup Installation Check out Sanuvox Technologies YouTube Channel for the SABER MAGNET 24V installation video 1 Prepare ...

Page 5: ...ket 90 to line up the pins with the holes STEP 3 STEP 4 STEP 5 STEP 6 5 Drill a 0 25 hole on the outside of the plenum and install the view port When the lamp is ON the glow of the lamp will be visible through this port 6 Connect the two black wires to the 24VAC terminals on the HVAC equipment NOTE Make sure that the HVAC equipment can at least supply 20VA If not we recommend the use of a dedicate...

Page 6: ...led When the LED flashes it is time to replace the UV Lamp after 1 year of use Once the UV Lamp has been replaced hold the RESET button for 3 seconds to reset the ballast timer Normal Operation SOLID RED In operation system OK FLASHING RED once every second Lamp 8 700 h time to replace the lamp FLASHING RED twice every second Lamp failure FLASHING RED three times every second Ballast failure FLASH...

Page 7: ...amp Remove the contents from packaging Only after you have visually inspected the UV lamp should you cut open the packaging 3 Carefully slide the new UV lamp out from the cardboard sleeve Be sure to wear the cotton gloves included guaranteeing a clean lamp free from fingerprints Fingerprints on the lamp will negatively impact the UV output of the lamp STEP 1 STEP 2 STEP 3 4 Place the new lamp in t...

Page 8: ... CUSTOMER SERVICE FIRST OR SEE YOUR WARRANTY DO NOT RETURN THE PRODUCT TO THE ORIGINAL PLACE OF PURCHASE DO NOT ATTEMPT TO OPEN THE PRODUCT OR TAMPER WITH ITS COMPONENTS WITHOUT CONTACTING CUSTOMER SERVICE FIRST DOING SO MAY VOID YOUR WARRANTY AND CAUSE PERSONAL INJURY OR DAMAGE TO THE PRODUCT TROUBLESHOOTING If your product is not working properly refer to the following What you will need A flat ...

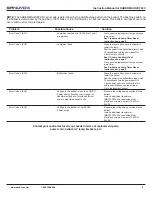
Page 9: ...ement lamp and reset lamp timer See Product and Lamp Timer Reset instructions on page 6 Error Code 3 EC3 Ballast has failed Press the reset button once to attempt to restart the ballast Shut the power to the ballast hard reset wait 10 seconds and turn the power back ON Check power source to confirm that it is within specifications on product label Get a replacement ballast Error Code 4 EC4 Voltage...

Page 10: ...its option SANUVOX will repair or replace this product if it is found to be defective in material or workmanship C This warranty does not cover damage resulting from any unauthorized attempts to repair or from any use not in accordance with the instruction manual D This warranty does not cover the filters pre filters UV bulbs or other accessories if included except for material or workmanship defe...

Reviews: