background image

_

4. USING THE UPS (BASICS)

_

19

4

4

.

.

2

2

O

O

p

p

e

e

r

r

a

a

t

t

i

i

o

o

n

n

P

P

r

r

o

o

c

c

e

e

d

d

u

u

r

r

e

e

s

s

4

4

.

.

2

2

.

.

1

1

S

S

t

t

a

a

r

r

t

t

i

i

n

n

g

g

t

t

h

h

e

e

U

U

P

P

S

S

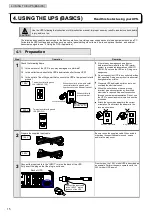
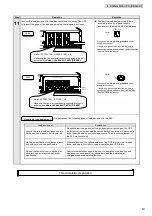
Follow the procedure below to start the UPS. In this section, the 100 V model UPS is described as an example. Perform the same 
operation with the 200 V model UPS as well.   

Step

Operation

Remarks

1

1

Check that the input cable is connected. 
When the cable is not connected, insert the supplied input cable into the “INPUT” 
inlet on the back of the UPS and into a utility power supply (wall outlet, etc.). 
Fully insert the plug so that the plug is not loose. 

Back of UPS 

For details on input cable connection, see steps 1 to 
4 in “4.1 Preparation”. 

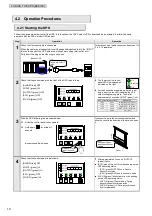
2

2

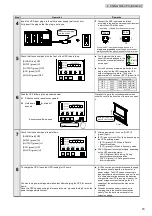
Check that the control panel on the front of the UPS is as follows. 

[ALARM (red)] OFF

[INPUT (green)] Lit 

[OUTPUT (green)] OFF 

[ECO (green)] OFF 

INV.ON (green)] OFF 

  The lit status of the control 

panel LEDs is displayed as 
indicated on the right. 

  For the 5 seconds immediately after the input 

plug is inserted, the LED indicating the UPS 
output voltage setting blinks. Then, after 
approximately 5 seconds, [INPUT (green)] is lit. 

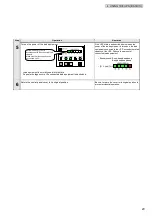
3

3

Start the UPS following the procedure below. 

3-1  Slide the control panel cover upward.

3-2  Hold down

  for at least 1 

second. 

Buzzer sound: Be-be-beep

Place your finger in the notch shown below and 
slide the cover in the direction of the arrow to open 
it. 

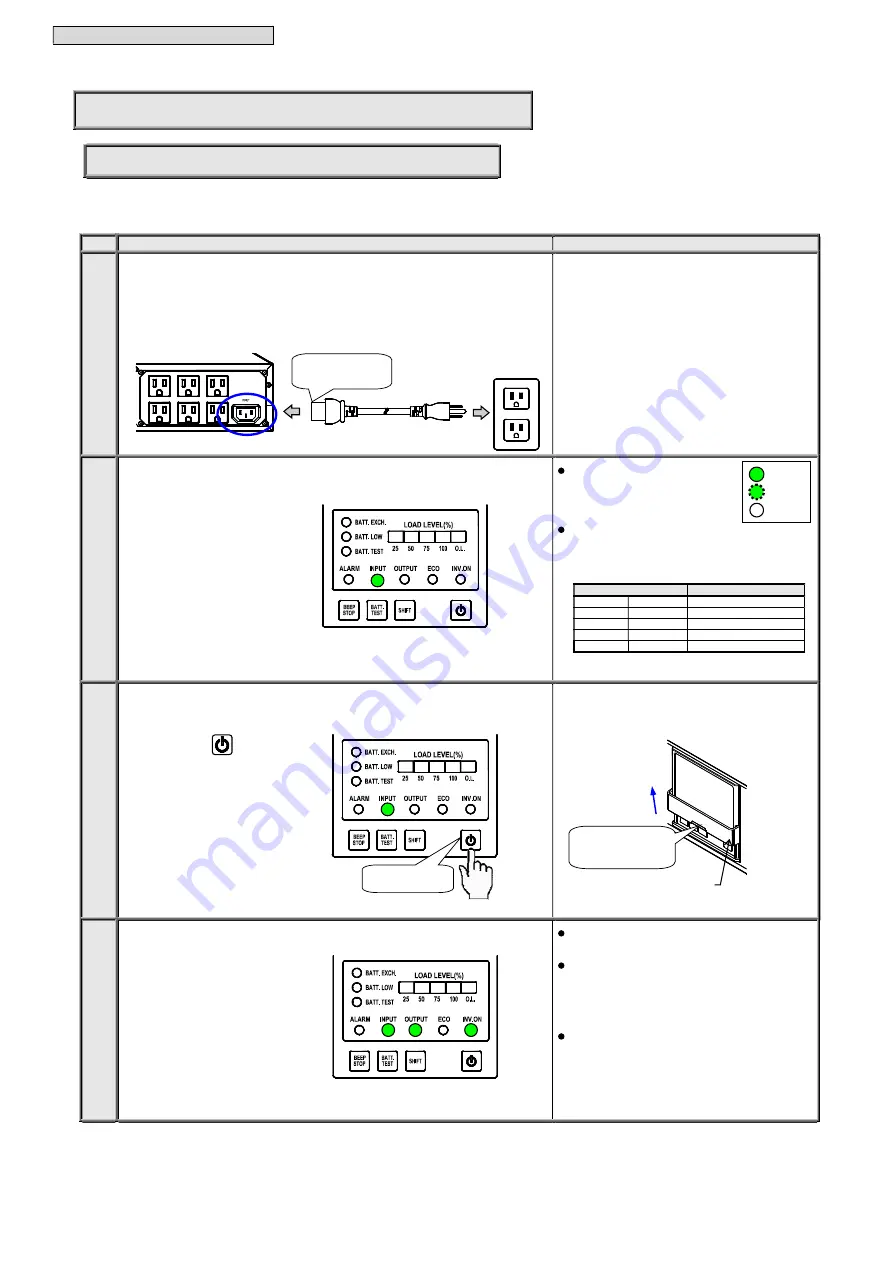
4

4

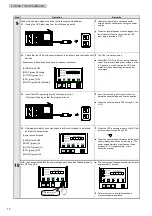
Check that the control panel is as follows. 

[ALARM (red)] OFF 

[INPUT (green)] Lit 

[OUTPUT (green)] Lit 

[ECO (green)] OFF 

[INV.ON (green)] Lit 

  After approximately 1 second, [OUTPUT 

(green)] lights. 

  [ECO (green)] turns off or on, depending on the 

UPS operating status. 
•  [ECO (green)] OFF: When in Double 

Conversion mode   

•  [ECO (green)] Lit: When in Economy mode 

  [INV.ON (green)] blinks fast or is lit, depending 

on the UPS operating status. 
•  [INV.ON (green)] Fast blinking: During 

asynchronous inverter operation 

•  [INV.ON (green)] Lit: During synchronous 

inverter operation 

Insert into “INPUT” 
inlet 

Hook your finger, 
and slide the cover 
upward. 

Cover 

Hold down for at 
least 1 second. 

UPS output voltage setting

Blinking LED

100 V

200 V

LOAD LEVEL 25 (green)

110 V 

220 V 

LOAD LEVEL 50 (green) 

115 V

230 V

LOAD LEVEL 75 (green

120 V

240 V

LOAD LEVEL 100 (green)

208 V 

O.L. (red)   

TOTAL OUTPUT MAX.800W 10A

: Lit 

: Blinking

: Off 

Summary of Contents for SANUPS E11B

Page 1: ...M0012366 Uninterruptible Power Supply Instruction Manual 1kVA 100V 200V ...

Page 2: ...r Supply 6 1 2 2 Installation Precautions 6 1 2 3 Handling Precautions 7 1 3 Checking the Contents of the Package 8 2 PART NAMES 9 2 1 External Dimensions and Part Names 9 2 2 Control Panel 10 3 UPS INSTALLATION 11 3 1 Checking the Installation Environment 11 3 2 Checking the Installation Space 11 3 3 Mounting the UPS on a Rack 12 3 4 Installing the UPS Horizontally 13 3 5 Installing the UPS Verti...

Page 3: ...ncy Stop Switch 31 5 8 Using UPS External Transmission Signals 33 6 INSPECTION AND MAINTENANCE 35 6 1 Routine Checks by Customer 36 6 2 Inspecting the Batteries 37 6 2 1 Checking the Battery Replacement Time 37 6 2 2 Running a Battery Test 39 6 3 Resetting the Bypass Breaker 41 6 4 Switching the Operation Between Bypass and Inverter 43 6 4 1 Switching from Inverter to Bypass Operation 43 6 4 2 Swi...

Page 4: ... This section describes the basic method of use of the UPS Preparation Starting the UPS Shutting down the UPS Using the UPS Application Pages 23 to 33 This section describes the method of use in accordance with the system used such as the various UPS functions and optional equipment UPS setting menus Using optional equipment Connecting external equipment Using UPS external transmission signals UPS...

Page 5: ... the UPS in applications or with load equipment such as the following Medical instruments used for life support Control units for trains or elevators failure of which could cause bodily injury Computer systems upon which social or public infrastructure depends Devices which serve applications related to the above Contact your sales representative or SANYO DENKI if you need to use the UPS in an app...

Page 6: ...t can be well ventilated and do not block the air intake and exhaust vents of the rack and UPS If the air intake or exhaust vent is blocked the internal temperature of the UPS rises which could cause battery deterioration resulting in a fire During maintenance the UPS requires at least 1 m of space at the front and at least 50 cm at the back The area around the UPS must be ventilated Unless the ve...

Page 7: ... Do not touch the UPS including the cables if thunder occurs nearby There is danger of an electric shock from a lightning strike 6 Maintenance and Inspection Precautions CAUTION Maintenance and repair of the inside of the UPS should be performed only by service technicians Electric shock bodily injury burns fuming or fire may otherwise result Do not open the cover of the UPS Do not detach the cove...

Page 8: ...t open or mutilate batteries The battery contains diluted sulfuric acid Released material is harmful to the skin and eyes It may be toxic If a battery leaks take appropriate measures to prevent any battery fluid from contacting your skin or clothing Diluted sulfuric acid may cause blindness if it gets into the eye and may burn skin upon contact Additionally it is electrically conductive and corros...

Page 9: ...always protect both polarities 1 1 2 2 2 2 I In ns st ta al ll la at ti io on n P Pr re ec ca au ut ti io on ns s 1 Carefully consider the sensitivity current when installing a leakage circuit breaker on the input side The maximum leakage current of this UPS is 3 mA 2 Keep the necessary distance from devices that are sensitive to magnetic flux such as CRT displays as the UPS emits a slight amount ...

Page 10: ...e sufficient charge which could result in a foreshortened battery life and premature battery failure 4 If the UPS is stored without being operated for a long period the batteries may require recharging If the batteries in the UPS are left uncharged their service life will be greatly foreshortened Recharge the batteries in accordance with the UPS storage environment as shown in the table on the rig...

Page 11: ...ge or anomaly Place a check mark in the boxes to confirm Contact your reseller if anything is missing Article Quantity Check Article Quantity Check UPS 1 Installation date Battery replacement date label 年 月 日 1 Communication cable 1 Input cable 1 Rack attachment plate 2 Rack attachment plate screw M4 6 4 SANUPS E11B Instruction Manual 1 SANUPS E11B Setting Menu Manual 1 Warranty Card 1 User Regist...

Page 12: ...d interface CARD I F Connector for connection during LAN interface card option 2 use 11 Option card Slot OPTION CARD LAN interface card option 2 or contact interface card option 2 insertion port 12 Remote terminal REMOTE ON OFF Terminal for connecting the remote switch option 2 13 EPO terminal EPO Input terminal for EPO emergency power off signal 14 Extension battery connector EXT BATTERY For conn...

Page 13: ...n for 10 seconds 3 Battery test button In Normal mode Executes a battery test when held down for 2 seconds In Setting mode Allows setting value in the setting menu 4 Shift button Switches to bypass operation when is held down for at least 3 seconds while holding down No Indication Color Description Lit Off Slow blinking Fast blinking 5 INV ON Green For indicating the UPS operation status UPS is op...

Page 14: ...ION Provide the specified space around the UPS and make sure that the air discharged from the UPS can be well ventilated If you mount the UPS on a rack be sure to use a well ventilated rack The internal temperature of the UPS may rise resulting in the risk of smoke ignition or a fire During installation provide the space illustrated below around the UPS At least 20 cm at front Air intake space for...

Page 15: ...Space and secure enough ventilation space at the front and the back The UPS is heavy so we recommend mounting it on the very bottom of the rack Use L type rails support rails when mounting the UPS on the rack For more information on L type rails contact your rack manufacturer or sales representative Do not place objects on top of the UPS Doing so may cause UPS failure 1 Prepare the following items...

Page 16: ...s When placed vertically without the stands or brackets vibration and shock such as an earthquake may cause the UPS to move or fall possibly resulting in bodily injury Do not sit step or lean on the UPS or carry out any other such conduct It may result in bodily injury The weight of the UPS is 15 kg Wear safety shoes during the installation All work that involves lifting the UPS should be carried ...

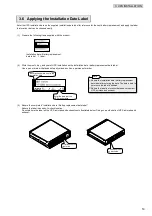
Page 17: ...ch as a permanent marker 3 Adhere the completed Installation date Battery replacement date label Adhere the label in an easy to check location Do not adhere the label on the UPS air intake and exhaust vents illustrated below Doing so would obstruct UPS air intake and exhaust Adhere the installation date battery replacement date label after entering the date The date is hard to enter once the label...

Page 18: ... to any outlet other than that specified Doing so may result in abnormal heat generation or a fire Prepare a UPS dedicated outlet so as to not overload the electrical circuit When the outlet does not have a ground terminal ground construction by a certified electrician is required Request construction through your sales representative Do not use the UPS in an environment where it cannot be grounde...

Page 19: ...roximately 1 second OUTPUT green lights ECO green turns OFF or lights depending on the UPS operating status ECO green OFF When in Double Conversion mode ECO green Lit When in Economy mode INV ON green blinks fast or lights depending on the UPS operating status INV ON green fast blinking During asynchronous inverter operation INV ON green Lit During synchronous inverter operation 8 8 To charge the ...

Page 20: ... UPS input plug into the utility power outlet Fully insert the plug so that the plug is not loose Insert the input plug restore power from the simulated power outage and check operation When the outlet breaker is OFF in step 9 1 turn it ON 9 4 After approximately 5 seconds check that the control panel is as follows and that the buzzer stops Buzzer sound Stopped ALARM red OFF INPUT green Lit OUTPUT...

Page 21: ...nce such devices are subject to high transient current surges the UPS will detect current surges and the battery backup operation will become no longer possible when a power outage occurs There is also the danger of the UPS malfunctioning Half wave rectification type devices such as hair dryers and halogen heaters With such devices the voltage balance of the UPS internal circuit breaks down result...

Page 22: ...ng the UPS output voltage setting blinks Then after approximately 5 seconds INPUT green is lit 3 3 Start the UPS following the procedure below 3 1 Slide the control panel cover upward 3 2 Hold down for at least 1 second Buzzer sound Be be beep Place your finger in the notch shown below and slide the cover in the direction of the arrow to open it 4 4 Check that the control panel is as follows ALARM...

Page 23: ...oad equipment is turned on the load equipment connected to the UPS exceeds the rated capacity of the UPS Reduce the amount of connected load equipment Buzzer sound Beep beep beep beep Beep beep beep beep O L red Lit 6 6 Return the control panel cover to its original position Be sure to return the cover to its original position to prevent accidental operation LOAD LEVEL is lit in accordance with th...

Page 24: ... inserted into the utility power outlet If the UPS will not be used for a long period of time proceed to step 6 and unplug the UPS input plug 5 5 Return the control panel cover to its original position Be sure to return the cover to its original position to prevent accidental operation 6 6 If the UPS will not be used for a long period of time unplug the UPS input plug Back of UPS If the UPS will n...

Page 25: ..._4 USING THE UPS BASICS _ 22 Blank page ...

Page 26: ...s to bypass due to overload 11 Operation during OFF OFF Set the output power supply state when UPS stops 12 Bypass power supply switch during input error Enable Enable or disable power supply switches to bypass when an input error occurs 13 Transmission signal at minor error Output Set whether or not to send a transmission signal when a minor error occurs 14 Simulated transmission signal output fo...

Page 27: ... there is battery power Press to stop the buzzer While there is battery power the UPS continues to run on the batteries The UPS changes as follows according to the battery power status and the timing at which the utility power is restored to normal When the Battery Power Startup setting in the setting menu is set to Disabled default setting the UPS cannot be started using this procedure When you w...

Page 28: ...nstall the software following the instructions on the screen 4 3 After installation restart the computer 4 4 Start the power management software and configure the settings on the UPS connection setting screen For details on power management software compatible operating systems and the like see the power management software installation guide and user guide During power management software use fol...

Page 29: ...anagement software set the time to at least 40 of the displayed backup time For details on how to configure settings see Setting the Shutdown Conditions in the user guide of the power management software 2 The estimated backup time may not be indicated accurately if the load factor is 30 or less 3 This estimated backup time is only an approximation It may differ from the actual backup time 4 The U...

Page 30: ...ver on the back of the UPS 3 2 Insert the LAN interface card into the optional card slot and secure the card with screws 3 3 Connect the UPS CARD I F connector and the UPS connector of the LAN interface card using the LAN interface card communication cable Back of UPS 4 4 Verify that Interface in the setting menu is set to WS work station default setting For how to operate setting menu items see t...

Page 31: ...ate setting menu items see the Setting Menu Manual 5 5 Run the UPS in accordance with the system Check operation before actual use FE When the contact interface card is used the signals below are output The below signals are for a D sub 15 pin type Signal Name Description AC input error This signal is output when there is a power outage or voltage error of the utility power Contact a contact b Low...

Page 32: ...FF WS work station Remote ON One touch shutdown For how to operate setting menu items see the Setting Menu Manual One touch shutdown One touch shutdown is a function that sends a computer shutdown command to the LAN interface card or power management software from the UPS The signals of the REMOTE terminal on the back of the UPS are as follows The operation of the remote switch is as follows accor...

Page 33: ... the end of the wire 4 2 Insert the wire into the terminals 1 to 4 while pressing the tab with an insulated flat head screwdriver 4 3 Pull the wire to check it does not come out The terminals of EPO 5 and 6 are for connecting the emergency stop switch Be careful not to mix up the connecting terminals 5 5 Press the ON OFF button of the remote switch to verify UPS operation Hold down the ON OFF butt...

Page 34: ...m of insulation from the end of the wire 3 2 Insert the wire into Terminal Nos 5 and 6 while pressing the tab with an insulated flat head screwdriver 3 3 Pull the wire to check it does not come out The terminals of REMOTE 1 to 4 are for connecting the remote switch Be careful not to mix up the connecting terminals EPO Terminal Specifications Circuit voltage 5 V DC Terminal No 6 Negative polarity C...

Page 35: ...ring an emergency stop of the UPS the UPS remains in the emergency stop state even if the EPO switch is released 4 4 Release the EPO switch 4 5 Hold down for at least one second Buzzer sound Be be beep Slide the cover of the control panel upward to perform the operation When the UPS has been shut down by the EPO function during battery operation and you want to start the UPS without the utility po...

Page 36: ...the setting we recommend checking the setting value For how to operate setting menu items see the Setting Menu Manual 4 4 Run the UPS in accordance with the system Check operation before actual use The external transmission signals in the table below are output from the CARD I F connector of the UPS The external transmission signals are transistor based semiconductor outputs Signal Name Descriptio...

Page 37: ..._5 USING THE UPS APPLICATION _ 34 Blank page ...

Page 38: ...e is for a case where the yearly average ambient temperature of the UPS is 30 C 86 F The expected life is not a guaranteed value Part replacement and repairs should never be attempted by customers Routine checks 6 1 Routine Checks by Customer Inspecting the batteries When trouble occurs 6 3 Resetting the Bypass Breaker 8 Troubleshooting What are service technicians This term is used to indicate se...

Page 39: ...lowing improve the environment See 3 1 Checking the Installation Environment Where the ambient temperature exceeds 55 C 131 F Where there is high humidity Where there is a great amount of dust Where salt or corrosive gas is present Where there is vibration or impact Where the UPS may get wet or a place with the risk of condensation In a poorly ventilated rack A place that exceeds an elevation of 2...

Page 40: ...eplacement time and therefore the result may differ for each method If the result of one method indicates it is time to replace the batteries the batteries need to be replaced A Calculate the replacement time from the UPS installation date or previous battery replacement date B Run the batteries while running an electric device connected to the UPS and determine the battery replacement time based ...

Page 41: ... management software the test result is not displayed Check the result using power management software Implement the battery test at the interval described below Note that we recommend changing the schedule to 90 days after the first year even if the automatic battery test schedule is set to 180 days Time from New UPS Installation or Previous Battery Replacement Battery Test Time 1 to 3 years Once...

Page 42: ... least 2 seconds The BATT TEST green blinks and the battery test starts Buzzer sound Beep beep Beep beep Beep beep BATT TEST green Blinking The test is completed within a period of approximately 1 minute 2 Check the results of the battery test based on the lit state of the BATT TEST green and buzzer sound When the BATT TEST green blinks and the buzzer sounds the batteries need to be replaced Conta...

Page 43: ...states 1 to 5 To cancel a battery test in progress Hold down on the control panel for at least 2 seconds The UPS returns to normal operation During the battery test if any of 1 to 3 occurs or if any of 4 to 5 is performed the battery test is canceled When the battery test is canceled the battery test result is not displayed in BATT TEST green Canceling a battery test 1 Input voltage frequency erro...

Page 44: ...bypass breaker is reset while the UPS is running ALARM red does not turn OFF from a lit state until the UPS is shut down Always shut down the UPS 3 3 Check that there is no abnormality with the connected load equipment and reduce the load capacity Be sure that the capacity of the connected load equipment is less than or equal to the output capacity of the UPS 4 4 Reset the bypass breaker Be sure t...

Page 45: ..._6 INSPECTION AND MAINTENANCE_ 42 Blank page ...

Page 46: ...o bypass operation is performed with interruption 2 2 Slide the cover of the control panel upward and hold down for at least 3 seconds while pressing Place your finger in the notch shown below and slide the cover in the direction of the arrow to open it After you finish operation return the cover to its original position to prevent accidental operation When INPUT green blinks after pressing and an...

Page 47: ...t ECO green OFF INV ON green Lit After approximately 1 second OUTPUT green is lit and operation switches to inverter operation When the input voltage is abnormal INPUT green Blinking operation does not switch to inverter operation even when the switch operation is performed When the input frequency is outside the synchronization range switching to inverter operation is performed with interruption ...

Page 48: ...e performed BATT EXCH orange Lit The battery service life has ended The batteries need to be replaced Contact your sales representative or SANYO DENKI When this display continues even after the batteries have been replaced the battery information has not been reset The Reset Remaining Battery Life operation in the setting menu needs to be performed 2 seconds 7 times 7 times BATT LOW red Lit BATT T...

Page 49: ...has not been reset The operation for resetting the battery information in the setting menu needs to be performed The ON OFF button on the control panel does not depress The control panel has a transparent cover Slide the cover upwards to operate the operation panel The LEDs on the control panel do not turn on All Off Is the UPS input plug inserted into the utility power outlet properly See steps 1...

Page 50: ...Resetting the Bypass Breaker INPUT green Blinking OUTPUT green OFF Has the bypass breaker BYPASS OC on the back of the UPS tripped The bypass breaker may have tripped by an overload or short circuit However when the input voltage is low or during a power outage Alarm red is not lit Be sure to check the status of the bypass breaker If the bypass breaker has tripped check the load capacity and wheth...

Page 51: ...tteries sufficiently charged When the batteries are low approximately less than 23 5 V the UPS cannot be started using this procedure Start the UPS using the utility power after the input power returns to normal Check the setting of Battery Power Startup in the setting menu When the setting is set to Disable default setting the UPS cannot be started using this procedure When the UPS in running wit...

Page 52: ...nstall the USB driver Have power management software services stopped due to an error Restart the UPS UPS inverter does not start automatically at the time set for scheduled operation in the power management software or the LAN interface card If Automatically start the UPS when power recovers in the Setting UPS control conditions in the user guide of the power management software or the LAN interf...

Page 53: ... power outage If a power outage persists and the battery voltage reaches the final discharge level a protective circuit shuts off the inverter to prevent over discharging of the batteries When normal utility power recovers after the inverter has been stopped operation is automatically resumed returning to the normal operation state described 1 When UPS Operation Upon Power Recovery in the setting ...

Page 54: ...Rectifier stops Charging stopped Inverter operation Battery operation Input overvoltage extended 3 Battery operation Inverter stops at end of battery discharge Power outage 2 Battery operation Power outage extended 3 Battery operation Inverter stops at end of battery discharge Input error frequency 2 Battery operation Input error extended 3 Battery operation Inverter stops at end of battery discha...

Page 55: ...When in Economy mode 130 W When in Double Conversion mode Input leakage current 3 mA or less Ambient conditions Ambient temperature 10 to 55 C 14 to 131 F Relative humidity 20 to 90 Note 8 Noise 40 db or less When in Economy mode 1 m from front of UPS A weighting 45 db or less When in Double Conversion mode Note 1 The inverter is capable of operation synchronized with AC input frequency and switch...

Reviews: