background image

- 4 - 

5. Method of operation  

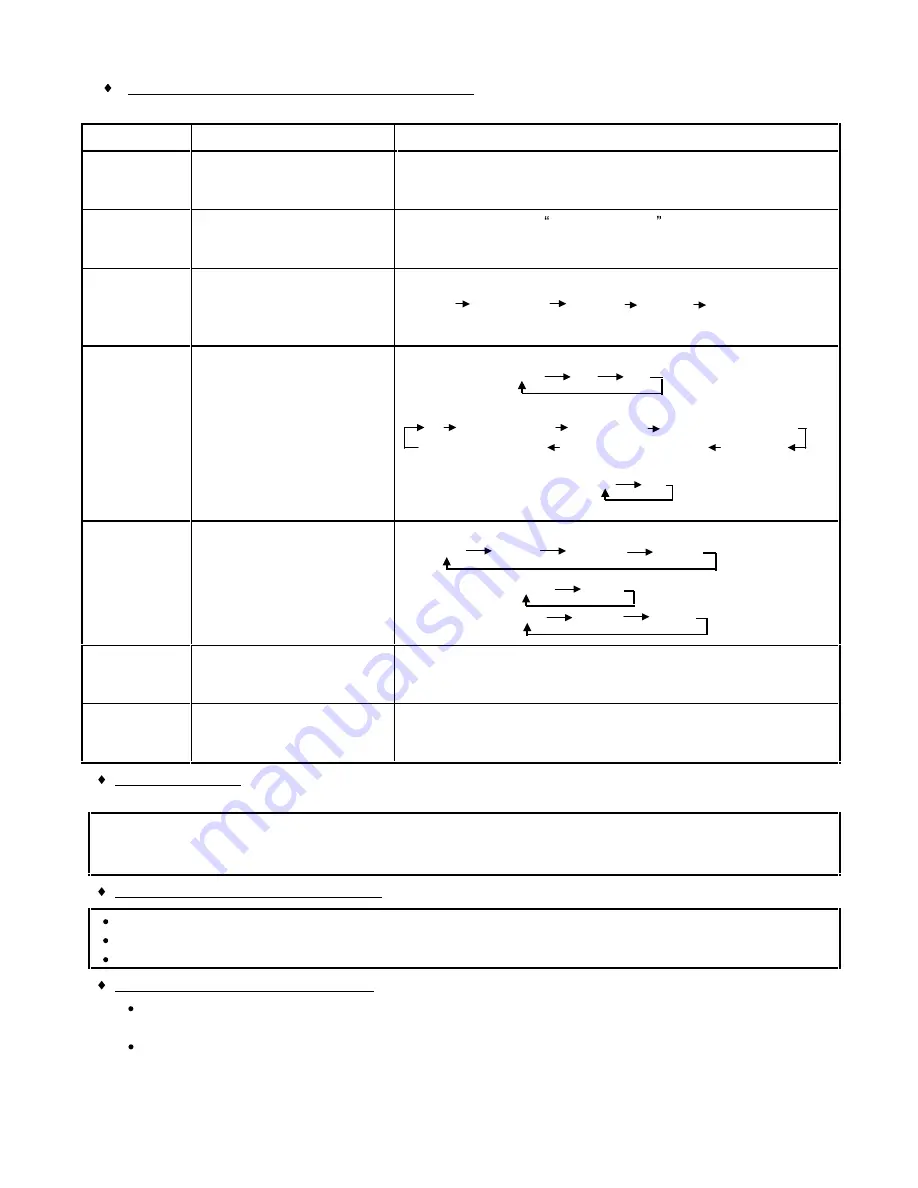
Name and function of buttons on control panel:


    When you press those buttons, the setting program and indicators (LED) will change alternately.  

BUTTON 

SETTING PROGRAM 

INDICATION OF LED 

POWER 

SWITCH 

To turn the power ON and 
OFF alternately. 

When you press the power switch to turn power ON, NORMAL 
indicator will light up. When power is turned off, NORMAL 
indicator will black out. 

START/PAUSE  

Start or temporarily stop  
wash operation. 

When you press the  START/ PAUSE  button to start, the 
indicator of the first process will blink. When pausing, LED 
indicator will light up. 

ONE TOUCH 

SELECT 

Choose the desired washing 
program : Normal, Heavy 
Duty, Custom, Blanket, Dry 
Care. 

Normal     Heavy Duty      Custom      Blanket     Dry Care             

SELECT/ SET 

Used to set a variety of 
wash programs.  

To preset the finish time, 
washing time, rinsing mode 
and spinning time. 

Setting Washing time:     
                        OFF           1          12 

Setting Rinsing mode: 
      0    1(water saver)    1.(overflow)    2(twice water saver)      

      3.(3times overflow)    3(3times water saver)     2.(once                                                                   

Setting Spinning time:            0         10  


WATER 

LEVEL 

Select the appropriate water 
level that matches the load 
volume. When this button 
pressed, water  level will be 
changed alternately: HIGH, 
MED, LOW 2 , LOW 1.    

Normal/ Heavy Duty/ Custom course:     
    HIGH          MED          LOW 2         LOW1     

Blanket:            HIGH          MED 

Dry Care:         MED         HIGH         LOW2 

OPTION 

Used to set a variety of 
Soak program and Soft Spin 
program 

While selecting the option function, the indicator will light up.  
If the option function is not selected, the indicator blacks out.  

CHILD 

SAFETY 

Press the water level button 
for 4 seconds to choose 
desired child safety. 

When this function is selected, Washing course will stop if 
Washer Lid is opened 5 seconds or more during washing. 

Signals of buzzer: 

Buzzer will sound in the following cases : 

The button is pressed  :


Buzzer  sounds beep in 0. 6 second. 

Washing cycle end 

:


Buzzer  sounds with beep tone ON -0.5 second & OFF- 0.5 second for  6 seconds. 

Have a trouble 

:


Buzzer  sounds with beep tone ON -0.3 second & OFF -0.3 second in 16 times. 

How to cancel the cycle end buzzer :


Deleting  : Turn on the POWER SWITCH and hold down the START / PAUSE  button for 4 seconds. 
Resetting : Turn on the POWER SWITCH and hold down the START / PAUSE  button for 4 seconds.  
In both cases, buzzer will sound to indicate that the program has been set. 

About  Automatic turn off function :


If you leave the washer  turned on without starting the operation, the Power Switch will turn  off 
automatically after 10 minutes. 
When washing operation finished, the POWER SWITCH will turn off in 5 seconds automatically.     

 
once 
overflow)


Summary of Contents for ASW U1100T

Page 1: ...4 6 Content of fully Automatic Washing program 5 7 Operation of fully Automatic Washing 6 8 Procedure of time presetting program 9 9 Indication and judgment of trouble 10 10 Inspection mode of service man 11 11 Care of service 12 12 Flow chart of trouble shooting 15 13 Trouble shooting of Bearing Ass y 19 14 Exploded view 21 15 Part list 24 REFERENCE No SM930202 Product Code No 300 849 85 240V 50 ...

Page 2: ...alve Ass y Driven by Magnetic Coil Fuse Ass y 250V 5A Spin Tub revolution speed 840 r p m Response Switch KPS 59 C Automatically select one of 4 water levels SPIN Spin Tub Drum dimension 460mm x 439mm H Safety Switch Operates while opening Washer Lid or serious unbalance SWITCH Power switch Relay system Accessories Printed circuit board IC Transformer Buzzer Push Switch Triac Instruction Manual Dr...

Page 3: ...r supply Magnetic Valve Pour Inlet Spin Tub Drum Outer Tub Drum Drainage Spin Tub Drum Outer Tub Drum Drain Valve Drain Hose Overflow Overflow Gate Overflow Hose Drain Valve Drain Hose Circulation Spin Tub Drum Outer Tub Drum Spin Tub Drum bottom holes Circulate Hose Spin Tub Drum Lint Filter Ass y Air course diagram 01 Pump Ass y 02 Hose joint Ass y 03 Hose joint Ass y Pum Ass y Hose Joint Ass y ...

Page 4: ... 3 4 Electric circuit diagram For the purpose of safety please use only designated parts ...

Page 5: ...y HIGH MED LOW 2 LOW 1 Normal Heavy Duty Custom course HIGH MED LOW 2 LOW1 Blanket HIGH MED Dry Care MED HIGH LOW2 OPTION Used to set a variety of Soak program and Soft Spin program While selecting the option function the indicator will light up If the option function is not selected the indicator blacks out CHILD SAFETY Press the water level button for 4 seconds to choose desired child safety Whe...

Page 6: ...36 4 Water saver 2 6 40 14 HEAVY DUTY 4 08 13 2 3 30 3 36 3 Overflow 2 3 30 3 36 3 Overflow 2 7 51 20 BLANKET 4 08 12 2 3 30 3 36 3 Overflow 2 3 30 3 36 3 Overflow 2 8 50 20 DRY CARE 3 56 6 2 2 3 36 1 30 Overflow 2 2 3 36 1 30 Overflow 2 2 32 08 SOAK 4 08 45 10 2 3 30 1 30 Shower 3 30 3 36 4 Water saver 2 6 85 14 Spending time for water supply and water drain depends on water pressure and draining...

Page 7: ...r level is reached 1 minute after starting washing process sensor will receive the signals from revolution of laundry Responding to the revolution of laundry microchip will determine the most suitable water flows 1 before completion of washing process Pulsator will rotate to create laundry disentanglement flow water After water level reaches reset point draining course continues for 1 40 In the fi...

Page 8: ...ts use MED water level Pulsator will rotate and select the suitable water flow After water level reaches reset point Draining course continues for 1 40 Water is supplied to the selected water level Intermittent spin cycle 1 10 ON Continuous spin cycle 2 20 ON During spinning if unbalance condition occurs safety switch will activate Water is supplied to HIGH level Overflow rinse Twice overflow Afte...

Page 9: ...Overflow rinse Twice overflow After water level reaches reset point draining continues 1 40 Intermittent spin cycle 1 10 ON Continuous spin cycle 50 ON During spinning if unbalance condition occurs safety switch will activate The safety device activation and load automatically adjusting program During Spin Dry cycle in Rinse process or Spin process if the safety device works the washer will automa...

Page 10: ...e indicator will blink on When pressing the SET button the preset time indicator is changed from 1 12 hours While the preset time program is selected all indicators except the PRESET hour indicator will be automatically turned off in about 1 minute Turn on the power switch ON OFF Load the laundry into the washer Turn the faucet on Press SELECT button four times to enter the preset time program Pre...

Page 11: ...ed by motor is low than 2 Motor rotated badly Tension strength of V Belt is out of specification Abnormal information Buzzer sounds with 0 3 seconds ON 0 3 seconds OFF cycles in 16 times Depending on the kind of troubles the indicators will blink on as bellow The blinking of indicators Kind of Trouble Spinning Drain Water supply Washing Child safety mode Other troubles Trouble release Trouble Indi...

Page 12: ...and PCB HEAVY DUTY The motor rotates counter clockwise Does Pulsator rotate counter clockwise Check the operation of Motor Bearing Ass y and PCB CUSTOM The drain valve operates Does drain valve open Is water drained Check the operation of Magnetic Coil and Drain valve DRY CARE The Magnetic Valve operates Does Magnetic Valve open Is water supplied Check the operation of Magnetic Valve and PCB Metho...

Page 13: ... both edges of the Control Plate lift and tilt it towards back 5 Take out 6 screws that are holding the PCB and remove the 9P 4P 3P and 2P connectors before removing the PCB 6 Reverse the order of the steps above to put the unit back Removing Back Plate 1 Remove the Cap on drainage and then remove screws 2 Hold both ends of the Back Plate lift and remove it 3 Once the Back Plate is removed the wat...

Page 14: ...emoving Magnetic Valve 1 Follow the steps 1 to 3 of Replacing Back Plate 2 Move Soap Box Ass y 3 Remove two screws that are holding Pour Inlet Ass y and Top Plate 4 With a screwdriver carefully remove the edges on both ends left and right of the Pour Inlet Ass y and lift it up Be careful not to scratch the Top Plate 5 Remove three screws holding Magnetic Valve and Pour Inlet Ass y 6 Pull Magnetic ...

Page 15: ...ollow the steps of Replacing top plate 2 Lay the washer down left or right suitably on the floor It is necessary to have a soft cloth or blanket to protect the washer 3 Remove the Top Plate 4 From bottom of Outer Tub push the Suspension Rod Ass y up until it raises from suspension base 5 After removing the Stopping Pin pull out the Suspension Rod Ass y from bottom of Frame 6 Follow the steps above...

Page 16: ... 14 pin connectors Repair or replace Magnetic Valve is defective Replace Response Switch is defective Replace P C B Complete is defective Replace Water is not supplied Check water pressure Low Remove the flow sheet of the Magnetic Valve High Clean the filter on the Magnetic Valve Note when removing the flow sheet reinstate the filter in place correctly Water does not stop Does water stop when the ...

Page 17: ...ecessary materials lock pulsator operation Take out Yes Does humming noise come on from motor No Motor wires are disconnected Repair or replace Capacitor s wires are disconnected Repair or replace Yes Capacitor is defective Replace Motor coil is shortened Replace Brake lining on Bearing Ass y is worn out Replace Bearing Ass y Is the Magnetic Coil working normally Brake Lever Ass y is defective Rep...

Page 18: ...the motor position V belt is snapped Replace Motor Pulley mounting screw is loose Tighten up Motor is disconnected or burnt Repair or replace Capacitor is defective or disconnected Repair or replace Bearing Ass y is defective Replace Magnetic Coil is defective Replace Brake Lever is defective Replace Thermostat on motor is opened Repair or replace after cooling down Poor connection of the 14 pin c...

Page 19: ...ts touch motor Repair or replace Something underneath pulsator Remove Pulsator is rubbed Adjust Bearing Ass y No Pulsator Shaft is burnt Replace Bearing Ass y Buzzing rattling during spin drying Is sound in low pitched mono tone Bearing of Bearing Ass y is defective Replace Machine is in unbalance Place machine evenly on base Does variable sound happen by vibration Suspension Rod Ass y is worn out...

Page 20: ...perness of brake lining material roughness of brake wheel surface and excessive strength of brake spring but attachment of foreign matter and high humidity can also be responsible for the symptom Diagnosis Allow water extraction program to complete automatically instead of forcibly apply the brake and listen for squeaky sound when the Spin Tub stops Handling Replace the Bearing Case complete and w...

Page 21: ... with alcohol or replace the Clutch Spring 6 Water leakage Symptom Water leaks from somewhere around the Bearing Ass y Parts of the Bearing are sometimes seen rusted Cause Oil seal lip lying on the top of ring complete is insufficiently fitted in the Outer Tub Bottom Handling Replace the Bearing Ass y 7 Click sound is heard during washing Symptom Click sound is heard from the vicinity of the Beari...

Page 22: ... 21 14 Exploded View ...

Page 23: ... 22 ...

Page 24: ... 23 ...

Page 25: ... 24 ...

Page 26: ...17 221 7390 1 P P TPC AR564 7 Hinge Shaft 617 250 0171 1 P P POM 8 Hinge Spring 617 259 8253 1 SUS 304 WPA 9 Safety Lever 617 259 8987 1 POM 10 Safety Lever Spring 617 175 0508 1 11 Switch 617 175 0485 1 KS 12 0 12 SCR TPG TRS 4x16 411 007 5606 1 13 Response Switch 617 235 7263 1 KPS 59 C 14 Lead Wire Ass y 617 245 6621 1 15 Hose Band 617 148 4632 1 16 Magnetic Valve 617 242 2084 1 JWV 203G 17 SCR...

Page 27: ... Spring Damper Base 617 180 4676 4 P P 45 Stopping Pin 617 261 0092 4 SUS 304 WPB D2 0 46 SCR TPG TRS 4x14 411 074 6605 2 47 Frame Handle 617 262 7809 2 P P NATURAL 48 Drain Hose Ass y 617 252 5853 1 INNER 49 Hose Band 617 026 4891 1 50 Drain Hose Ass y 617 155 7879 1 OUTER 51 Leg 617 259 7096 1 AR564 COOL GRAY 10C 52 Bottom Cover 617 259 8345 1 P P 53 SCR TPG TRS 4x14 411 074 6605 7 54 Cushion 61...

Page 28: ...ension Rod Ass y 617 259 7195 1 REAR LEFT 83 Overflow Hose 617 262 2040 1 PE 84 Hose Joint Ass y 617 259 7539 1 85 Special Screw 617 216 8159 3 86 Bearing Ass y 617 259 7812 1 87 Special Screw 617 029 0050 2 4x10 88 Special Screw 617 029 0234 4 SWCH 18A 89 Balance Weight 617 141 6695 1 90 Magnetic Coil 617 234 3990 1 KD SW22LB 200 240V 91 Special Screw 617 028 9740 4 FIX MAGNETIC COIL 92 Valve Ass...

Page 29: ...7355 1 106 1 SCR TPG TRS 4x10 411 074 5301 8 FIX CIRCULATE HOSE A B 106 2 SCR TPG TRS 5x22 411 075 2507 6 FIX SPIN TUB TO BALANCE WEIGHT 106 3 SCR TPG TRS 5x22 411 075 2507 12 FIX SPIN TUB BOSS 106 4 Spin Tub Ass y 617 259 7362 1 106 4 1 Circulate Hose Ass y A 617 259 7409 1 106 4 2 Circulate Hose Ass y B 617 259 7478 2 106 4 3 Balance Weight Ass y 617 259 7423 1 106 4 4 Spin Tub Boss SER SPC 0016...

Reviews: