background image

19

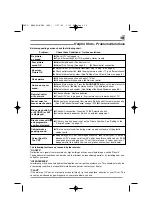
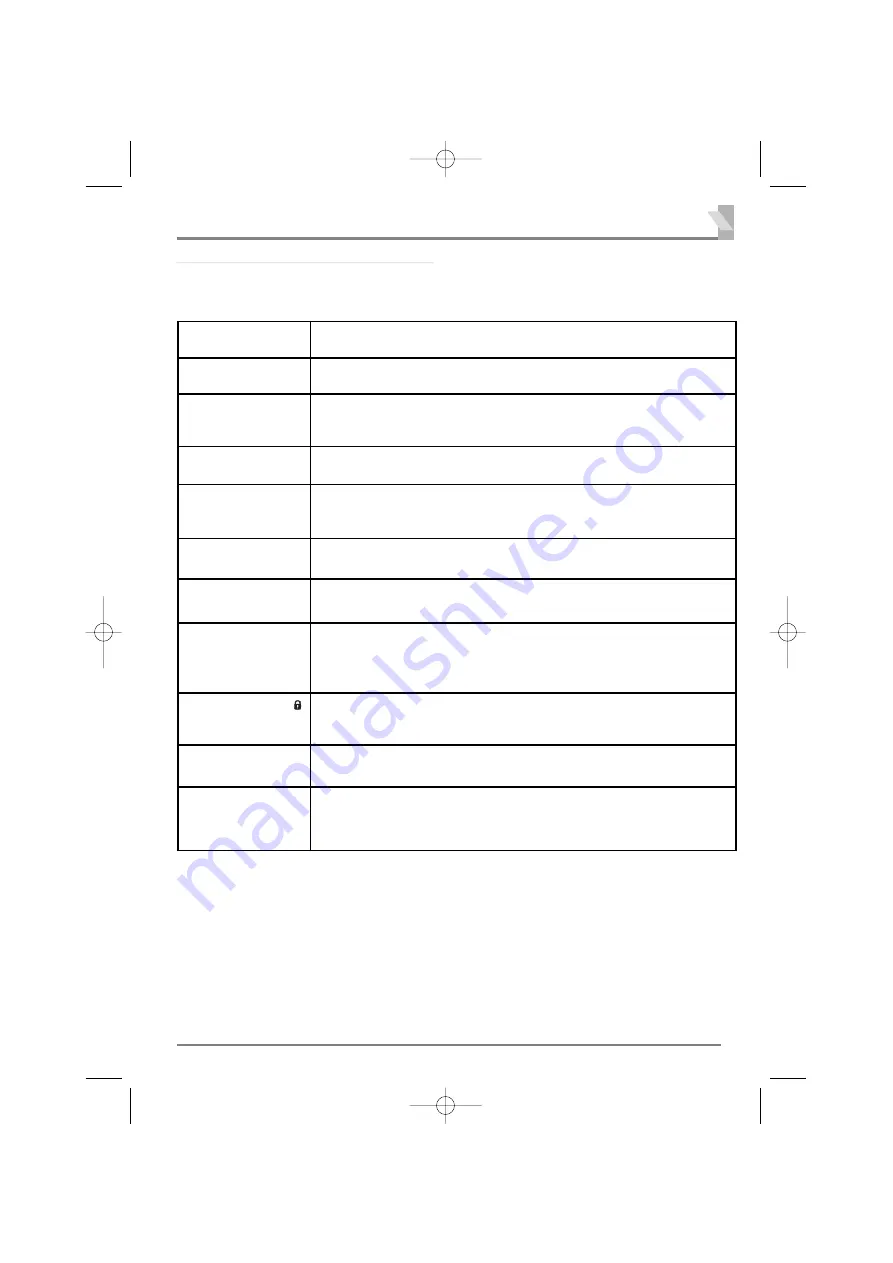
Before requesting service check the following chart.

“GHOSTS”

Reflections of signals from mountains or high buildings will cause multiple images, called “Ghosts”.
These abnormal conditions can be reduced to minimum by repositioning aerial or by installing new one
suited for your area.

“INTERFERENCE”

Interference may be caused by electrical appliances, car ignition systems, etc. This should normally be
a temporary condition, but should this interference persist, contact your dealer.

The following faults are not caused by the receiver: 

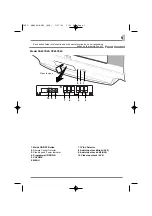
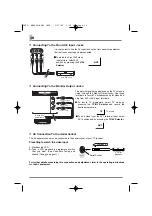
Check aerial connection on back of TV set.

Check aerial for broken wires.  

● 

Re-orient aerial.

Problem:             Check these Conditions / Try these solutions:

Check if TV is plugged in.

Try a different channel, if OK, probably station trouble.

No picture, 
no sound

Adjust Brightness or Contrast control.

Adjust Fine Tuning. (See page 9.)      

● 

Check aerial connection.

Poor picture,
sound OK

No colour,
Picture OK

Adjust Colour or Tint control. 

Adjust Fine Tuning. (See page 9.)

● 

Check aerial connection.

● 

Is the programme in colour ? Try a different channel.

● 

Select other colour system. (See Setting of the Colour System on page 8.)

Weak picture

No sound or poor
sound.

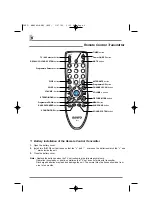
Sound Mute may be on. Press the 

SOUND MUTE

button on the remote control.

Adjust Volume.   

● 

May be station trouble. Try a different channel.

● 

Select other sound system. (See Setting of the Sound System on page 8-9.)

Remote Control
will not work.

Check batteries. Replace batteries.

Check if TV set is plugged in.  Aim remote control towards front of TV.

Cannot select or
scan some channels.

Channel may be removed from memory. Add channel to memory manually. 

(See “Skip Channel Set and Cancel” on page 12-13.)

Check aerial connection.

This is a normal condition during warm-up and cool down of the plastic 

cabinet parts.

Blue screen with AV1
or AV1(DVD) or AV2
is displayed. 

Check AV connection. Press the TV/AV Selection button.

● 

Check external equipment. Switch on external equipment. 

Check to see if channel is set as the Private Position. See “Setting of the 

Private Position” on page 13.

Black screen with
and programme 
position displayed.

Cabinet makes
popping sound.

Colour Spot On
The CRT

Keep away your TV set from magnetic source, then turn-off your TV set and 

disconnect TV's power cord from AC outlet, keep this condition about  30-60 
minutes and turn-on again your TV set if time is reach. If colour spot is not 
disappear after this solution have done, please contact your local dealer.

“SLANT”

If the picture of TV set is not properly horizontal (slant), try to change face  direction of your TV set. This
case may be caused by geo-magnetic on your place where you live. 

Helpful


Hints


-


Problems/Solutions

INST. MANUAL-BE8Y (AUS)  1/27/09  3:23 PM  Page 19

Summary of Contents for CA29YS2BS

Page 1: ...29YS2BS CP29YS2B S Instruction Manual Colour Television Flat Screen Multi System CATV Hyper Band 256 Programmes with Automatic Tuning AV Stereo Sound System DVD Input with Video Component INST MANUAL BE8Y AUS 1 27 09 3 23 PM Page 1 ...

Page 2: ...posed to dripping or splashing and that no objects filled with liquids such as vases shall be placed on the television Do not drop or push objects into the television cabinet slots or openings Never spill any kind of liquid on the television receiver At installation of the unit the plug of power cord shall remain accessible and readily operable to disconnect the unit from the wall outlet When the ...

Page 3: ...olutions 19 Plug Play I AM SEARCHING AUTO SET UP COMPLETED HAPPY VIEWING 1 ALL PROGRAMMES PLEASE WAIT This TV set provides a self automatic tuning and sorting system function called Plug Play It automatically begins searching and storing of all available channels when switching on the TV set for the first time 2 Press any of the control buttons to make the ending message disappear Or will automati...

Page 4: ...YS2BS CP29YS2B S VIDEO AV2 IN TV AV MENU CH L AUDIO R Press to open 1 2 3 6 7 4 5 8 9 10 1 Mains ON OFF Button 2 Remote Control Detector 3 Stand by and Power Indicator 4 Programme UP DOWN 5 VOLUME 6 MENU 7 TV AV Selector 8 Audio Input Jack Right AV2 9 Audio Input Jack Left AV2 10 Video Input Jack AV2 INST MANUAL BE8Y AUS 1 27 09 3 23 PM Page 4 ...

Page 5: ...F Button 2 Remote Control Detector 3 Stand by and Power Indicator 4 Programme UP DOWN 5 VOLUME 6 MENU 7 TV AV Selector 8 Audio Input Jack Right AV2 9 Audio Input Jack Left AV2 10 Video Input Jack AV2 Model CA29YS2S CP29YS2S VIDEO AV2 IN TV AV MENU CH L AUDIO R Press to open 1 2 3 6 7 4 5 8 9 10 INST MANUAL BE8Y AUS 1 27 09 3 23 PM Page 5 ...

Page 6: ...button BASS EXPANDER button SOUND MODE button SOUND SYSTEM button DIGIT button Battery Installation of the Remote Control Transmitter 1 Open the battery cover 2 Install two AA 1 5 volt batteries so that the and marks on the batteries match the and marks inside the unit 3 Close the battery cover Note Replace the batteries when the TV set is showing the following symptoms Operation is unsteady or er...

Page 7: ... Press the Digit button press 1 button Press 7 button For programme position 125 Press the Digit button twice Press 2 button Press 5 button For programme position 225 Press the Digit button 3 times Press 2 button Press 5 button P P Alternate To select the previous position and the present position Volume Up Down To adjust the sound volume level Also operates as left and right cursor CH CH Programm...

Page 8: ...UME or button The set time will be increased or decreased by 10 minutes each time the button is pressed the maximum time which can be set is 24 hours 3 Use Direct Programme Selection to insert programme position for when TV is switched on by ON TIMER see page 7 On Timer Continued Normally set the colour system to AUTO if the clear picture cannot be obtained even when the broadcasting or AV signal ...

Page 9: ... Iran Lebanon etc B G SECAM Russian Federation etc D K SECAM Myanmar etc M NTSC Picture Adjustment The 2nd page is not displayed when there is no TINT adjustment BRIGHTNESS TINT CONTRAST SHARPNESS 40 COLOUR SELECT ADJUST BACK EXIT Page 1 Page 2 FINE TUNING WHITE TONE SELECT ADJUST BACK EXIT Picture Adjustment Menu SHARPNESS Adjusts picture detail WHITE TONE Adjusts white balance FINE TUNING Fine t...

Page 10: ...djustment BALANCE Left right speaker volume balance adjustment BASS EXPANDER Operates BASS EXPANDER on and off SURROUND Operates SURROUND on and off Note When the stereo signal is inputted from the right and left audio input terminals in the AV mode surround mode is changed as follows SURROUND ON and SURROUND OFF To return to Main menu press the ALTERNATE button To return to normal TV mode press t...

Page 11: ...CH by pressing the Programme UP or DOWN button 5 Press the VOLUME button to start channel tuning The VOLUME button will move tuning toward the higher frequencies and the VOLUME button will move tuning toward the lower frequencies Semi Auto Tuning Press and release the VOLUME or button to search for required TV station Once a station is located tuning will automatically stop Continue till desired c...

Page 12: ...2 Press the SWAP button SWAP 6 AND The two TV channels will now have changed places 6 12 SWAP 6 AND 12 6 SWAPPING 3 Press the DIGIT button 1 button and then 2 button on the remote control to enter programme number 12 For example to enter programme number 3 press 3 button only When there is a position you do not use Position 4 for example by setting the SKIP Channel function it is possible to jump ...

Page 13: ...is play on the screen The private position setting is now completed Private position is used to restrict of pro gramme positions that you do not want others to watch Any position can be set as the Private position 15 15 15 AUTO BG B G AUTO 15 How To Set the Private Position 1 Select programme position 15 2 Press and hold the RECALL COLOUR SYSTEM button for more than 2 seconds 3 Press the MENU butt...

Page 14: ...obtained although the switching of surround is displayed in this monaural connection When the stereo signal is inputted from the right and left audio input terminals each time the SURROUND button is pressed or selection of On screen Menu surround mode is changed as follows SURROUND ON and SURROUND OFF To watch video input p i c t u r e select AV1 position by p r e s s i n g the TV AV Selector AV1 ...

Page 15: ...ed as follow Depending on the type of video tape or connected AV equipment being used it may be necessary to select colour system In this case press the RECALL COLOUR SYSTEM button and select a suitable colour system AV1 AUTO AV1 PAL AV1 SECAM AV1 NTSC AV1 NTSC 4 43 Connect the component output terminal on your DVD player to the component video input terminal of this product NOTE When a sig nal of...

Page 16: ...these terminals to record TV broadcasts and for video dub bing from AV1 or AV2 input terminals TV mode To Audio Input R AV2 To Audio Input L AV2 To Video Input AV2 Video DVD Player Y MONITOR OUT AV1 DVD CR CB R L MONO VIDEO R L INPUT V D E O I To Audio Output R To Audio Output L To Video Output VCR for Recording To video and audio inputs It is convenient to use the AV input jack on the front panel...

Page 17: ... with a soft cloth dampened with a mild household detergent and warm water Dry thoroughly Note NEVER spray liquids on the screen because they can run down and drip onto the chassis This may cause component failure not covered under Warranty Connect the cable with a plug from a UHF or VHF aerial to the aerial socket on the cabinet back Aerial Cable Aerial Socket For all aerial circuit problems plea...

Page 18: ...12 cm x 2 pcs Ext terminals DVD Video Component Composite Component Y CB CR input Video Inputs Phone Jack x 2 1 0Vp p impedance 75 Ω Audio Inputs Phone Jack L R x 2 436mVrms impedance more than 40KΩ Video monitor outputs Phone Jack x 1 1 0Vp p impedance 75 Ω Audio monitor outputs Phone Jack L R x 1 436mVrms impedance less than 600Ω Dimension 763 W x 578 H x 418 D mm Weight approx 38 2 Kg Specifica...

Page 19: ...lume May be station trouble Try a different channel Select other sound system See Setting of the Sound System on page 8 9 Remote Control will not work Check batteries Replace batteries Check if TV set is plugged in Aim remote control towards front of TV Cannot select or scan some channels Channel may be removed from memory Add channel to memory manually See Skip Channel Set and Cancel on page 12 1...

Page 20: ...SANYO ELECTRIC Co Ltd Part No 1AA6P1P5720 BE8E FC8 B INST MANUAL BE8Y AUS 1 27 09 3 23 PM Page 20 ...

Reviews:

Related manuals for CA29YS2BS