


20
■
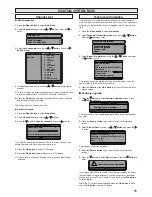
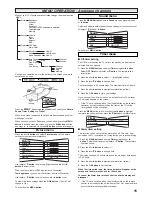
Screen options
Today there are various transmission formats with different size
ratios, eg. 4:3 , 14:9, 16:9 and video formats such as letterbox.
■
Auto
It automatically switches to the optimum screen mode according to
the WSS signal provided in the receiving signal source. If the signal
does not have it, the TV keeps current screen mode.
✐
This setting may cause the picture to change when a different
format is received eg. when an advert is received.
✐
WSS (Wide screen signalling)
Some broadcasters transmit this signal and some VCR tapes have it
included . The signal identifies the picture format ratio (16:9, 14:9, 4:3
etc.).
If WSS is not being received and you are not happy with your picture
this TV provides you the option to change it with the following options.
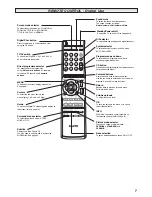
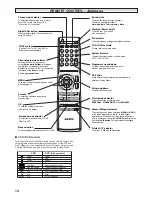
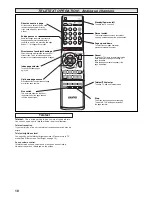
Press the
WIDE button
repeatedly to select your desired setting.
OPERA
OPERA
TION
TION
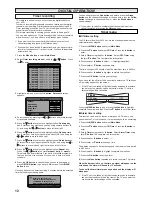
Selecting of picture size
4:3
14:9
16:9
Letterbox Video
Stretches the
picture horizontally
to fill the screen.
The picture is more
stretched at the
edges.
The height is
expanded to fill the
whole screen.
The picture fills the
screen and is
proportionally
correct.
The black bars top
and bottom remain
and the height is
compressed to fit
the picture area.
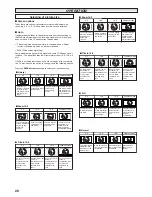
■
Natural
4:3
14:9
16:9
Letterbox Video
The correct picture
width is maintained
but the top and
bottom are
cropped.
Zooms in slightly
cropping the top
and bottom.
Zooms in slightly
cropping the top
and bottom.
The black bars top
and bottom are
smaller and the
picture height is
compressed slightly.
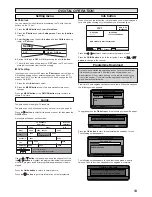
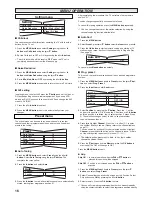
■
Zoom 14:9
4:3
14:9
16:9
Letterbox Video
As zoom (14:9), but
bottom is
compressed even
more to allow
subtitles to be
seen.
As zoom (14:9), but
bottom is
compressed even
more to allow
subtitles to be
seen.
As zoom (14:9), but
bottom is
compressed even
more to allow
subtitles to be
seen.
As zoom (14:9), but
bottom is
compressed even
more to allow
subtitles to be
seen.
TITLES ON SCREEN
TITLES ON SCREEN
TITLES ON SCREEN
TITLES ON SCREEN
■
Title In 14:9
4:3
14:9
16:9
Letterbox Video
The correct picture
width is maintained
but the top and
bottom are
cropped.
Zooms in slightly
cropping the top
and bottom.
Zooms in slightly
cropping the top
and bottom.
The black bars top
and bottom are
smaller and the
picture height is
compressed slightly.
■
Zoom 16:9
4:3
14:9
16:9
Letterbox Video
As Zoom (16:9),
but bottom is
compressed even
more to allow
subtitles to be
seen.
As Zoom (16:9),
but bottom is
compressed even
more to allow
subtitles to be
seen.
As Zoom (16:9),
but bottom is
compressed even
more to allow
subtitles to be
seen.
As Zoom (16:9),
but bottom is
compressed even
more to allow
subtitles to be
seen.
TITLES ON SCREEN
TITLES ON SCREEN
TITLES ON SCREEN
TITLES ON SCREEN
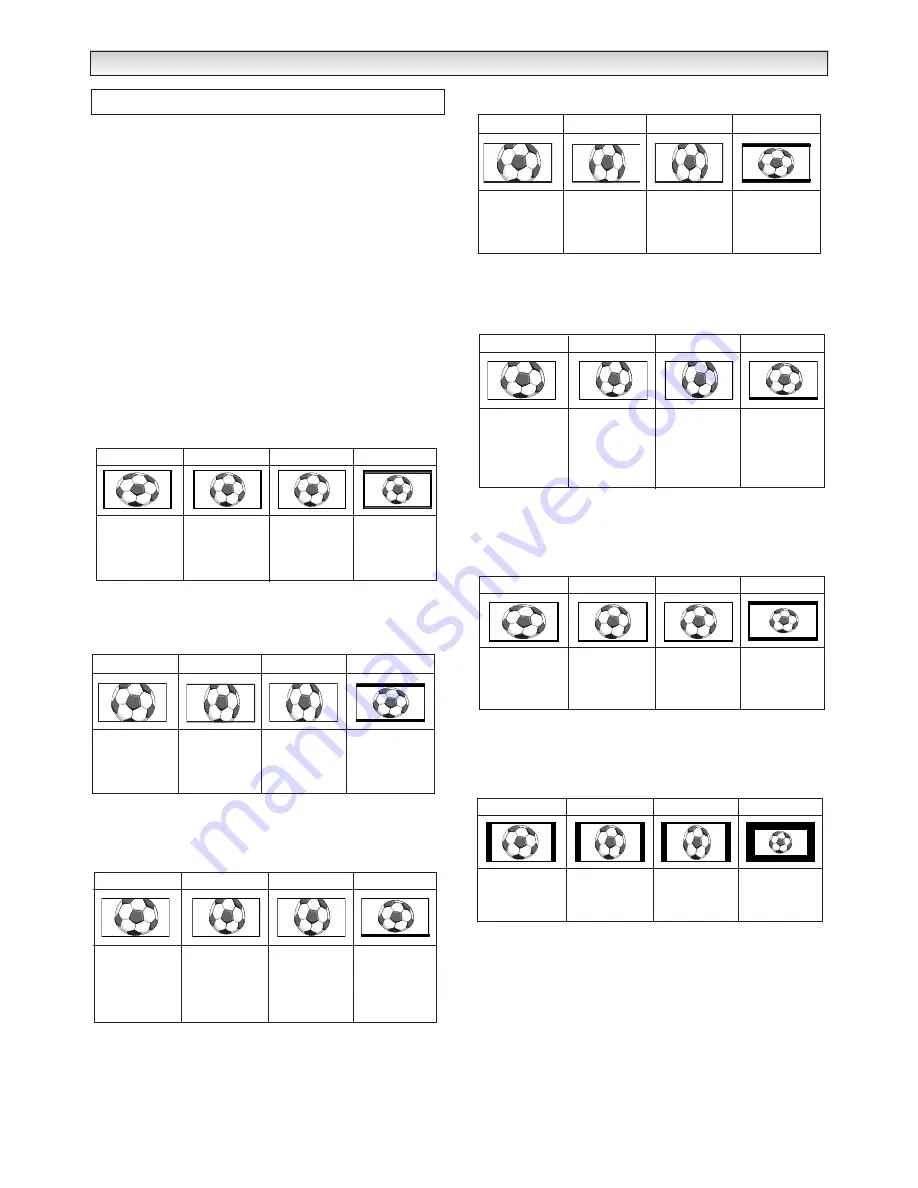
■
Title In 16:9
4:3
14:9
16:9
Letterbox Video
The correct ratio is
maintained with
black bars on the
left and right.
Black bars left and
right, picture height
is stretched.
Black bars left and
right, picture height
is stretched.
Black bars left,
right, top and
bottom.
■
Normal
4:3
14:9
16:9
Letterbox Video
The whole screen
is filled stretching
the width.
The whole screen
is filled stretching
the height slightly
at the edges.
The whole screen
is filled with the
corrrect picture
ratio.
The black bars top
and bottom are
present and the
height is
compressed.
■
Full
Summary of Contents for CE27LD4-B
Page 23: ...23 ...
Page 24: ...24 Part No 1KA6P1P0194 B N2WK WKA N2YK YKA Printed in U K ...


