background image

E8

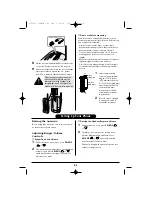
Installing the belt clip

▼ 

To attach the belt clip

Insert the belt clip into the holes
on each side of the handset. Press
down until it clicks.

Headset installation 

Your phone may be used with an optional headset.
To use this feature, simply plug any standard shield-
ed headset with a 2.5-mm plug into the headset
jack.

▼ 

To remove the belt clip

Insert a standard flat head
screwdriver into a notch of the
belt clip, then remove the belt
clip as shown below.

If you have wall-mounted the base, you
must install the belt clip to hold the
handset in the proper charging position.
Do not hang the handset with the keypad
facing inside.

Installing the Belt clip

Suggestion

• Make sure the AC adaptor is plugged into the base and wall outlet.
• Make sure the handset is properly seated in the base.
• Make sure the rechargeable battery pack is properly connected in the handset.
• Make sure that the charging contacts on the handset and on the base are clean.

• Make sure that the base antenna is in the vertical position.
• Interference by other electronics equipment such as TVs, computers, microwaves,

fluorescent lighting, etc.

• You may have gone too far from the base.
• Press 

SCAN

to search for clearer reception.

• Check both ends of the telephone line cord.
• Make sure the AC adaptor is plugged into the base and a wall outlet.
• Disconnect the AC adaptor for a few minutes, then reconnect it.
• Reset the security code by placing the handset back on the base for a few seconds.

The 

CHARGE/IN USE 

indicator will blink indicating that the phone has been reset.

• The Nickel-Cadmium battery pack may be weak. Charge the battery for a full 15

hours.

• The handset may be too far away from the base.
• Place the base away from appliances or metal objects.
• Reset the security code by placing the handset back on the charging cradle for a

few seconds. The 

CHARGE/IN USE 

indicator will blink indicating that the phone

has been reset.

Problem

CHARGE/IN USE 

indicator

won’t come on when handset
is placed in base.

Weak and/or scratchy sound

Can’t make or receive calls.

Handset doesn’t ring or
receive a page.

If your cordless telephone is not performing to your expectations, please try these simple steps. If you
are still unable to resolve the problems, contact your place of purchase or call SANYO SOS Helpline. 

Caution: Do not attempt to service this unit yourself. Servicing must be performed by
qualified personnel. 

Troubleshooting

Not all headsets are the same. Some head-
sets may lower volume levels or perform-
ance of the phone.

headset

jack

 CLT2410 (SANYO) A5 2nd  7/18/00  6:41 PM  Page 9

Summary of Contents for CLT-2410

Page 1: ...z Digital Spread Spectrum Cordless Telephone IMPORTANT Charge the handset battery pack for 15 hours before using your cordless handset for the first time Français au verso www sanyocanada com CLT2410 SANYO A5 2nd 7 18 00 6 41 PM Page 1 ...

Page 2: ...ingle narrow band used in standard digital transmissions The result is the clarity of digital sound extended range and a secure conversation with virtually no interfer ence from other 2 4 GHz cordless phones or radio transmission devices The clearest channel is automatically selected for each transmission The phone selects one of over 65 000 digital security codes for the handset and base These fe...

Page 3: ...andset microphone while you are using the phone 8 FLASH accesses call waiting if available 9 SCAN selects another channel for clearer reception 10 TONE switches to tone dialing in pulse dialing mode 11 HANDSET RETAINER holds handset in base for wall mounting 12 CHARGE IN USE indicates the phone is in use or the handset is charging 13 PAGE FIND pages or locates the handset TALK BATT LOW MEMORY MUTE...

Page 4: ...only the SANYO battery pack 3KR 600AAL or GES PCF01 3 Replace the battery cover Charging the Handset Place the handset on the base to charge The handset can charge in either the face up or face down position Low Battery Indicator When the battery pack in the handset is low and needs to be charged the TALK BATT LOW LED flashes every 3 seconds If this occurs while you are on the phone you will hear ...

Page 5: ... bottom bracket into the notches on the base 2 Plug the telephone line cord to the TEL LINE jack and the AC adaptor to the DC IN 9V jack 3 Plug the telephone line cord into the tele phone outlet 4 Fit the AC adaptor cord into the molded chan nel Then wrap the cord around the strain relief notch 5 Plug the AC adaptor into a standard 120 V AC wall outlet 6 Raise the antenna to a vertical position 7 ...

Page 6: ...handset retainer out of the slot Rotate it clockwise 180 degrees 9 Flip it over Slide it back into the slot so that the lip of the retainer is up and the points down The retainer holds the handset in place Handset retainer When the phone is mounted on the wall the handset belt clip must be attached to hold the handset in the charging position Do not place the handset with the keypad facing inside ...

Page 7: ...ress any buttons The Auto Standby feature allows you to hang up the phone by simply returning the handset to the base Temporary Tone Dialing Even if your phone line is pulse dialing you can still access special telephone services that are available to tone dialing lines only After the line is connected press TONE The subse quent numbers dialed will be sent as tone dialing Storing a Number in Memor...

Page 8: ...he SCAN but ton This function works only when the phone is in use Interference can come from appliances or other phones in your home The SCAN button on the handset allows you to choose from 30 factory set channels During the course of a conversation if you hear static or noise which makes it difficult to hear press SCAN The TALK BATT LOW indicator flashes indicating the phone is changing to anothe...

Page 9: ...or clearer reception Check both ends of the telephone line cord Make sure the AC adaptor is plugged into the base and a wall outlet Disconnect the AC adaptor for a few minutes then reconnect it Reset the security code by placing the handset back on the base for a few seconds The CHARGE IN USE indicator will blink indicating that the phone has been reset The Nickel Cadmium battery pack may be weak ...

Page 10: ...rference that may cause undesired operation of the device NOTICE Privacy of communications may not be ensured when using this telephone Other devices including other cordless tele phone telephones may interfere with the operation of this cordless telephone or cause noise during operation Units without coded access may be accessed by other radio com munication systems Cordless telephones must not c...

Page 11: ...1 800 263 2244 between 10 00 AM 7 00 PM EST Stay At Home Convenience It s a nuisance making another trip to the store when you re stuck Now with SOS all that s necessary is a quick call from your home for product assistance or exchange SOS it s the ultimate in convenience Hassle Free Exchange Should your Sanyo telephone telephone with answering system require servicing during the warranty period S...

Page 12: ...etail purchaser must present your original dated bill of sale together with this warranty to SANYO Canada Inc or to an author ized Sanyo Service Depot when you make a claim under this warranty You the original retail purchaser are responsible for any costs of TRANSPORTING the product to and from SANYO Canada Inc or an authorized Sanyo Service Depot You also are responsible for the cost of any MAIN...

Reviews: