background image

-18-

Purity and Convergence Adjustment

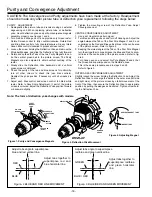
RED

BLUE

Adjust tabs together to
superimpose red and
blue horizontal line.

Figure- 2 BLUE AND RED LINE MOVEMENT

Figure- 3 BLUE/RED AND GREEN MOVEMENT

Adjust tabs together to
superimpose red/blue
and green horizontal
line.

Adjust tabs angle to superimpose
blue and red vertical line.

Adjust tabs angle to superimpose
red/blue and green vertical line.

GREEN

BLUE / RED

CAUTION: The Convergence and Purity adjustments have been made at the factory. Readjustment
should be made only after picture tube or deflection yoke replacement, following the steps below:

PURITY ADJUSTMENT
1. Demagnetize the picture tube and receiver using an external

degaussing coil. When replacing picture tube or deflection
yoke, mount deflection yoke and purity-convergence magnets
assembly properly, see figures 1 and 4.

2. Turn Red and Blue guns off and provide only Green raster.

Rotate Screen control to fully counterclockwise. Rotate Red
and Blue Bias controls fully counterclockwise. Slowly rotate
Green Bias control clockwise to produce Green raster.

3. Loosen the screw holding the Deflection Yoke and remove the

3 Rubber Wedges, and slide the Deflection Yoke fully forward.

4. Rotate and spread the Tabs of the two Purity Magnets to cen-

tre the vertical green belt in the picture screen. The Purity
Magnets are also adjusted to obtain vertical centring of the
raster.

5. Slowly slide the Deflection Yoke backward until a uniform

green screen is obtained.

6. Check the purity of the red and blue screens for uniformity,

turn off other colours to check this (use bias controls).
Readjust the yoke position if necessary until all screens are
pure.

7. Adjust each Bias control and screen control to obtain white

raster. Refer to Gray Scale Adjustment. If part of the picture
screen is coloured, adjust the Deflection Yoke position forward
or backward slightly.

8. Tighten the mounting screw of the Deflection Yoke. Adjust

Convergence next.

CENTRE CONVERGENCE ADJUSTMENT
1. Use a dot crosshatch pattern signal.
2. Turn Red and Blue guns on and turn off Green gun. Adjust the

angle between the Tabs of the Four Pole Magnet 1 and 2, and
superimpose the Red and Blue vertical lines in the centre area
of the picture screen. Refer to figure 2.

3. Keeping the mutual angle of the Tabs of the Four Pole Magnet

turn them together to superimpose the Blue and Red horizon-
tal lines in the centre area of the picture screen. Refer to fig-
ure 2.

4. Turn Green gun on and adjust Six Pole Magnet 3 and 4 that

the Green line superimposed on the Red/Blue lines.
This is the same procedure used in steps 2 and 3.
Refer to figure 3.

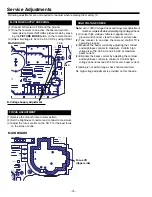
OUTER AREA CONVERGENCE ADJUSTMENT

Slightly loosen the screw holding the Deflection Yoke. Adjust the
Deflection Yoke to converge the detail in the outer area (left side
and right side) of the picture screen by orbital movement of the
front of the Yoke, then secure the Deflection Yoke in appropriate
position by putting the wedges as illustrated. Tighten screw hold-
ing the Deflection Yoke.

RUBBER
WEDGE

DEFLECTION YOKE

DEFLECTION YOKE
MOUNTING SCREW

Figure 4. Deflection Yoke Movement

SIX-POLE
MAGNET TABS

FOUR-POLE
MAGNET TABS

ANGLE
OF TABS

PURITY
MAGNET
TABS

4

3

2

1

FOCUS GAP
(G3-G4)

Figure 1. Purity and Convergence Magnets

MAGNET TABS

ANGLE OF MAGNET TABS

Figure 5. Adjusting Magnet

Note: The form of deflection yoke changes with models.

SM_21-BD6V(AC7-A)Aus  11/8/07  1:14 PM  Page 18

Summary of Contents for CP21VF1

Page 1: ...H 468 D mm Weight approx 20 5 Kg Specifications subject to change without notice Original Version Chassis Series AC7 A BD6V BD6W FILE NO Model No CP21VF1 Service Ref No CP21VF1 00 CP21VF1 50 Australia New Zealand Give complete SERVICE REF NO for parts order or servicing It is shown on the rating plate at the cabinet back of the unit This T V receiver will not work properly in foreign countries whe...

Page 2: ...ithout danger of electrical shock X RADIATION PRECAUTION The primary source of X RADIATION in television receiver is the picture tube The picture tube is specially con structed to limit X RADIATION emissions For continued X RADIATION protection the replacement tube must be the same type as the original including suffix letter Excessive high voltage may produce potentially hazardous X RADIATION To ...

Page 3: ...UT L OUT R OUT IF OUT X161 SAW FILTER IF IN IF IN T471 FBT SDA SCL T611 CONVERTER TRANS 5VRC 8V 5V 2 5V 1 3 3VRC 14V 14V 24V 11V 130V IC201 PRIMARY CIRCUIT D610 HV FOCUS SCREEN Q901 CRT L902 DY AC Power ON High 1 5 6 2 4 8 12 5 DEFLECTION AUDIO AMP FBT TUNER 11 16 12 13 ABL FEED BACK 3 26 4 25 6 23 32 28 24 80 20 19 18 2 74 72 POWER FAILURE STB Q886 54 55 56 9 13 29 Q703 Q701 Q705 38 39 POWER MNG ...

Page 4: ...Active High OSD BLUE OUT Active High CRT UNIT POWER PROTECT IN POWER ERROR LOW POWER CIRCUIT etc IIC SCL IIC SDA IC801 MEMORY LED ON OFF POWER ON High RC SIGNAL IN ACTIVE HIGH RC PRE AMP 69 SOUND MUTE MUTE H IC001 AUDIO AMP 5V_1 5V_2 8V A101 F S TUNER 5 6 5 4 IC1200 AUDIO CONTROL 17 18 74 Q886 33 27 8 7V 8 7V 8 7V POWER REGULATOR Q201 Q202 Q203 System Control QXXAVC896 M ...

Page 5: ...TS IIC Decoder ROM RAM I O CPU Core vco OSD RESET Power Manage HV BLK DRIVE CUT OFF BRIGHT CONTRAST OSD MIXING RGB MATRIX COLOR FAST SW VERTICAL COUNT DOWN HORIZONTAL COUNT DOWN SYNC SEP AFC1 H VCO AFC2 V RAMP CbCr Y RGB to YUV CONVERT G B R VCXO DDS VIDEO PRO Y DELAY SHARPNESS BLACK STRETCH Y MUTE CHROMA PRO C BPF APC PAL NTSC SECAM KILLER ID ACC 6dB AMP BASEBAND TINT MIX SBPF LIM FM DET AF AMP A...

Page 6: ...put amplifier Output amplifier Ripple Filter Ri 30kΩ Ri 30kΩ 2 7 4 5 3 6 9 14 13 11 Vcc ground shorting protection circuit Load shorting protection circuit Thermal protection circuit 10 12 IC501 Vertical Output LA78040B E Thermal Protection AMP Pump Up 1 INVERTING INPUT 2 Vcc 3 PUMP UP OUT 4 GND 5 Ver OUTPUT 6 OUTPUT STAGE Vcc 7 NON INV INPUT ...

Page 7: ...lowing picture appears on the screen 5 Switch off the TV set by pressing the Power Switch button on the TV set while the above On Screen Display is still on the screen This completes the initialization of memory IC Following shows the initialized contents of memory data by this procedure Plug play No executed Inhibit data Cancelled Ch skip data Cancelled Sound volume data 10 63 steps Volume Lock O...

Page 8: ...adjustment Data value for Blue To return to normal TV mode press the MENU button on the TV set or the remote control handset 2 Select item by pressing the SOUND MUTE Item No UP or TIMER Item No DOWN button on the remote control handset 3 Adjust data value by pressing the VOLUME or VOLUME button on the remote control handset Example 1 button POS 1 01 02 03 04 05 200 200 96 95 94 93 01 MENU TV AV CH...

Page 9: ...sition adjustment for PAL 19 AFC2 H PHASE 60 0F 10 02 Horizontal Phase H Position adjustment for NTSC 20 CONTRAST CONTROL 0 2F 1F Contrst Control Offset Data 21 BRIGHTNESS CONTROL 0 3F 33 Brightness Control Offset Data 22 TINT CONTROL TV 3F 40 0 Tint Control Offset Data for TV 23 TINT CONTROL AV 3F 40 0 Tint Control Offset Data for AV 24 SERVICE SW 0 1 0 Vertical Output ON OFF Switch Contrast Cont...

Page 10: ...D DET OFF 0 1 0 Vertical frequency standard non standard detection 68 V STD DET2 0 1 0 Vertical frequency standard non standard detection 69 V FREE FREQ 0 1 0 Vertical free running frequency 70 OSD VD DELAY 0 1 0 VD TIMING delay for OSD TIMING 71 W VBLK ON 0 1 1 Vertical blanking wide mode 16 9 72 VLOGIC STOP 0 1 0 Vertical count up logic stop 73 VBLK TEST 0 1 0 V blanking control 74 WIDE VBLK TOP...

Page 11: ...F ON 0 1 0 VIF AGC CURRENT CHANGE ON OFF switch 117 AMF VTH 0 7 0 VIF AGC CURRENT CHANGE FUNCTION INPUT LEVEL Adj 118 VIF AGC VTH HYS OFF 0 1 0 VIF AGC CURRENT CHANGE FUNCTION HYSTERESIS OFF SWITCH 119 VIF AGC SPEED UP 0 7 0 VIF AGC SPEED Adj 120 AUDIO ATT L MONO 0 7F 7F L Ch Audio output level attenuation 121 SIF OUT MUTE 0 1 01 AF direct put out ON OFF Mute switch 122 AUDIO ATT R 0 7F 7F R Ch Au...

Page 12: ... DL FINE 0 1 0 Cr signal delay time adjustment 159 CBCR GAIN UP 0 1 0 CbCr signal pedestal Gain Switch 160 CBCRPED ADJ ON 0 1 1 CbCrPED ADJ ON 161 CRPEDESTAL ADJ 0 F 3 Cr signal Pedestal level adjustment 162 CBPEDESTAL ADJ 0 F 4 Cb signal Pedestal level adjustment 163 CB DL FINE 0 3 0 Cb signal delay time adjustment 164 DL TEST 0 1 0 1HD TEST MODE 165 R MATRIX PAL 0 3 1 VIF AGC SPEED Adj 166 R MAT...

Page 13: ...BG STRAP OFFSET 9 9 01 S TRAP OFFSET for sound strap adjustment BG System 193 DK STRAP OFFSET 9 9 05 S TRAP OFFSET for sound strap adjustment DK System 194 I STRAP OFFSET 9 9 2 S TRAP OFFSET for sound strap adjustment I System 195 M STRAP OFFSET 9 9 1 S TRAP OFFSET for sound strap adjustment M System 196 BGSUB STRAP OFFSET 9 9 4 S TRAP OFFSET for sound strap adjustment Bilingual System 197 OPT PAL...

Page 14: ...e does not appear place this control to maximum fully clockwise 9 Raise each CUT OFF Level with 1 2 3 4 5 and 6 keys to obtain just visible white line 10 Select No 167 WHITE BALANCE Drive Adjustments 11 Adjust Red and Blue Drive Levels alternately with 1 3 4 or 6 key to produce normal black and white picture in highlight areas 12 Check for proper grayscale at all brightness levels To turn off the ...

Page 15: ... be optimum vertical size 5 Exit from service mode Item 6 V SIZE 50 VERTICAL SIZE Horizontal centre Vertical size c Upper Center Bottom d e a b Upper Center Bottom 1 Receive a crosshatch pattern 2 Select a picture mode of NATURAL by pressing the PICTURE MODE button 3 Select V S CORRECT 50 in the service mode 4 Adjust Vertical S letter Correction so that the difference of c d and e becomes less tha...

Page 16: ...01A R631 R632 J294 C610 C613 D609 D613 R611 D637 R639 R606 R685 C612 VR631 C617 C632 L632 L602 R609 D612 J625 D614 D636 D686 C637 R692 IC601 C614A C614 C616 8 1 7 T611A 1 9 8 T611 TP B C489 R605 C607H1 T471H5 T611H10 T611AH9 T611H7 T611AH7 T611H1 T611AH4 T611H4 T611AH1 T471H4 T47 1 Connect DC meter to TP B and the ground 2 Tune the receiver to an active channel and synchro nized picture Select NAT...

Page 17: ...de is ON Programme position from 247 to 255 and 0 are set Music Mode Only sound is provided and any picture is not on the screen under Music Mode Set AV START to ON and every time the TV set is switched on AV1 position will be the initial programme position 4 AV Start setting TUNING LOCKED How to set the special function Note When making the VOLUME LOCK setting set the desired maximum sound volume...

Page 18: ...as controls Readjust the yoke position if necessary until all screens are pure 7 Adjust each Bias control and screen control to obtain white raster Refer to Gray Scale Adjustment If part of the picture screen is coloured adjust the Deflection Yoke position forward or backward slightly 8 Tighten the mounting screw of the Deflection Yoke Adjust Convergence next CENTRE CONVERGENCE ADJUSTMENT 1 Use a ...

Page 19: ...tective circuit and restore power supply turn the power to the TV set OFF and then ON again via either the main power switch or the ON OFF button on the remote control This will work only if the power supply trouble was temporary If there is permanent trouble such as a damaged circuit power cannot be restored and the circuit will have to be repaired This TV set has a built in power supply protecti...

Page 20: ...DEC IND BB2A 3 610 331 7380 BUTTON UNITED BB2A 4 610 335 2978 CABINET FRONT BD6A 5 645 069 2185 BADGE SANYO 43 5X10L43 5 6 610 335 3012 CABINET BACK BD6A 7 645 071 1145 ASSY REMOCON JXPSC or 652 002 0634 REMOCON JXPSG 8 610 313 3393 RC BATTERY LID JXPLA 610 336 7637 INSTRUCTION MANUAL C8WE A 610 338 0674 CORRECTION NOTICE C8WM Key No Part No Description Key No Part No Description ANT 75Ω AUDIO CR ...

Page 21: ...rea of a receiver Components indicated by a mark in this parts list and the circuit diagram show components whose value have special significance to product safety It is particularly recommended that only parts specified on the following parts list be used for components replacement pointed out by the mark Note Parts order must contain Service Ref No Part No and descriptions The main PCB unit will...

Page 22: ...1739813 TR 2SC3928A1R 4051739912 TR 2SC3928A1S Q801 4050235009 TR 2SD400 E MP Q802 4052203115 TR ISA1235AC1E 4052203016 TR ISA1235AC1F 4051648016 TR KTA1504S GR RTK 4051345925 TR 2SA1037AK T146 R 4051472215 TR 2SA1037AK S T146 4051739615 TR 2SA1235A1E 4051739714 TR 2SA1235A1F Q886 4051648412 TR KTC3875S GR RTK 4050144519 TR 2SC2412K T146 R 4050144618 TR 2SC2412K T146 S 4050158724 TR 2SC2812 L6 TB ...

Page 23: ... CERAMIC 1U K 10V 4033456615 CERAMIC 1U M 10V C1223 4033588316 CERAMIC 1U K 10V 4033456615 CERAMIC 1U M 10V C1224 4033588316 CERAMIC 1U K 10V 4033456615 CERAMIC 1U M 10V C1225 4033588316 CERAMIC 1U K 10V 4033456615 CERAMIC 1U M 10V C1226 4033588316 CERAMIC 1U K 10V 4033456615 CERAMIC 1U M 10V C1228 4033588316 CERAMIC 1U K 10V 4033456615 CERAMIC 1U M 10V C124 4040970101 ELECT 1U M 50V 4040843801 EL...

Page 24: ...0849902 NP ELECT 2 2U M 100V C486 4041054701 ELECT 22U M 250V 4034553610 ELECT 22U M 250V 4034320806 ELECT 22U M 250V C489 4041137107 MT POLYEST 0 47U J 250V 4030666106 MT POLYEST 0 47U J 250V 4034335008 MT POLYEST 0 47U J 250V C491 4041136803 CERAMIC 680P K 500V 4034164915 CERAMIC 680P K 500V C511 4041151707 ELECT 10U M 50V 4032113519 ELECT 10U M 50V C514 4041151707 ELECT 10U M 50V 4032113519 ELE...

Page 25: ...U K 50V 4040901204 CERAMIC 0 01U K 50V 4032152211 CERAMIC 0 01U K 50V C803 4041032402 CERAMIC 1000P K 50V 4040901105 CERAMIC 1000P K 50V 4031133815 CERAMIC 1000P K 50V C804 4041032907 CERAMIC 0 01U K 50V 4040901204 CERAMIC 0 01U K 50V 4032152211 CERAMIC 0 01U K 50V C805 4040970408 ELECT 47U M 35V 4040854609 ELECT 47U M 35V C806 4040970408 ELECT 47U M 35V 4040854609 ELECT 47U M 35V C807 4041032907 ...

Page 26: ...LAZE 100 JA 1 10W 4011050415 MT GLAZE 100 JA 1 16W R107 4012556510 MT GLAZE 100 JA 1 10W 4011050415 MT GLAZE 100 JA 1 16W R109 4011623015 MT GLAZE 22K JA 1 10W 4011052914 MT GLAZE 22K JA 1 16W R111 4011622414 MT GLAZE 1 2K JA 1 10W 4011051016 MT GLAZE 1 2K JA 1 16W R112 4011624111 MT GLAZE 5 6K JA 1 10W 4011056011 MT GLAZE 5 6K JA 1 16W R114 4011523216 MT GLAZE 330 JA 1 10W 4011054017 MT GLAZE 330...

Page 27: ...057919 MT GLAZE 0 000 ZA 1 16W R248 4011506011 MT GLAZE 0 000 ZA 1 10W 4011057919 MT GLAZE 0 000 ZA 1 16W R355 4010126953 CARBON 10K JA 1 4W 4010127009 CARBON 10K JA 1 4W R355 4021027701 CARBON 10K JA 1 4W 4020935700 CARBON 10K JA 1 4W R421 4011506219 MT GLAZE 1K JA 1 10W 4011050514 MT GLAZE 1K JA 1 16W R422 4010213712 CARBON 56K GA 1 4W 4010214036 CARBON 56K JA 1 4W 4010214105 CARBON 56K JA 1 4W ...

Page 28: ...A 1 6W 4021085800 CARBON 3 9K JA 1 6W 4020943101 CARBON 3 9K JA 1 6W R801 4011505915 MT GLAZE 10K JA 1 10W 4011050613 MT GLAZE 10K JA 1 16W R802 4011506110 MT GLAZE 2 2K JA 1 10W 4011052815 MT GLAZE 2 2K JA 1 16W R805 4010247004 CARBON 1K JA 1 6W 4021027503 CARBON 1K JA 1 6W 4020939500 CARBON 1K JA 1 6W R806 4011505915 MT GLAZE 10K JA 1 10W 4011050613 MT GLAZE 10K JA 1 16W R809 4010269600 CARBON 4...

Page 29: ...0 ZENER DIODE MTZJ10A 4070996122 ZENER DIODE MTZJ10B 4080472009 ZENER DIODE MTZJ10A 4080472207 ZENER DIODE MTZJ10B 52 D106 4070638220 ZENER DIODE MTZJ10A 4070996122 ZENER DIODE MTZJ10B 4080472009 ZENER DIODE MTZJ10A 4080472207 ZENER DIODE MTZJ10B 52 D1201 4070058602 DIODE ERA15 02 V1 4080456801 DIODE ERA15 02 4080583101 DIODE ERA15 02 D122 4080627003 DIODE 1SS356WS 4071661118 DIODE 1SS356 TW11 D19...

Page 30: ...R FUSE 6520019591 HOLDER FUSE A101 6450904059 TUNER U V A1901 6450476228 UNIT REMOCON RECEIVER 6450820465 UNIT REMOCON RECEIVER K1001 6520012974 JACK RCA 3 6520018914 JACK RCA 3 K1003 6520015425 JACK RCA 6 6520022751 JACK RCA 6 K1005 6520022768 JACK RCA 3 6520015401 JACK RCA 3 PS601 4080465407 TH PTDCA1BF4R5Q200 SW1901 6450034701 SWITCH PUSH 1P 1TX1 6450194887 SWITCH PUSH 1P 1TX1 6520018761 SWITCH...

Page 31: ...8 4012567516 MT GLAZE 390 JA 1 10W 4011054512 MT GLAZE 390 JA 1 16W R711 4010654505 OXIDE MT 12K JA 2W R712 4010654505 OXIDE MT 12K JA 2W R713 4010654505 OXIDE MT 12K JA 2W R715 4010091508 CARBON 2 7K JA 1 2W 4021033207 CARBON 2 7K JA 1 2W 4020924308 CARBON 2 7K JA 1 2W R716 4010091508 CARBON 2 7K JA 1 2W 4021033207 CARBON 2 7K JA 1 2W 4020924308 CARBON 2 7K JA 1 2W R717 4010091508 CARBON 2 7K JA ...

Page 32: ... R833 J805 J808 J819 J811 J299 J003 J219 J027 J229 J1901 J1903 J836 J838 JP205 J101 J102 J103 JP602 J502 J505 D001 D005 D202 D609 J012 J290 J830 J822 J024 J023 J026 J014 J828 J827 J025 J228 J833 J834 J018 J013 J820 J011 J293 J205 R818 JP643 D485 D632A J004 C524 J825 J017 J503 R635 J404 J606 T471 R614 R613 D613 R611 D637 R639 D486 J608 J610 J609 K1003 K1005 J1001 J289 D445 D1201 D512 J006 R606 R 66...

Page 33: ...1AA4B10S0440B 1 5 JP741 K701 K701A K7U K7Y Q701 Q703 Q705 R701 R707 R715 R716 R717 R732 E Q701A R743 C708 E Q703A E Q705A C751 J701 C710 JP705 J702 JP703 JP702 R711 R712 R 7 1 3 L702 JW7Y K7P K7Q 1 3 A30C5 CRT Board Parts Side ...

Page 34: ...0 9V 4 GND 5 11 5V 6 25 2V 7 2 1V IC802 MEMORY Pin 1 GND 2 GND 3 GND 4 GND 5 5V 6 5V 7 0V 8 5V IC001 AUDIO AMP Pin 1 0V 2 11 9V 3 0 7V 4 0V 5 0 7V 6 3 9V 7 0V 8 0V 9 11 5V 10 5 6V 11 0V 12 5 7V 13 0V 14 5 5V 15 0V IC1200 AUDIO CONTROL Pin 1 3 6V 2 3 6V 3 3 6V 4 3 6V 5 3 6V 6 3 6V 7 3 6V 8 3 6V 9 3 6V 10 3 6V 11 3 6V 12 0V 13 0V 14 0V 15 7 2V 16 7 2V 17 3 4V 18 3 4V 19 3 6V 20 3 6V 21 3 6V 22 3 6V ...

Page 35: ... 35 ...

Page 36: ...SANYO Electric Co Ltd Nov 07 30 CPS Printed In Indonesia ...

Page 37: ... PC123Y52 D610 PC123X5YFZ 1 10GZ0C R238 1 16GZ0C X R237 1 10GZ0C R246 KK0 01GQ C816 KK0 01LBYAG KK0 01VEAG 250GJ 0 47 C489 250GJ 0 47FE 2SJ 1 5C R604 2SJ0 68C R603 2SJ12C R643 2SJ1C R668 2SJ2 7C R481 X R223A X R831A 1SJ120GB R831 X R210A 1SJ100GB R223 1SJ68 KGB R606 1SJ39KGB R103 1 10GJ22C R840 35EM47LBVD C204 35EM47LBWA 100PM2 2X C471 100PM2 2LBYAJ 100PM2 2LBZAJ 35EM47LBVD C805 35EM47LBWA 35EM47 ...

Reviews: