background image

REMOTE CONTROL

Controls

Number buttons (1-9, 0)

These buttons are used to select the track numbers
on a disc or preset radio stations.
If the function is “CD”, the buttons select the track
numbers on a disc.
If the function is “TUNER”, the buttons select preset
radio stations.
With any other function, the buttons will not function.
-

Two buttons must always be pressed.
Example:
To select No. 3, press 0, then 3.
To select No. 10, press 1, then 0.
To select No. 25, press 2, then 5.

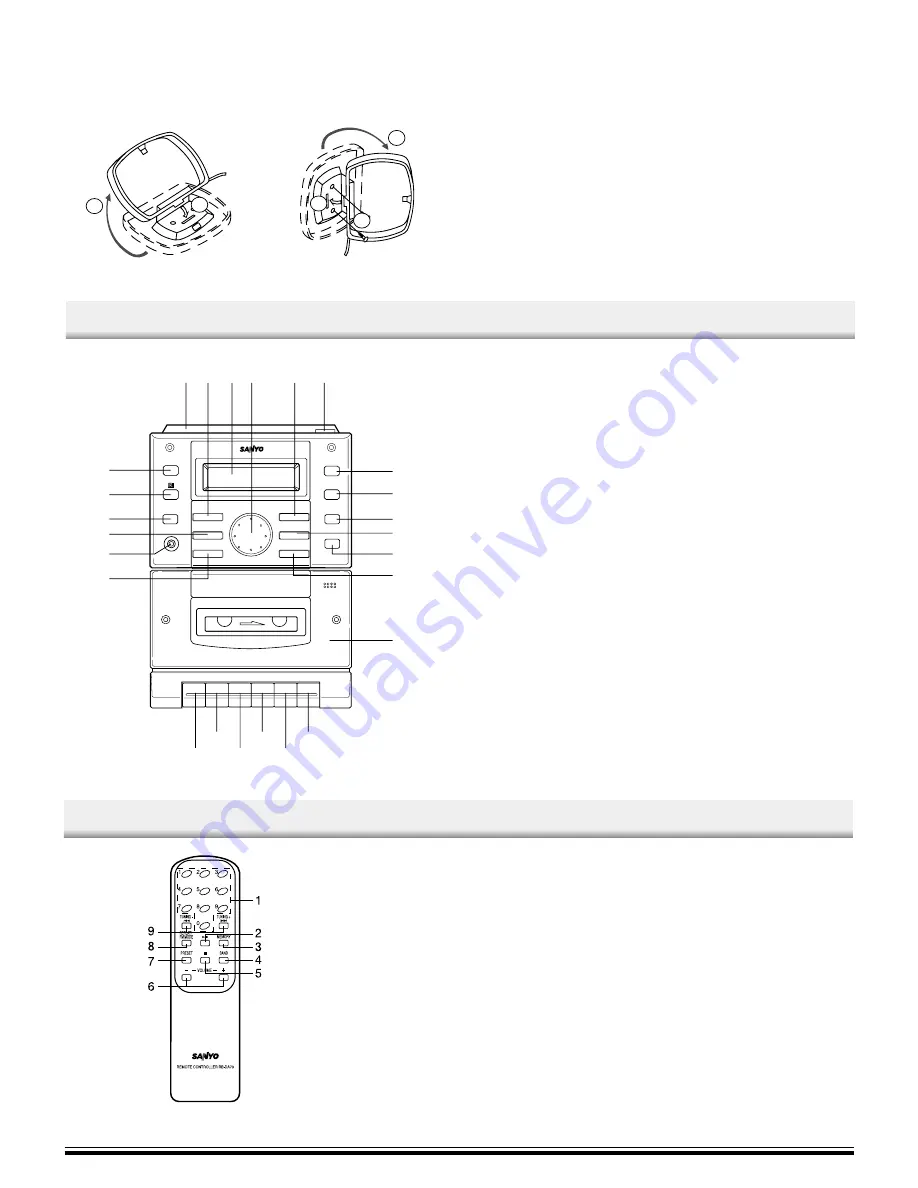
CONTROLS

CD player / Tuner / General

  1. CD compartment lid
  2. Radio band button (TUNER/BAND)
  3. Display
  4. Volume control (VOLUME DOWN/UP)
  5. Surround button (SURROUND)
  6. CD compartment opening button (CD OPEN)
  7. CD Play/Pause button (

i

)

  8. Stop/Clear button (

n

)

  9. Tuning up/Skip/Search button (TU UP 

g

)

10. Bass expander button (BASSXPANDER)
11. Tuning down/Skip/Search button  (TU DOWN 

h

)

12. Sound preset button (SOUND PRESET)
13. Power button (

Y

 OFF, 

Z

 ON)

14. Remote sensor (IR)
15. Function button (FUNCTION)
16. Preset button (PRESET)
17. Headphones socket (PHONES)
18. Memory button (MEMORY)

Cassette deck

19. Record button (REC)
20. Play button (PLAY)
21. Rewind button (REW)
22. Fast forward button (F FWD)
23. Stop/Eject button (STOP/EJECT)
24. Pause button (PAUSE)
25. Cassette holder

AM loop aerial

Assemble the loop aerial as shown in figure. Unwind the aerial wires, then
connect them to the AM LOOP terminals. Place the loop aerial in a position
which yields the best AM reception, or attach it to a wall or other surface
as shown in figure.

Screws (not supplied)

1

2

3

2

1

Note:
To minimize noise, the speaker, mains and any other leads should not
come close to the indoor or external aerial lead and AM loop aerial. Do not
place the aerial leads close to the system.

Subwoofer output socket (SUB WOOFER)

Connect the amplified subwoofer (not supplied) to the SUB WOOFER
socket.

Headphones

Connect stereo headphones (not supplied) to the PHONES socket for
monitoring or for private listening. The speakers are automatically discon-
nected when headphones are connected.

 1. Number buttons (1-9, 0)
 2. Play/ Pause button ( 

i

 )

 3. Memory button (MEMORY)
 4. Radio band button (BAND)
 5. Stop/ Clear button ( 

n

 )

 6. Volume buttons (,–)
 7. Preset button (PRESET)
 8. Repeat/ FM mode button

(REPEAT/ FM MODE)

 9. Tuning/ Skip/ Search buttons

(TUNING– 

f

 , 

e

)

-2-

Y

OFF

Z

ON

FUNCTION

PHONES

MEMORY

DOWN

PRESET

TUNER/ BAND

UP

VOLUME

TU UP

TU DOWN

SOUND PRESET

BASS

XPANDER

SURROUND

i

n

c

/

e

d

a

m

c

n

/

q

k

f

/

d

PUSH TO CLOSE

REC

PLAY

REW

F FWD

STOP/ EJECT

PAUSE

1

2

3 4

5

6

7

8

9
10

11

12

25

13

14

15
16
17

18

19

21

23

20

22

24

Summary of Contents for DC-DA180

Page 1: ...C DA180 Micro Component System Y OFF Z ON FUNCTION PHONES MEMORY DOWN PRESET TUNER BAND UP VOLUME TU UP TU DOWN SOUND PRESET BASS XPANDER SURROUND i n c e d a m c n q k f d PUSH TO CLOSE REC PLAY REW F FWD STOP EJECT PAUSE ...

Page 2: ...r tion and noise CONNECTIONS Amplified subwoofer not supplied FM aerial wire AM loop aerial L ch speaker R ch speaker To an AC outlet 1 CLASS 1 LASER PRODUCT LUOKAN 1 LASERLAITE KLASS 1 LASERAPPARAT CAUTION USE OF CONTROLS OR ADJUSTMENTS OR PERFORMANCE OF PROCEDURES OTHER THAN THOSE SPECIFIED IN THE OPERAT ING INSTRUCTIONS MAY RESULT IN HAZARDOUS RADIATION EXPOSURE THIS PRODUCT SHOULD NOT BE ADJUS...

Page 3: ...n STOP EJECT 24 Pause button PAUSE 25 Cassette holder AM loop aerial Assemble the loop aerial as shown in figure Unwind the aerial wires then connect them to the AM LOOP terminals Place the loop aerial in a position which yields the best AM reception or attach it to a wall or other surface as shown in figure Screws not supplied 1 2 3 2 1 Note To minimize noise the speaker mains and any other leads...

Page 4: ... appears on the display and a wide effect is created Bass expander system Press the BASSXPANDER button to enhance the bass sound BASS appears on the display Selecting the sound mode Press the SOUND PRESET button to select the sound mode matching the music to be listened to POP Pops etc ROCK Rock music etc JAZZ Jazz etc CLASSIC Classical music etc WHAT TO DO IF If the operation of the unit or displ...

Page 5: ...di tion to conventional 12 cm CDs this system can be used to play 8 cm CDs without an adapter 1 Press the FUNCTION button to select CD function 2 Press the CD OPEN button The CD compartment opens 3 Place the disc with the label fac ing up on the disc turntable Place only one disc at a time 4 Press the CD compartment lid PUSH TO CLOSE portion to close it The total number of tracks and total playing...

Page 6: ...f button on the remote control can also be used Manual tuning Press the TU UP or TU DOWN button briefly until the desired frequency is displayed To preset stations Up to 20 stations for FM band 12 stations for AM band can be preset 1 Tune in the station to be preset as described above 2 Press the MEMORY button LISTENING TO THE RADIO 3 While PROG is blinking press the PRESET button to select the ch...

Page 7: ...quired For programmed recording programme the material in advance as described under PROGRAMMED PLAY 4 Press the REC button The PLAY button is engaged simultaneously and CD recording starts When you want to record music as you listen press the REC button Recording starts automatically from the beginning of the track 5 Press the STOP EJECT button to stop recording When the end of the tape is reache...

Page 8: ...stereo Frequency response 80 Hz to 15 kHz Signal to noise ratio 40 dB Wow flutter 0 15 WRMS Fast forward rewind time Approx 110 sec C 60 SPECIFICATIONS General Output power 4W x 2 at 4 ohms 10 distortion Outputs SPEAKERS 4 ohms PHONES 8 32 ohms Power requirements AC 230 240 V 50 Hz Power consumption 19 W Dimensions 150 W x 240 H x 212 D mm Weight 2 3 kg Speaker systems Type Full range bass reflex ...

Reviews: