background image

8

F 9

F11

F10

2.     Press the 

/- 

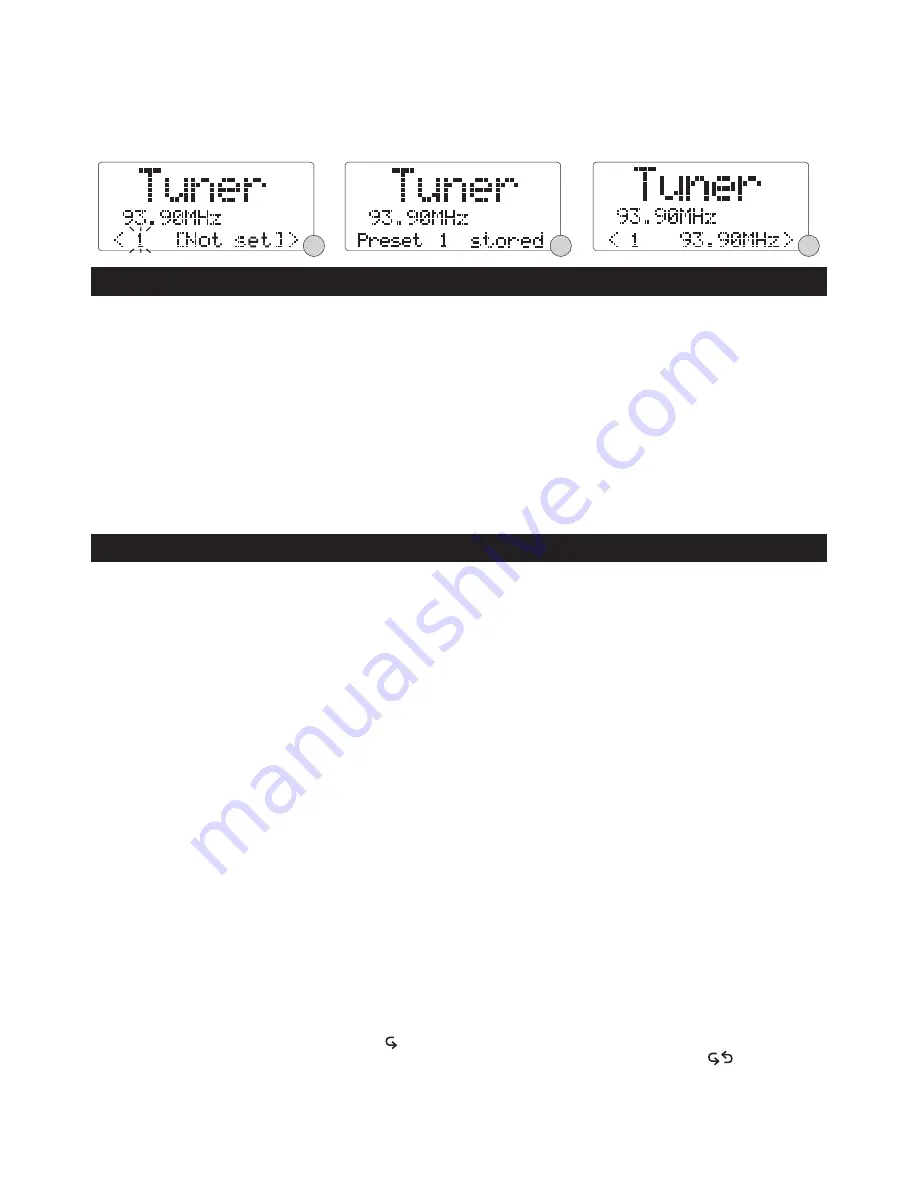
buttons to select your desired station preset number.

3.

Finally  press  the 

PROGRAM 

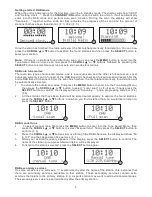
button  to  confirm  your  selection,  the  display  will  show  “Preset  # 

stored”. (F.10)

4.

To  recall  a  preset  station  that  you  have  stored,  press  the 

PRESET  +/-

  buttons,  the  display  will 

show  the  preset  number  and  the  associated  information.  It  would  tune  to  the  station  in  one 
second after the buttons are released. (F.11)


When  you  move  the  system  to  another  part  of  the  country,  your  pre-tuned  and  stored  DAB  stations 
may  no  longer  be  available.  If  this  is  the  case  then  you  will  need  to  reset  your  system  back  to  its 
original factory settings; to perform a factory reset, please do the following:
1. 

Connect the unit to mains and press the

 STANDBY/ON

 button once to turn the unit on.

2.

Ensure the unit is in DAB mode, then press and hold the 

MENU

 button until the display shows 

“Press SELECT to confirm reset”.

3.

Release  the 

MENU

  button  and  press  the 

SELECT 

button  once,  the  display  will  show 

“Restarting…” and then perform auto scan function.

4.

After  the  scan  has  finished,  the  radio  will  select  and  display  the  first  alphanumerically  found 
station. 

Note:

  All of your stored DAB & FM presets will be lost once the reset has taken place.

NOTE:

  Although  this  CD  player  can  read  CD-R  and  CD-RW  discs  in  addition  to  normal  CDs,  the 

playability of CD-R and CD-RW discs may be affected by the type of software that was used to create 
the  discs,  as  well  as  the  quality  and  condition  of  the  blank  media  you  are  using,  100%  playability 
cannot be guaranteed. This is not an indication of a problem with the player.

Playing the entire CD

1.      When the unit is ON, press the 

CD

 button to select CD function. The display will first show 

“Switch to CD” and then finally “NO DISC”. (F.12) (F.13) 

2.

Press the 

OPEN

 button to open the CD door, insert the disc with the printed label side facing up 

and then close the CD door. The display will first show “READING” and then the total number of 
tracks and time. (F.14)

3.

Press the 

/II 

button to start playback from the first track, the display will show the current track 

number and elapsed time. (F.15)

4.

To interrupt playback, press 

/

II


button once, “

II

” will be displayed and the time in the display will 

flash. 

5.

To resume playback, press the 

/

II


button again.

6.

To stop playback, press the 

 button.

Selecting a different track during play

1.      To select a different track during play, press the

 I

◀◀

or 

▶▶

I

buttons until the desired track 

number appears on the display, then release the button, playback will begin from this track.

2.

To play the next track, press the 

▶▶

I

button once.

3.

To play the previous track, press the 

I

◀◀

button twice. 

4.

To play the current track from the beginning during play, press the 

I

◀◀

button once.

Repeat play

1.      Press the 

REPEAT

 button to select the repeat play, to repeat the same track, press the 

REPEAT


button once, the display will show “      1 ”. (F.16)

2.

To repeat the entire disc, press the 

REPEAT

 button again, the display will show “        ”. (F.17)

3.

To  cancel  repeat  play,  repeatedly  press  the 

REPEAT 

button  until  the  repeat  icon  disappears  in 

the display.

    FACTORY RESET

    LISTENING TO YOUR COMPACT DISCS

Summary of Contents for DC-DB10

Page 1: ...INSTRUCTION MANUAL DC DB10 Micro Hi Fi System with DAB FM ...

Page 2: ...UTIONS 2 4 REMOTE 4 PUTTING THE BATTERY INTO THE REMOTE CONTROL UNIT 5 5 5 5 LISTENING TO YOUR RADIO 5 7 8 8 9 10 10 10 10 11 11 12 REMOTE CONTROL OPERATION 5 CLOCK SETTING STORING AND RECALLING PRESET STATIONS FACTORY RESET LISTENING TO YOUR COMPACT DISCS TIMER FUNCTION SLEEP FUNCTION MUTE FUNCTION remote control only HEADPHONE JACK MAINTENANCE TROUBLE SHOOTING ...

Page 3: ... or built in cabinet Minimum distance about 100mm around the apparatus for sufficient ventilation No naked flame sources such as lighted candles should be placed on the apparatus Do not use where there are extremes of temperature below or exceeding 35 C Sudden changes in the ambient temperature may cause condensation to form on the optical lens inside the unit lf this happens take out the disc lea...

Page 4: ... RADIATION WHEN OPEN AND INTERLOCKS DEFEATED AVOID EXPOSURE TO BEAM CUIDADO PRODUTO LASER DE CLASSE 1 RADIAÇÃO LASER INVISÍVEL CUANDO ABERTO E SE O DE SEGURANÇA ESTIVER DEFEITUOSO A EXPOSIÇÃO AOS RAIOS ADVARSEL USYNLIG LASERSTRALING VED ÃBNING NÃR SIKKERHEDSAFBRYDERE ER UDEAF FUNKTION UNDGA UDSÆTTELSE FORSTRÃLING VARO AVATESSA JA SUOJALUKITUS OHITETTAESSA OLET ALTTIINA NÄKYMÄTTÖMÄLLE LASERSÄTEILYL...

Page 5: ...AM BUTTON 16 VOLUME CONTROL 17 DISPLAY INFO BUTTON 18 SLEEP BUTTON 19 TIMER BUTTON 20 IR SENSOR 21 SPEAKER TERMINALS 22 DAB FM WIRE ANTENNA 23 AC POWER CORD 1 2 3 4 5 6 8 9 10 11 12 13 14 16 15 7 1 STANDBY ON BUTTON 2 DISPLAY INFO BUTTON 3 REPEAT BUTTON 4 PROGRAM BUTTON 5 RANDOM BUTTON 6 MUTE BUTTON 7 DAB FM BUTTON 8 CD BUTTON 9 STOP MENU BUTTON 10 PLAY PAUSE SELECT BUTTON 11 SCROLL I BUTTON 12 SC...

Page 6: ...onnected to a 240V 50Hz AC outlet then you can now press the STANDBY ON button to switch the unit ON Pull the AC plug out of the wall socket if you want to switch off completely CLOCK SETTING LISTENING TO YOUR RADIO The clock will only set and be updated if you can receive DAB signals in your location In order for the clock to synchronise to the current local time you must leave it one DAB station...

Page 7: ...ally selected 1 To activate the auto scan modes first press the MENU button to enter into the Tune Select Menu then press the SCROLL or button to select Local scan or Full scan finally press the SELECT button to confirm the display will show Scanning and a progressing slide bar F 4 F 5 2 All the stations that have been found will be stored automatically to explore the found stations press the SCRO...

Page 8: ...Y Ensemble Multiplex Group name The Ensemble Multiplex is a collection of radio stations that are bundled and transmitted together in a single frequency There are national and local multiplexes local ones contain stations that are specific to that area Note Press and hold the DISPLAY INFO button for longer than 2 seconds the software version number will be displayed FM radio 1 To select FM press t...

Page 9: ...lity and condition of the blank media you are using 100 playability cannot be guaranteed This is not an indication of a problem with the player Playing the entire CD 1 When the unit is ON press the CD button to select CD function The display will first show Switch to CD and then finally NO DISC F 12 F 13 2 Press the OPEN button to open the CD door insert the disc with the printed label side facing...

Page 10: ...ntinue until the last programmed track has played 6 To erase the program in CD stop mode press the button once in CD play mode press the button twice MEM will disappear in the display Repeat program play You may use the program play and the repeat play features together to continuously repeat a programmed playback First program the desired playback sequence then press the REPEAT button to select r...

Page 11: ...ly the display will show MUTE and flash To cancel mute and restore the sound press the MUTE button again or the VOLUME button the MUTE will disappear in the display A 3 5mm type stereo headphone jack is located on the front panel Connect a set of stereo headphones not included to this jack for private listening without disturbing others The external speakers are automatically disconnected when the...

Page 12: ...eaned from the centre to the edge Never use benzene thinners record cleaner fluid or anti static spray Be sure to close the CD door so the lens is not contaminated by dust Do not touch the lens CORRECT INCORRECT FROM THE CENTRE TO THE EDGE 11 COMPACT DISC SPECIFICATIONS POWER SUPPLY AC 240V 50Hz OUTPUT POWER 3W x 2 UNIT DIMENSION 135 L x 233 W x 170 H mm SPEAKER BOX DIMENSION 130 L x 135 W x 170 H...

Page 13: ...ons FM stereo broadcast is hard to hear due to much noise Weak signal Press the SELECT button to display MONO Reorient the FM aerial wire Connect the speaker wires firmly to the speaker terminals The remote controller does not work properly The batteries in the remote controller are weak or installed incorrectly Check the battery polarity or Replace the battery The remote controller is not aimed a...

Page 14: ...CODE NO 112975600 SANYO Electric Co Ltd Printed in China ...

Reviews: