background image

9

Note:

 Please make sure you are using the correct insert for your iPod and that it is properly docked into the clock

radio.  Failure to do so may damage your iPod.

While your iPod is docked in the system, it recharges (until fully charged).  Note that other non-docking iPods
will NOT charge.

1.

Dock the already playing iPod.  The clock radio will autmoatically turn on and you will hear the music playing
from your iPod.

1.

2.

3.

Note:

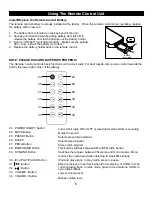
 If the playing song/music loudness is too low, clock radio may not detect iPod is in play mode.  Press the

PLAY/PAUSE Button

 on the clock radio (or 

PLAY/PAUSE Button

 on the remote control) twice to play it.

When the iPod is docked and in standby mode, press the 

PLAY/PAUSE Button

 on the clock radio (or 

PLAY/

PAUSE Button

 on the remote control) to play it.  The iPod Icon will appear on the clock radio LCD display,

showing iPod Playing mode.
Press the 

PLAY/PAUSE Button

 again to pause play; press again to resume play.

Press the 

VOLUME UP or DOWN

 on the clock radio (or 

and Volume - Button

 on the remote

control) to adjust the system volume.
Press the 

MUTE Button

 on the remote control to turn OFF the sound. Press the 

MUTE Button

 again or

/- buttons

 on Handset to restore the sound.

Press        or         

Button

 to go to the next or previous track.  Press and hold while track is  playing for high

speed forward or reverse music search of the current track.
To turn off the unit, press the 

POWER Button

 or 

POWER ON/OFF Button

 on remote control to turn it off.

The iPod will continue charging while in the dock.

4.

5.

6.

7.

Charging your iPod

Listening to your iPod

Please note that this unit will not recharge iPod 1G, 2G and 3G.

Summary of Contents for DMP-P7

Page 1: ...Clock Radio with dock for iPod INSTRUCTION MANUAL iPod is a trademark of Apple Inc registered in the US and other countries DMP P7 ...

Page 2: ...ing and that no objects filled with liquids such as vases shall be placed on the product The normal ventilation of the product shall not be impeded for intended use Do naked flame sources such as lighted candles should be place on the apparatus The ventilation should not be impeded by covering the ventilation openings with items such as newspapers table cloths curtains etc Do not place the product...

Page 3: ...ains plug and consult your dealer DON T remove any fixed cover as this may expose dangerous voltages DON T leave equipment switched on when it is unattended unless it is specifically stated that it is designed for unattended operation or has a standby mode Switch off using the switch on the equipment and make sure that your family knows how to do this Special arrangements may need to be made for i...

Page 4: ... Button ALARM 2 Button SNOOZE DIMMER Button iPod PLAY PAUSE Button BAND RADIO Button POWER Button 1 2 3 4 5 6 7 8 9 10 11 12 13 14 15 Battery compartment AC Cord AUX OUT Jack CLOCK Button AM Loop Antenna Socket AUX IN Jack FM Antenna Wire 16 17 18 19 20 21 22 Controls and Indicators 1 2 3 4 5 6 7 8 9 10 11 12 13 14 15 16 22 21 20 19 18 17 ...

Page 5: ...tor located on the back of the unit for AM band radio operation For best reception please move the AM antenna 12 away from the unit and iPod 1 2 3 4 Getting Started Thin iPods Insert Thick iPods Insert Nano Insert iPod 3 Gen 10 15 GB iPod 3 Gen 20 GB iPod 4 Gen 20 GB iPod Photo 30 GB iPod 3 Gen 30 GB iPod 3 Gen 40 GB iPod 4 Gen 40 GB iPod Photo 40 GB iPod Photo 60 GB iPod Nano 2 GB iPod Nano 4 GB ...

Page 6: ...Batteries information 1 2 3 4 Do not mix old and new batteries Do not mix alkaline standard carbon zinc or rechargeable nickel cadmium batteries Maintenance Place the unit on a level surface away from sources of direct sunlight or excessive heat Protect your furniture when placing your unit on a natural wood and lacquered finish A cloth or other protective material should be placed between it and ...

Page 7: ...new one NOTE PLEASE DISCARD BATTERIES PROPERLY Using The Remote Control Unit 23 25 27 34 29 31 33 24 26 28 30 32 POWER ON OFF Button MUTE Button PRESET Button SLEEP PROG Button BAND RADIO Button ST MONO Button iPod PLAY PAUSE Button Button Button VOLUME Button VOLUME Button Turns clock radio ON or OFF or reset alarm when alarm is sounding Mutes the sound Selects preset radio stations Selects sleep...

Page 8: ...od Indicator SHUFFLE Indicator PRESET Indicator Alarm 1 Armed Wake To Indicator iPod Radio Buzzer Alarm 2 Armed ST KHz MHz Indicator Radio Frequency Date Volume Level AUX Display FM Indicator PM Indicator TIME ALARM Display AM Indicator ...

Page 9: ...ote Make sure to adjust volume level for comfortable wake up volume 2 Setting Clock Time and Calendar 1 2 3 4 Press and hold the CLOCK Button located on the back of the unit until 12H or 24H appeared Select your desired clock display either 12 hour or 24 hour by pressing SKIP FORWARD or BACKWARD Button repeatedly Then press the CLOCK Button again to confirm 12H or 24H mode setting The clock displa...

Page 10: ... radio or PLAY PAUSE Button on the remote control to play it The iPod Icon will appear on the clock radio LCD display showing iPod Playing mode Press the PLAY PAUSE Button again to pause play press again to resume play Press the VOLUME UP or DOWN on the clock radio or Volume and Volume Button on the remote control to adjust the system volume Press the MUTE Button on the remote control to turn OFF ...

Page 11: ...tenna should be placed up to 12 away from the unit for best reception Rotate the AM loop antenna as required for best AM reception Listening to a non docking iPod or other portable audio devices Listening to Radio 10 Press the BAND RADIO Button on the clock radio to play the radio The radio frequency appears at the lower of the display Press the BAND RADIO Button on the clock radio repeatedly to s...

Page 12: ...urs unless the controls are changed 1 2 3 4 5 NOTE TO WAKE TO iPOD YOUR iPOD MUST BE PROPERLY DOCKED AND OFF NOT IN PLAY MODE OR NO ALARM WILL SOUND 6 Note When you select Wake To iPod please make sure your iPod has enough songs to play for 1 hour otherwise please set the iPod repeat mode to ON Note If you select Wake To iPod but no iPod is present or there is no music on the iPod at alarm time th...

Page 13: ...P or DOWN or press Volume and Volume Button on the remote control to adjust sleep volume The sleep volume will remain at that level the next time the you enter sleep mode until controls are changed To stop listening at any time press the POWER Button or POWER ON OFF Button on the remote control 1 2 3 4 5 Press the SNOOZE DIMMER Button on the clock radio after the alarm sounds The alarm will go off...

Page 14: ...e dock and on your iPod Then reseat it in the dock iPod didn t install properly iPod does not respond to the unit Remove your iPod from the dock and check for obstruction on the connectors in the dock and on your iPod Then reseat it in the dock iPod is not installed properly Upgrade software on your iPod For details visit http www apple com ipod download Your iPod software is too old Please make s...

Page 15: ...c CD via the aux socket Sound source is distorted Battery weak Point the Remote Control toward the clock radio move within 10 feet of the unit Remote Control is not pointed toward to the clock radio This is normal Sound is distorted Remote Control didn t work Unit gets warm after extended play at high volume The signal from the aux out jack needs amplification Use powered speakers monitors or othe...

Page 16: ...SANYO Electric Co Ltd Made in China 77 20AR60100520 English ...

Reviews: