background image

34

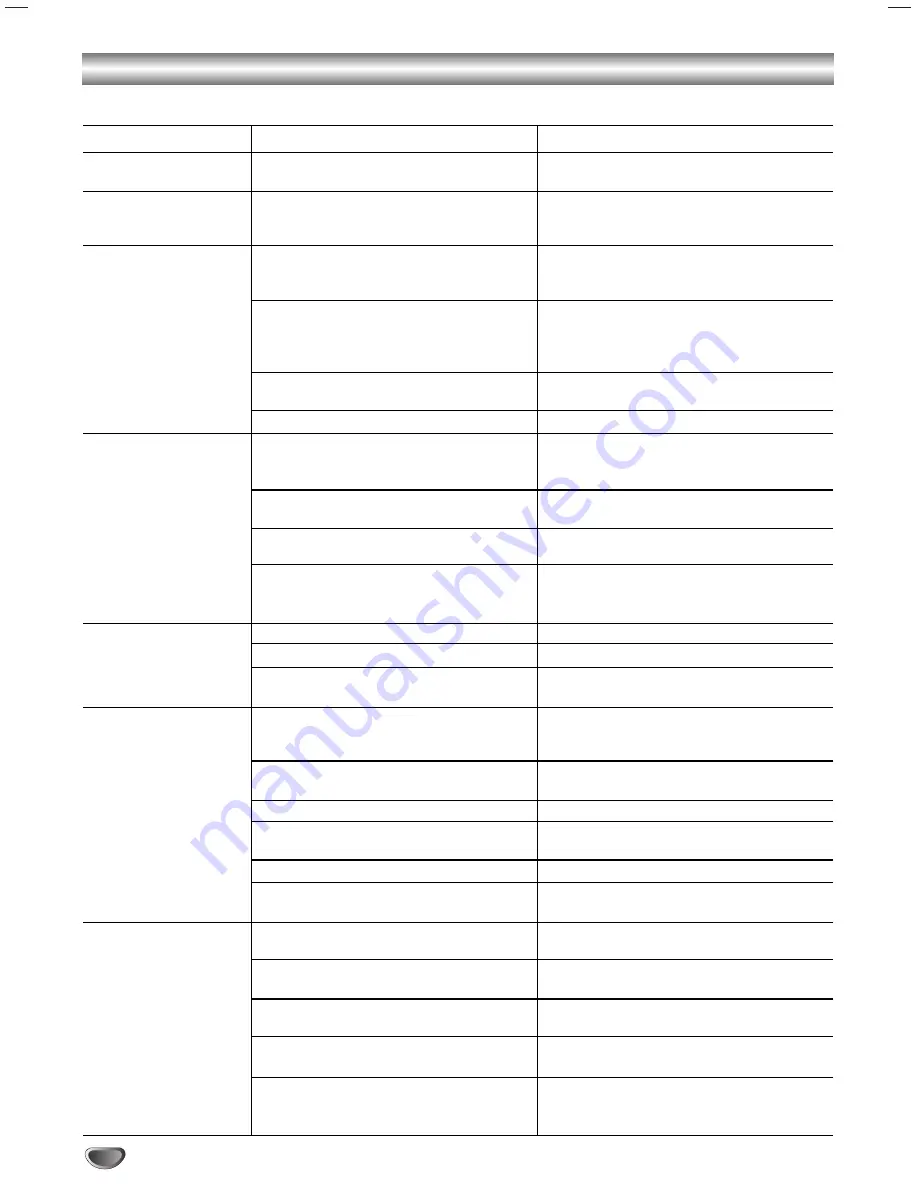
Symptom

No power.

The power is on, but
the DVD+VCR does not
work.

No picture.

No sound.

The playback picture is
poor.

The DVD+VCR does
not start playback.

The remote control
does not work properly.

Cause

The power cord is disconnected.

No disc is inserted.

No tape is inserted.

The TV is not set to receive DVD+VCR
signal output.

TV/VCR mode for DVD+VCR is set to
TV.

The video cable is not connected
securely.

The connected TV power is turned off.

The equipment connected with the
audio cable is not set to receive
DVD+VCR signal output.

The audio cables are not connected
securely.

The power of the equipment connected
with the audio cable is turned off.

The Digital Audio Output is set to the
wrong position.

The disc is dirty.

Tape heads are dirty.

Tape is a rental or was recorded on
another VCR.

No disc is inserted.

No tape is inserted.

An unplayable disc is inserted.

The disc is placed upside down.

The disc is not placed within the guide.

The disc is dirty.

The Rating level is set.

The remote control is not pointed at the
remote sensor of the DVD+VCR.

The remote control is too far from the
DVD+VCR.

There is an obstacle in the path of the
remote control and the DVD+VCR.

The batteries in the remote control are
exhausted.

This remote control has same buttons
between VCR and DVD (ex. PLAY).

Correction

Plug the power cord into the wall outlet
securely.

Insert a disc or tape. (Check that the
disc or tape indicator in the display 
window is lit.) 

Select the appropriate video input mode
on the TV so the picture from the
DVD+VCR appears on the TV screen.

Press the TV/VCR button on the remote
control repeatedly to choose VCR
mode. VCR indicator light appears in
the display window.

Connect the video cable securely. 

Turn on the TV. 

Select the correct input mode of the
audio receiver so you can listen to the
sound from the DVD+VCR.

Connect the audio cable securely.

Turn on the equipment connected with
the audio cable.

Set the Digital Audio Output to the 
correct position, then turn on the
DVD+VCR again by pressing POWER.

Clean the disc.

Clean video heads.

Use CH/TRK (

v

/

V

) for manual tracking

adjustment while tape is playing.

Insert a disc or tape. (Check that the
disc or tape indicator in the display 
window is lit.) 

Insert a playable disc. (Check the disc
type, color system, and Regional code.)

Place the disc with the playback side down.

Place the disc on the disc tray correctly
inside the guide.

Clean the disc.

Cancel the Rating function or change
the rating  level.

Point the remote control at the remote
sensor of the DVD+VCR.

Operate the remote control within 23 ft
(7 m).

Remove the obstacle.

Replace the batteries with new ones.

When using a VCR, first press the VCR
button. When using a DVD, first press
the DVD button.

Troubleshooting

Check the following guide for the possible cause of a problem before contacting service.

Summary of Contents for DVC-2500

Page 1: ... operating it for the first time Keep the manual in a safe place for future reference As an ENERGY STAR Partner SANYO has determined that this product or product model meets the ENERGY STAR guidelines for energy efficiency INSTRUCTION MANUAL DVC 2500 DVD Player Video Cassette Recorder English Lecteur DVD Magnétoscope à cassette Français ...

Page 2: ...enerates uses and can radiate radio frequency energy and if not installed and used in accordance with the instruction manual may cause harmful interference to radio communications However there is no guarantee that interference will not occur in a particular installation If this product does cause harmful interference to radio or television reception which can be determined by turning the product ...

Page 3: ...duct 12 Overloading Do not overload wall outlets extension cords or integral convenience receptacles this can result in a risk of fire or electric shock 13 Outdoor Antenna Grounding If an outside antenna or cable system is connected to the product be sure the antenna or cable system is grounded so as to provide some protection against voltage surges and built up static charges Article 810 of the N...

Page 4: ...rts specified by the manufacturer or have the same characteristics as the origi nal part Unauthorized substitutions may result in fire elec tric shock or other hazards 22 Safety Check Upon completion of any service or repairs to this product ask the service technician to perform safety checks to determine that the product is in proper operating condition 23 Disc Tray Keep your fingers well clear o...

Page 5: ...cast 26 Tape Counter Memory Feature 27 Additional Information 27 Operation with DVD and Audio CD 28 31 Playing DVD and Audio CD 28 General Features 28 Moving to another TITLE 28 Moving to another CHAPTER TRACK 28 Slow Motion 28 Still Picture and Frame by Frame Playback 29 Search 29 Random 29 Repeat 29 Repeat A B 29 3D Surround 29 Changing the Audio Language 29 Changing the Audio Channel 29 Time Se...

Page 6: ...d CDs excessive noise may be exhibited from the analog stereo output To avoid possible damage to the audio system turn down the volume before playing back such discs adjust the vol ume gradually and keep the volume level low To enjoy DTS Digital SurroundTM playback an external 5 1 chan nel DTS Digital SurroundTM decoder system must be connected to the digital output of the unit Disc related terms ...

Page 7: ...sunlight or sources of heat or leave it in a parked car exposed to direct sun light as there may be a considerable temperature increase inside the car Cleaning discs Fingerprints and dust on the disc can cause poor pic ture quality and sound distortion Before playing clean the disc with a clean cloth Wipe the disc from the cen ter out Do not use strong solvents such as alcohol benzine thinner comm...

Page 8: ... window Shows the current status of the DVD VCR Disc Tray DVD deck Insert a disc here POWER Switches the DVD VCR ON and OFF DVD VCR indicator Indicates the active deck OUTPUT SELECT DVD VCR Select one of your output sources to view on the TV screen between DVD and VCR REC z z To record normally or to activate Instant Timer Recording CHANNEL v v V V To scan up or down through memorized channels PLA...

Page 9: ...Displays the recording and playback speed AM Indicates AM time PM is not displayed HI FI Indicates the unit is playing back a tape recorded in Hi Fi Indicates total playing time elapsed time remaining time or current deck status Playback Pause etc CH DVD VCR is tuned to Channel XX TITLE Indicates current title number CHP TRK Indicates current chapter or track number VCR DVD VCR functions are avail...

Page 10: ...t forwards picture search through 30 seconds of recording A B SP EP Repeats sequence Selects recording speed OPEN CLOSE EJECT Z Z Opens and closes the disc tray Ejects the tape in the VCR deck OUTPUT SELECT Cycles through the 3 main output views DVD Tuner and VCR SELECT ENTER Acknowledges menu selection Displays functions on the TV screen DISC MENU Accesses menu on a DVD disc INPUT To select the V...

Page 11: ...em TV Monitor Another VCR ANTENNA INPUT Connect the VHF UHF CATV antenna to this terminal DVD VHS OUT VIDEO AUDIO Left Right Connect to a TV with video and audio inputs AUDIO OUT Left Right DVD OUT Connect to a TV amplifi er receiver or stereo system AC Power Cord Plug into the power source S VIDEO OUT DVD OUT Connect to a S Video Input on TV COMPONENT VIDEO OUT Y Pb Pr DVD OUT Connect to a TV wit...

Page 12: ... Antenna Adaptor 300 ohm to 75 ohm not supplied and slip the Adaptor onto the ANT IN jack The Adaptor does not screw on to the DVD VCR it just slips over the jack Without Cable Box If your cable wire is connected to your TV without a converter or descrambler box unscrew the wire from your TV and attach it to the ANT IN jack on the DVD VCR Use the supplied round coaxial cable to connect between the...

Page 13: ... listen to DVD playback through the connections shown below For using S VIDEO OUT or COMPONENT VIDEO OUT jack set the TV Output Select mode on the SETUP menu to corresponding mode See page 19 Audio Video connection 1 1 Connect the VIDEO OUT jack on the DVD VCR to the video in jack on the TV using the video cable supplied V 2 2 Connect the Left and Right AUDIO OUT jacks of the DVD VCR to the audio ...

Page 14: ...ides the best sound quality For this you need a multi channel Audio Video receiver that supports one or more of the audio formats supported by your DVD VCR MPEG 2 Dolby Digital and DTS Check the receiver manual and the logos on the front of the receiver Caution Due to the DTS Licensing agreement the digital output will be in DTS digital out when DTS audio stream is selected Notes If the audio form...

Page 15: ... SETUP clock setting and timer recordings are accessed conveniently with On Screen Menu Displays that lead you through each step The following pages describe the On screen selections to be set Menu Selection Your VCR allows remote control adjustment of several features 1 1 Press MENU and the MAIN menu will appear 2 2 Select the desired menu with v V button and then press SELECT ENTER Note Menus re...

Page 16: ...n a stereo tape is played the stereo sound will be heard through the left and right channels If a mono tape is played and the audio output is set to stereo the same mono sound will be heard from both left and right channels AUDIO OUTPUT can be switched among STEREO LEFT and RIGHT by pressing b B Channel Selection This DVD VCR is equipped with a frequency synthesized tuner capable of receiving up t...

Page 17: ... TV station does not send or sends wrong date and or time information and the DVD VCR sets the incorrect time If this happens we recommend that you set the clock manually Manual Clock Set Example July 5 2002 2 15 AM 1 1 Press MENU and the MAIN menu will appear 2 2 Press v v V V to choose the SET CLOCK menu Press SELECT ENTER and the SET CLOCK menu will appear 3 3 Press b b B B to choose the month ...

Page 18: ...screen display disappears OFF A B ALL TRACK CHAPT TITLE Options Title Number Chapter Number Time search Audio language and Digital Audio Output mode Subtitle language Angle Sound Function Press v v V V to select desired option Shows the current title number and skips to the desired title number Shows the current chapter number and skips to the desired chapter number Shows the elapsed playing time ...

Page 19: ...a standard 4 3 TV is con nected Displays pictures cropped to fill your TV screen Both sides of the picture are cut off 16 9 Wide Select when a 16 9 wide TV is connected TV Output Select It is used to select the video output source either S VIDEO OUT jack or COMPONENT VIDEO OUT jacks S Video Select when you use S VIDEO jack for TV connection Component Select when you use COMPONENT VIDEO OUT jacks f...

Page 20: ...hanged Use v V to select the desired option and press SELECT ENTER The setting of the selected option is changed between On and Off Dynamic Range Control DRC With the DVD format you can hear a program s sound track in the most accurate and realistic presentation possible thanks to digital audio technology However you may wish to compress the dynamic range of the audio output the difference between...

Page 21: ... the rating level in order to play the disc 5 5 Press SELECT ENTER to confirm your rating selection then press SETUP to exit the menu Password If you change the rating level to 7 or lower you must enter a 4 digit password to prevent playback of discs with higher ratings 1 1 Select Password using v v V V buttons on the setup menu 2 2 While Password is selected press B 3 3 Enter a 4 digit password u...

Page 22: ...screen This is normal The audio is automatically muted during special effect modes so there is no sound during search During the high speed picture search modes a short period is needed to stabilize tape speed when re entering the PLAY mode Slight interference may be observed during this period Search This function lets you quickly and visually search for a desired tape section in either direction...

Page 23: ... to resume recording Timer Recording This DVD VCR can be programmed to record up to 8 programs within a period of 1 year For unattended recording the timer needs to know the channels to be recorded and the starting and ending times Preparation Turn on the power of both the DVD VCR and the TV Be sure the TV is set to the DVD VCR output channel 3 or 4 Make sure the CHANNEL SOURCE in the CHANNEL SETU...

Page 24: ...VCR off for timer recording to take place Tip If you are finished programming and you want to set the DVD VCR to record the programs you have entered A MAKE SURE YOU HAVE INSERTED A TAPE INTO THE DVD VCR B YOU MUST TURN OFF THE DVD VCR BEFORE IT WILL RECORD ANY TIMER PROGRAMS TIMER indicator lights The DVD VCR is now set to record the preset programs Note If the power fails or the DVD VCR is unplu...

Page 25: ... wish to edit or dub your camcorder or another VCR recordings to this DVD VCR the rear or Front panel mounted Audio and Video A V input jacks make the connections quick and easy These direct A V jacks will also provide better picture results than using the RF jack on the rear panel 1 1 Connect the camcorder s or another VCR s A V outputs to your DVD VCR as illustrated on page 14 2 2 Set the input ...

Page 26: ...sed One or both of the indicators will light depending on the MTS broadcast If only STEREO appears on the TV screen The DVD VCR can record in stereo onto the VHS Hi Fi audio tracks when the BROADCAST TYPE option is in the STEREO position The DVD VCR will also record mono audio onto the mono audio track If only SAP appears on the TV screen Set the BROADCAST TYPE option to SAP If STEREO SAP appears ...

Page 27: ...or may not be displayed correctly depending on the condition of the tape and the kind of the tape T 140 T 160 or T 210 etc Additional Information In manual recording Timer recording Instant Timer Recording playback or fast forward modes the DVD VCR automatically starts rewinding the tape at the end of the tape The cassette will stop at the beginning of the tape and be ejected and the DVD VCR will ...

Page 28: ...e Do not keep an image or on screen displayed for a long time General Features Note Unless stated otherwise all operations described use the remote control Some features may also be available on the Setup menu Moving to another TITLE When a disc has more than one title you can move to another title as follows Press DISPLAY when playback is stopped then press the appropriate numbered button 0 9 the...

Page 29: ... title currently playing press REPEAT a second time The Repeat Title icon appears on the TV screen 3 To exit Repeat mode press REPEAT a third time The Repeat Off icon appears on the TV screen Audio CDs Repeat Track All Off 1 To repeat the track currently playing press REPEAT The Repeat Track icon appears on the TV screen 2 To repeat the disc currently playing press REPEAT a second time The Repeat ...

Page 30: ... TV screen in the sequence shown below X4 X16 Normal 2 Use b B v V buttons to move the zoom point 3 Press SELECT ENTER The zoomed picture appears 4 To resume normal playback press ZOOM repeatedly until the normal picture appears Notes The zoom function may not work for some DVDs The zoom function may not work on multi angle scenes Marker Search You can start playback from a memorized point Up to f...

Page 31: ...ilable on the disc Programmed Playback with Audio CD Program allows you to store your favorite tracks for a particular disc in the DVD VCR memory Program can contain 20 tracks 1 1 Insert an audio CD and close the tray 2 2 Press PROGRAM during playback or in the stop mode The Program menu appears Note Press PROGRAM to exit the Program menu 3 3 Use the numbered buttons to select the desired track nu...

Page 32: ...hese standards There are many different types of recordable disc formats including CD R containing MP3 files Customers should also note that permission is required in order to download MP3 files and music from the Internet Our company has no right to grant such per mission Permission should always be sought from the copyright owner Playing MP3 Discs The DVD VCR can play MP3 format recordings on CD...

Page 33: ...a track repeatedly Press REPEAT once during playback The current track will be played back repeatedly To playback a entire directory repeatedly Press REPEAT twice during playback All of the tracks within the directory will be played back repeat edly To playback an programmed track repeatedly Press REPEAT once during programmed playback The current track will be played back repeatedly To playback a...

Page 34: ...he power cord into the wall outlet securely Insert a disc or tape Check that the disc or tape indicator in the display window is lit Select the appropriate video input mode on the TV so the picture from the DVD VCR appears on the TV screen Press the TV VCR button on the remote control repeatedly to choose VCR mode VCR indicator light appears in the display window Connect the video cable securely T...

Page 35: ... or MONO Correction Use ADD DEL CH to restore channels See Channel Selection on page 16 Tighten connections or replace cable Try all CHANNEL SOURCE options See Channel Selection on page 16 for details Turn camcorder on and operate properly Press INPUT to select LINE input chan nel LINE1 or LINE2 Set clock to correct time See Setting the Clock on page 17 Turn DVD VCR off to enable timer TIMER indic...

Page 36: ... Korean 7585 Kurdish 7679 Laothian 7665 Latin 7686 Latvian Lettish Code Language 7678 Lingala 7684 Lithuanian 7775 Macedonian 7771 Malagasy 7783 Malay 7776 Malayalam 7784 Maltese 7773 Maori 7782 Marathi 7779 Moldavian 7778 Mongolian 7865 Nauru 7869 Nepali 7879 Norwegian 7982 Oriya 8065 Panjabi 8083 Pashto Pushto 7065 Persian 8076 Polish 8084 Portuguese 8185 Quechua 8277 Rhaeto Romance 8279 Romania...

Page 37: ...VCR Specifications Head system Four head helical scan azimuth system Timer 12 hour display type with AM PM Tape speed SP 33 35 mm sec LP 16 67 mm sec EP 11 12 mm sec Tape width 12 7 mm Maximum recording time SP 2 HOURS T 120 EP 6 HOURS T 120 8 HOURS T 160 Rewind time About 3 minutes T 120 Antenna 75 ohms VHF UHF VHF output signal Channel 3 or 4 Switchable Channel coverage VHF 2 13 UHF 14 69 CATV 1...

Page 38: ......

Reviews: