background image

12

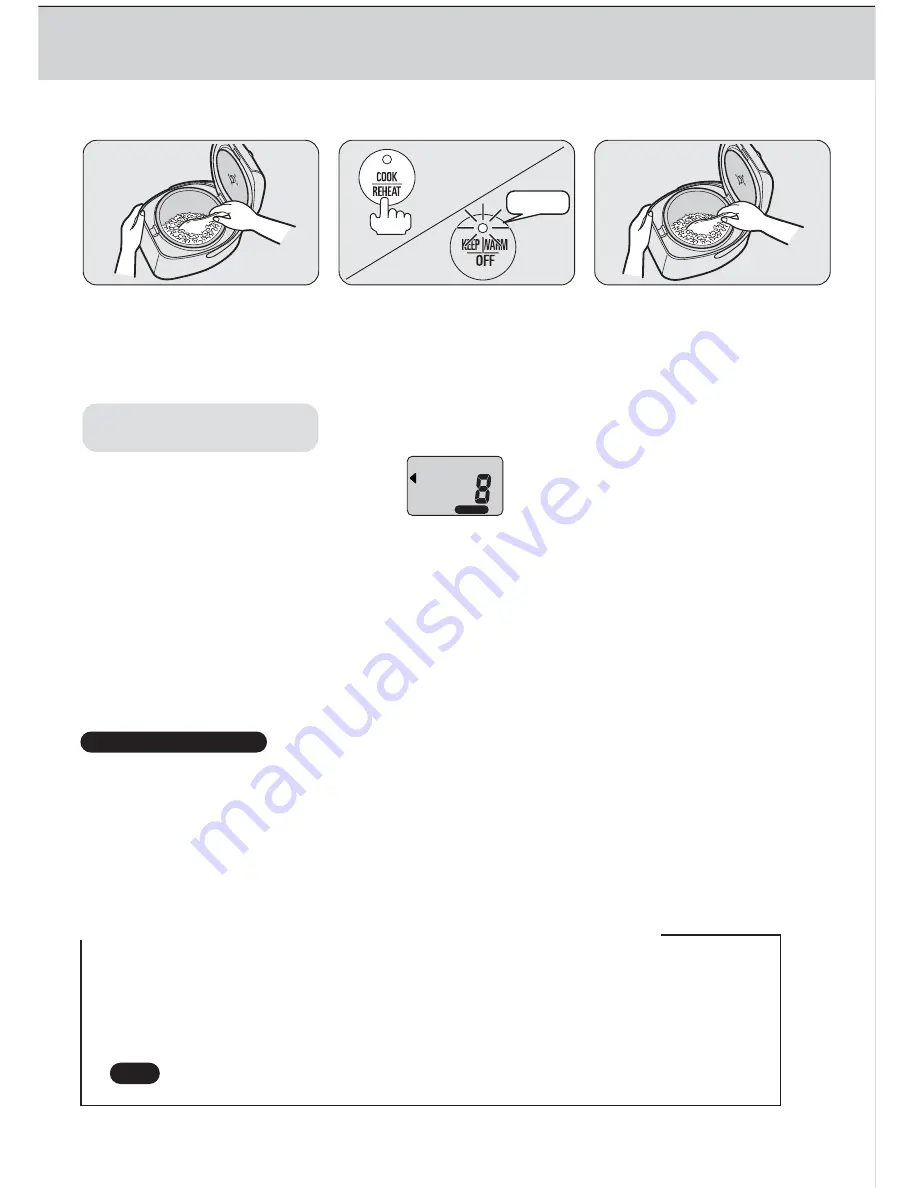
HOW TO REHEAT RICE

HOW TO COOK DOL SOT BI BIM BAB

• Always stir the rice in the Inner 

Pot to prevent scorching.

• Level the rice.

• Close the Outer Lid. 

Stir the rice and make it
level.

1

2

3

Press the COOK/REHEAT
button.

Stir the rice again when
reheating is completed.

• The 

KEEP WARM 

lamp will flash

and reheating will begin.

• The 

DISPLAY PANEL

will show 

the remaining time.  Reheating 
takes approximately 8 minutes
depending on the rice temperature.

• To cancel reheating, press the 

  COOK/REHEAT 

button again.

  The 

REHEAT  

lamp disappears 

  from the 

DISPLAY PANEL 

and 

  the unit will return to the 

KEEP 

  WARM 

mode. 

• When reheating is completed, 

the 

KEEP WARM 

lamp will light, 

and the unit will return to

KEEP WARM 

mode.

• Make sure to stir the rice 

thoroughly as the rice at the 
bottom may become slightly 
hard.

(Rice being kept warm may be reheated.)

Make sure that the 

KEEP WARM

lamp is lit.

TIPS FOR REHEATING

• For better results, reheat rice when the Inner Pot is less than half full.  

• Do not reheat other than white or rinse-free rice.  Do not reheat rice more than once as this may cause 

rice to burn, turn yellow or develop an odor.

• Sprinkle some water on the rice when reheating a small amount of the rice.  This will prevent the rice 

from becoming dry.  Sprinkle 1 tablespoon of water per 2 bowls of rice.

• Do not reheat cold rice as this may cause the rice to develop an odor.

Flashing

TIME LEFT

M

REHEAT

• Put up to 4 cups of cooked rice into Inner Pot.
• Add the cooked ingredients of Dol Sot Bi Bim Bab on rice and stir it gently.
• Select 

DOL SOT BI BIM BAB

 from the menu, then begin cooking.  

  Cooking takes approximately 12 to 20 minutes depending on the rice temperature.
• When cooking is done, stir the rice gently and serve hot.

Note

   When cooking packaged convenience foods, follow the directions according to package.

Summary of Contents for ECJ-E35S

Page 1: ...INSTRUCTION MANUAL MICRO COMPUTERIZED RICE COOKER WARMER ECJ E35S 3 5Cups マイコンジャー炊飯器 ...

Page 2: ...tant Safeguards 3 Precautions 4 6 Names and Function of Parts 7 Setting the Clock 8 How to Cook Rice 9 10 How to UseTimer Cooking 11 Reheating 12 Cleaning and Maintenance Specifications 13 Troubleshooting 14 Recipes 15 18 Warranty 19 Thank you for your purchase of a Sanyo Rice Cooker Warmer Please read these instructions carefully before use and be sure to keep the manual in a safe place for futur...

Page 3: ...ce containing hot oil or other liquids 13 Do not clean the appliance with cleansers steel wool pads or other abrasive material 14 Always attach plug to appliance first then plug cord into the wall outlet To disconnect turn the switch to its Off position then remove the plug from wall outlet 15 Do not use appliance for other than intended use This product is designed for household use only SAVE THE...

Page 4: ... in or unplug with wet hands If the power supply plug blades or plug surfaces become dirty be sure that they are cleaned thoroughly A dirty power supply plug can potentially cause a fire A fire electric shock or short circuit may result if the plug is not fully inserted into the outlet This action may cause a short circuit or electric shock Using any other power supply voltage may result in fire a...

Page 5: ...This action may cause electric shock or appliance malfunction resulting in injury CAUTIONS Grasp only the plug when unplugging the power supply cord Do not pull the power supply cord itself when unplugging the electrical plug Doing so may cause electric shock or short circuit potentially causing a fire Hold the power supply plug when rewinding the power supply cord If the plug is not held the unco...

Page 6: ...on or result in the Outer Lid becoming deformed or discolored Do not shake the appliance by the handle While rice is cooking keep the handle folded down behind the appliance and do not carry it Not doing so may cause scalding burns or handle deformation may occur due to escaping steam If carrying the appliance immediately after use use caution to avoid the steam that is released from the steam ven...

Page 7: ...le Outer Lid Outer Lid Seal Inner Lid Attachment Shaft Use for carrying the unit Remove Attach Inner Lid Seal Inner Lid Steam Vent STEAM VENT LID RELEASE How to Remove Do not touch the Steam Vent during or immediately after operation Pull the Inner Lid towards you Attach the Steam Vent securely Lid Release Press the Lid Release to open the Outer Lid How to Attach Push the Inner Lid onto the Inner ...

Page 8: ...ctancy is 4 5 years at a room temperature of 68 F 20 C The battery may last longer when the appliance is plugged into the wall outlet because the battery power is not consumed When the battery begins reaching the end of its life the display will appear weaker and the timer setting will not be maintained while the appliance is unplugged When the battery weakens the appliance can still be used as us...

Page 9: ...l cause steam to escape or water to boil over HOW TO COOK RINSE FREE RICE Fill the Inner Pot with water up to the RINSE FREE level Place the Inner Pot into the main unit Select WHITE RINSE FREE SPROUTED from the menu then begin cooking HOW TO COOK SPROUTED BROWN RICE Mix washed white rice with sprouted brown rice White rice to Sprouted Brown rice ratio 2 cups of White rice to 1 cup of Sprouted Bro...

Page 10: ...rice is done will be displayed beginning from 13 minutes QUICK or PORRIDGE courses 10 minutes prior to the completion Once the cooking is completed the COOK REHEAT lamp goes off Then the KEEP WARM lamp will light and the unit will automatically switch operation to keep the rice warm The DISPLAY PANEL will show the elapsed warming time Do not keep rice warm for more than 12 hours as rice may develo...

Page 11: ...ton 4 Once the timer has been set timer cooking can be performed in two steps Lamp turns off Lamp turns on The TIMER lamp will go off when cooking starts and the COOK lamp will light Press TIMER button after reviewing the menu selection Press COOK REHEAT button after reviewing the time setting Previous timer settings are stored in memory The timer cannot be set if the KEEP WARM lamp is lit or flas...

Page 12: ...e being kept warm may be reheated Make sure that the KEEP WARM lamp is lit TIPS FOR REHEATING For better results reheat rice when the Inner Pot is less than half full Do not reheat other than white or rinse free rice Do not reheat rice more than once as this may cause rice to burn turn yellow or develop an odor Sprinkle some water on the rice when reheating a small amount of the rice This will pre...

Page 13: ... the Upper Steam Vent Cap Turn the Lower Steam Vent Cap clockwise Make sure the Steam Vent Seal is placed properly in the Upper Steam Vent Cap ash with dishwashing detergent and soft sponge after each use If Cooking 460 W 23 Wh 195mm 711 16 275mm 1013 16 226mm 87 8 Keep Warm 3 0 kg 6 6 lbs Approx 0 95m 373 8 Cooking Capacity 0 09 0 63L 0 5 3 5 cups 0 09 0 54L 0 5 3 0 cups 0 09 0 54L 0 5 3 0 cups 0...

Page 14: ... inner lid or between the Inner Pot and Outer Lid seal Is the water quantity correct Are there any foreign objects sticking to the outer Inner Pot sensor or heating element Is the correct menu selected Is rice washed thoroughly before cooking Is the inner lid attached properly Are there any foreign objects between the Inner Pot and inner lid or between the Inner Pot and Outer Lid seal Is the water...

Page 15: ...ake into thin strips and boil briefly 6 Briefly boil deep fried tofu and cut into thin slices 7 Make seasoning by adding soy source sake and salt to the Japanese broth dashi and mix well 8 Drain rice and pour into Inner Pot Add enough seasoning prepared in step to fill up to 3 on the MIXED water level line Then mix ingredients from steps through and place on top of rice 9 Close Outer Lid and selec...

Page 16: ...NU button Press the COOK REHEAT button 5 When rice is cooked add dried parsley and stir the rice gently Add 1 teaspoon of Poultry Seasoning if desired BROWN RICE Seasoned Brown Rice Makes 6 servings Ingredients 3 cups long grain brown rice 2 cans 10 5 oz chicken broth 3 Tbs margarine 1 2 tsp crushed garlic from jar 1 tsp dried parsley Makes 4 servings Ingredients 1 2 cup rice 1 2 cup asari clams d...

Page 17: ...sauté well Add tuna and season with salt and pepper Remove from skillet and set aside 6 Heat 1 2Tbs olive oil in skillet Sauté drained rice in step until rice become transparent 7 Place the sautéed rice in step into Inner Pot Add liquid from step to fill up to 1 on the PORRIDGE water level line Then place sautéed garlic onion and tuna from step on top of rice 8 Close Outer Lid and select PORRIDGE ...

Page 18: ...p crushed garlic 1 Tbs ground sesame seeds 2 1 2 Tbs sesame oil 2 3 eggs fried easy over or sunny side up 1 2 Tbs Kochujang Korean chili bean paste available in Korean grocery 1 3 cup soy sauce 1 2 cup miso soy bean paste 1 4 cup sugar 1 2 tsp salt 1 2 tsp cayenne pepper powder slices of bread 2 oz butter or margarine 1 3 cup sugar 1 cup milk 3 eggs 1 2 tsp vanilla 1 4 tsp cinnamon Preparation 1 T...

Page 19: ... CONSEQUENTIAL DAMAGES ARISING FROM OWNERSHIP OR USE OF THIS PRODUCT OR FOR ANY DELAY IN THE PERFORMANCE OF ITS OBLIGATIONS UNDER THIS WARRANTY DUE TO CAUSES BEYOND ITS CONTROL SOME STATES DO NOT ALLOW LIMITATIONS ON HOW LONG AN IMPLIED WARRANTY LASTS AND OR DO NOT ALLOW THE EXCLUSION OR LIMITATION OF CONSEQUENTIAL DAMAGES SO THE ABOVE LIMITATIONS AND EXCLUSIONS MAY NOT APPLY TO YOU THIS WARRANTY ...

Reviews: