background image

EG-5

EG

1.

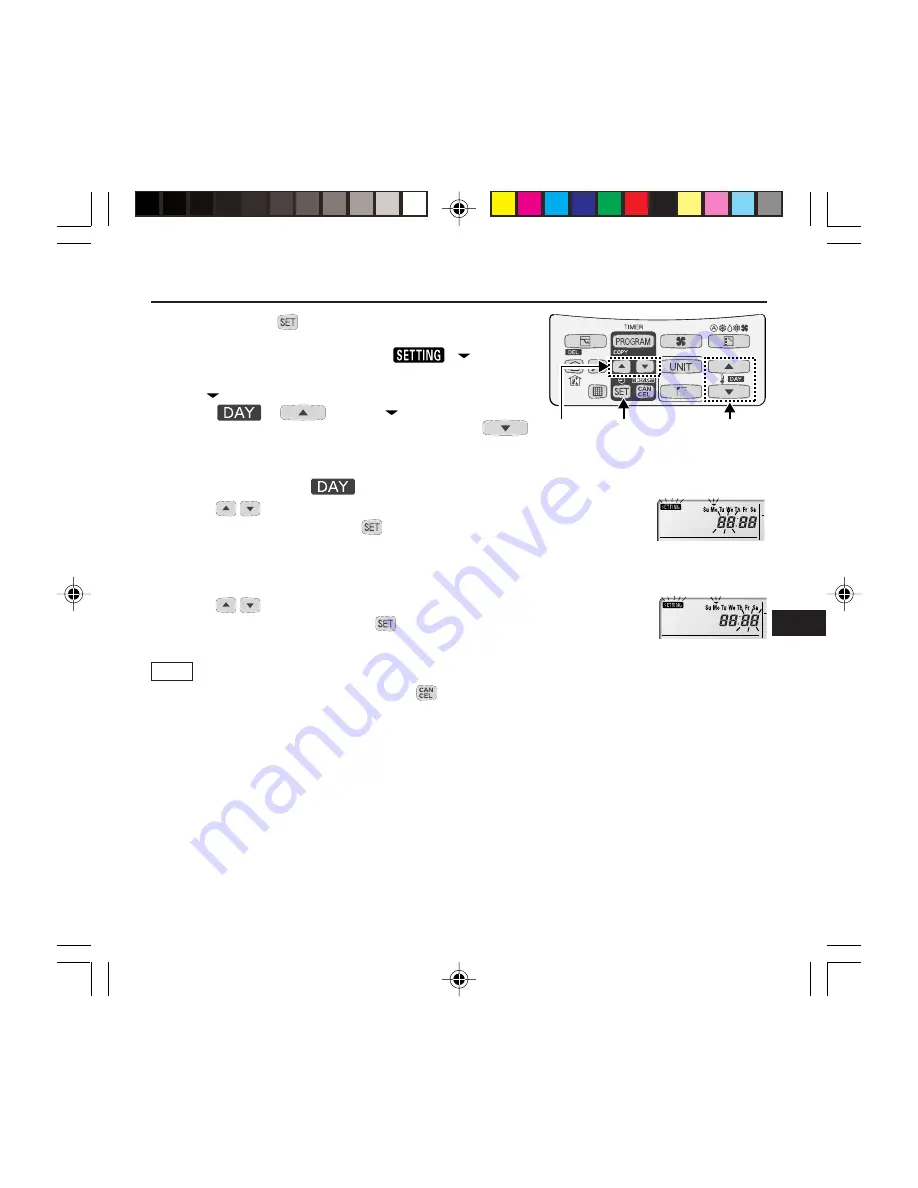
Press and hold 

 for more than 2 seconds to enter in

the present day and time setting mode.

Once you enter in the setting mode, 

, “

”(day) and

“time” flash.

2.

Set “

” to today’s day of the week.

Press  

 *

1


 to move “

” (flashing on the

display) in the order of : Su 

 Mo 

 Tu 

.... Press 

to move it in the order of : Su 

 St 

 Fr 

 ....

*

2

While in time setting mode, the temperature setting
buttons function as  

  (changing day) button.

3.

Press 


 to change the present “hour” in the range of 0 to 23*

2

.

Set the present hour and press 

.

The “hour” digits light up, and the “minute” digits start flashing.

*

2

If the clock uses the 12 hours AM/PM setting, the hour is displayed in the range of AM 0 to 11/PM 0
to 11.

4.

Press 


 , to change the present “minute” in the range of 0 to 59.

Set the present minute and press 

. The day and time are set and finishes the

setting mode.

Note

*

The unit returns to the normal mode if the 

 is pressed or there is no operation made in 3 minutes

during the setting. In this case, all the settings in progress will be lost.

*

If the present time is invalid, “- - : - -” is displayed.

If the power failure for more than 1 hour occurs, check if the set data of day and time are valid.

3. Setting the Present Time

1,3,4

3,4

2

Summary of Contents for ECO-i RCS-TM80BG

Page 1: ...ortant Safety Instructions EG 1 2 Names and Operations EG 2 3 Setting the Present Time EG 5 EG 4 Weekly Program Function EG 6 5 Outing Function EG 12 6 Sleeping Function EG 14 XXXX 1 XXXX XX 1 2 XXXX XX 2 3 XXXX XX 5 4 XXXX XX 6 5 XXXX XX 12 6 XXXX XX 14 F XXXX 1 XXXX XX 1 2 XXXX XX 2 3 XXXX XX 5 4 XXXX XX 6 5 XXXX XX 12 6 XXXX XX 14 D XXXX 1 XXXX XX 1 2 XXXX XX 2 3 XXXX XX 5 4 XXXX XX 6 5 XXXX XX...

Page 2: ... controller from water Damage to the system can result Stop the system and turn the power off if you sense unusual smells or other irregularities Continuing operation when the system is out of order can result in electric shock fire and damage to the system Contact your dealer Moving and Repair Precautions Do not repair Never repair the system yourself Contact your dealer for repair Electric shock...

Page 3: ...is button after cleaning the filter Operation Section Refer to the page I 10 Ventilation button Use this button when you installed a fan available in the market Pressing this button turns on and off the fan When turning off the air conditioner the fan will be also turned off While the fan is operating will appear in the display If is displayed on the LCD of the remote control unit when pressing th...

Page 4: ...n 1 SETTING indication Appears when the timer program is being set 2 UNIT indication Indicates the unit No of the indoor unit which is selected with the Unit Select button or the unit in which an abnormality occurs 3 TIMER No indication Appears when the time program is being set 4 Timer program The indoor unit starts operation at the programmed time The indoor unit stops operation at the programme...

Page 5: ...e flap swings 23 Flap position indication Indicates the flap position 24 Filter indication Appears when filter needs cleaning Clean the filter 25 Inspection indication Appears when the protective device is activated or when an abnormality occurs 26 Ventilation indication Appears when a fan available in the market is installed and is operating 27 Oil indication Appears when the engine oil needs to ...

Page 6: ...ss The hour digits light up and the minute digits start flashing 2 If the clock uses the 12 hours AM PM setting the hour is displayed in the range of AM 0 to 11 PM 0 to 11 4 Press to change the present minute in the range of 0 to 59 Set the present minute and press The day and time are set and finishes the setting mode Note The unit returns to the normal mode if the is pressed or there is no opera...

Page 7: ...onfirmation mode CH and start setting Once you enter the program confirmation mode the present day is indicated as TIMER No 1 2 Select the day Press and to move the horizontally on the day to select Press to move flashing on the display in the order of Su Mo Tu Press to move it in the order of Su Sa Fr is displayed when the program is not set 3 Select a Timer number Press to select a TIMER No from...

Page 8: ...ess to set the hour Confirm the hour and press The enters the program changing mode setting of the minute 3 Set the minute program step 2 Press to set the minute Confirm the minute and press The unit enters the program pattern selection mode 1 2 3 4 4 2 3 4 Program step1 Program step2 SET SET SET SET CANCEL DEL normal remote controller program check PROGRAM CANCEL CANCEL DEL CANCEL PROGRAM SET CAN...

Page 9: ...e the temperature setting Pattern 4 The indoor unit changes the temperature setting at the programmed time Press to change the temperature setting Select the program pattern and press The program timer setting is confirmed and the unit enters the confirmation mode Note If you press during the setting it returns to the program confirmation mode If there is no operation made for 3 minutes during the...

Page 10: ... want to delete 3 Press to select a TIMER No from 1 to 6 4 Press to display the program setting mode 5 Press to delete the program Note After deleting the unit returns to the program confirmation mode If you press during the setting the unit returns to the program comfirmation mode If there is no operation made for 3 minutes during the setting the unit returns to the normal mode 4 3 5 1 2 ...

Page 11: ...e next one How to cancel the program timer invalidation Press and hold for more than 2 seconds disappears and the programs will be validated from the next one If Power Failure Occurred If a power failure occurs when air conditioner is in use the air conditioner is in the stop mode after the power recovery If the power recovers in a short time period the program after the recovered time will be val...

Page 12: ...y of the copy source flash on the display 2 Press to select the day of the copy source Select the copy destination 3 If is pressed in the mode of selecting the copy source C1 it enters the copy mode Selecting the copy destination C2 of the program timer 4 Press to select the day of the copy source Then press to complete copying and return to the program checking mode Note The program will be overw...

Page 13: ...imit Room temperature Outing function Lower limit General Performance of the Outing Function Precautions The outing control only starts stops the air conditioner It does not change the operation mode temperature setting Therefore the operation mode temperature needs to be set beforehand so that the outing function turns on the air conditioner with your desired operation mode temperature setting If...

Page 14: ...s 10 C Canceling the outing function Press and hold for 2 seconds while the outing function is set Outing function indication Outing function indication Off Flashing Lighting Status The outing function is not set The outing function is now being set or under operation Although the outing function is set not under operation Setting the Outing Function 2 3 Note A remote controller loses outing funct...

Page 15: ...ly finished Ex In case of 7 hours timer 1 SLF button Press Each time the button is pressed the indication changes in the following order 7H 6H 1H 10H 1H every one hour Press to stop the time setting 2 Press The timer operation starts When the off time comes The indoor unit stops The temperature returns to the setting at the time when sleeping function operation started To cancel the sleeping funct...

Page 16: ...e sleeping function operation will be cancelled in the following cases 1 When the unit is operated to stop or change the temperature setting by the other remote control unit or centralized control device 2 When the unit is operated to stop or change the temperature setting with the weekly program function outing function 3 When the centralized control unit is prohibited from stopping the unit or c...

Reviews: