Assembling & Removing the Stand
Safety Precautions:
1.Please read these instructions thoroughly prior to attempting this installation.
2.Be sure to handle this product very carefully when attempting assembly. If you are unsure of your capability, or the use of tools necessary to complete this activity,
refer to a professional installer or service personnel. The manufacturer is not responsible for any damages or injuries that occur due to mishandling or improper
assembly/installation.
3.When using a table or bench as an aid to assembly, be sure to put a soft cushion or covering to prevent accidental scratching or damage to the unit's finish.
4.The speaker is not intended to support the weight of this display. Do not move or handle this product from the speaker; which can cause damage to the display not
covered under the manufacturer's warranty.
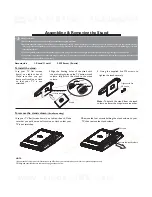
To install the stand:
1.Lay your TV flat (screen
down) on a table or bench.
Make sure that you put
down a soft cushion or cloth
so that your TV is not
scratched.
3. Using the supplied five M5 screws to
tighten the stand securely.
Accessories:
1. Stand (1 unit)
2. M5 Screw (5 units)
Tighten with five
M5 screws
2 Align the
fixating
holes
of the stand with
the protruding holes on the TV bottom stand
column, fully attach the stand to the stand
column.
To remove the stand column:
(if wall mounting)
1.Lay your TV flat (screen down) on a table or bench. Make
sure that you put down a soft cushion or cloth so that your
TV is not scratched.
2.Remove the four screws holding the stand column to your
TV, then remove the stand column.
Note: To detach the stand from the stand
column, perform the steps in reverse order.
Protruding holes
Stand Column
Fixating holes
NOTE
:
1.Appearance of this product in illustrations may differ from your actual product, and is for comparative purposes only.
2.Design and specifications are subject to change without notice.
Attach the stand to
the stand column
Stand
Screws
Remove the stand column
Summary of Contents for LCD-42XR8KH
Page 11: ...9 2 TDA4470 2 2 TDA4470 ...
Page 13: ...11 ...
Page 20: ...MIAN BOARD ...
Page 21: ...MIAN BOARD ...
Page 22: ...MIAN BOARD ...
Page 23: ...MIAN BOARD ...
Page 24: ...MIAN BOARD ...
Page 25: ...MIAN BOARD ...
Page 26: ...INTERFACE CONNECTION ...
Page 27: ...KEY ...
Page 28: ...IR ...
Page 29: ...POWER ...
Page 31: ...APPENDIX B Exploded view LCD 42XR8KH APPENDIX B Exploded v view LCD 42 ...
Page 36: ...June 2009 ...


