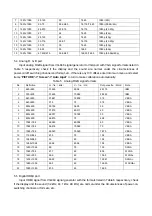
Factory software burned instructions listed as Table 7
Table 7 Factory software burned instructions
Model
Loc.
No.
Part No.
Part Type
Software
function
Burned
before
SMT
Burning method
N103 5272564002
EN25Q64-104HIP
Main
program
Yes
Use ALL-100 with write-protect,
refer to Note 1 in detail.
N106 5272404002
AT24C04IV-10SU-2.7
HDCP
KEY
Yes Use
ALL-100,
etc.
N301
N316
5272402002
AT24C02BN10SU-1.8
HDMI
EDID
Yes Use
ALL-100,
etc.
<26”
CCFL
N305 5272402002
AT24C02BN10SU-1.8
VGA
EDID
Yes Use
ALL-100,
etc.
N103 5272564002
EN25Q64-104HIP
Main
program
Yes
Use ALL-100 with write-protect,
refer to Note 1 in detail.
N106 5272404002
AT24C04IV-10SU-2.7
HDCP
KEY
Yes Use
ALL-100,
etc.
N301
N311
5272402002
AT24C02BN10SU-1.8
HDMI
EDID
Yes Use
ALL-100,
etc.
<26”
LED
N305 5272402002
AT24C02BN10SU-1.8
VGA
EDID
Yes Use
ALL-100,
etc.
N103 5272564002
EN25Q64-104HIP
Main
program
Yes
Use ALL-100 with write-protect,
refer to Note 1 in detail.
N106 5272404002
AT24C04IV-10SU-2.7
HDCP
KEY
Yes Use
ALL-100,
etc.
N302
N305
N316
5272402002
AT24C02BN10SU-1.8
HDMI
EDID
Yes Use
ALL-100,
etc.
≥
26”
LED
N309 5272402002
AT24C02BN10SU-1.8
VGA
EDID
Yes Use
ALL-100,
etc.
Note 1:
Method of write-protect setup: enter into burning interface of ALL-100, tick option “
Config
”,
press item “
config Setting
”, set option “
Protect
” as “
All Protect
”; make sure that option “
Config
”
must be ticked before burning software and write-protect must be reset after ALL-100 burning
software is opened every time.
Note 2:
Method of burning and upgrading software online by using ISP burning device:
a) For main board upgrade: connect 4-pin cable of ISP burning device to Debug port of main board
(<26”:
X404
,
≥
26”:
X604
); for unit upgrade, connect both D-SUB ports of ISP burning device and
main board, enter into factory menu and set item “
Other Settings
->
ISP Mode
” as “
ON
”;
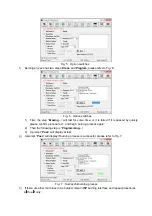
b) Using
Mstar
online burning program, enter into menu “
Device
”, tick option “
WP Pin pull to high
during ISP
” to ensure that hardware write-protect of Flash is removed and erasing process is
normal, please refer to Fig. 2;
Method of software upgrading
instructions
Summary of Contents for LED-32XR10FH
Page 19: ...Blockdiagram ...
Page 30: ...Troubleshooting guide LED 32XR10FH 1 No Backlight ...
Page 31: ...2 No Picture but backlight is normal ...
Page 43: ...APPENDIX B Exploded view LED 32XR10FH ...
Page 48: ...May 2010 ...


