background image

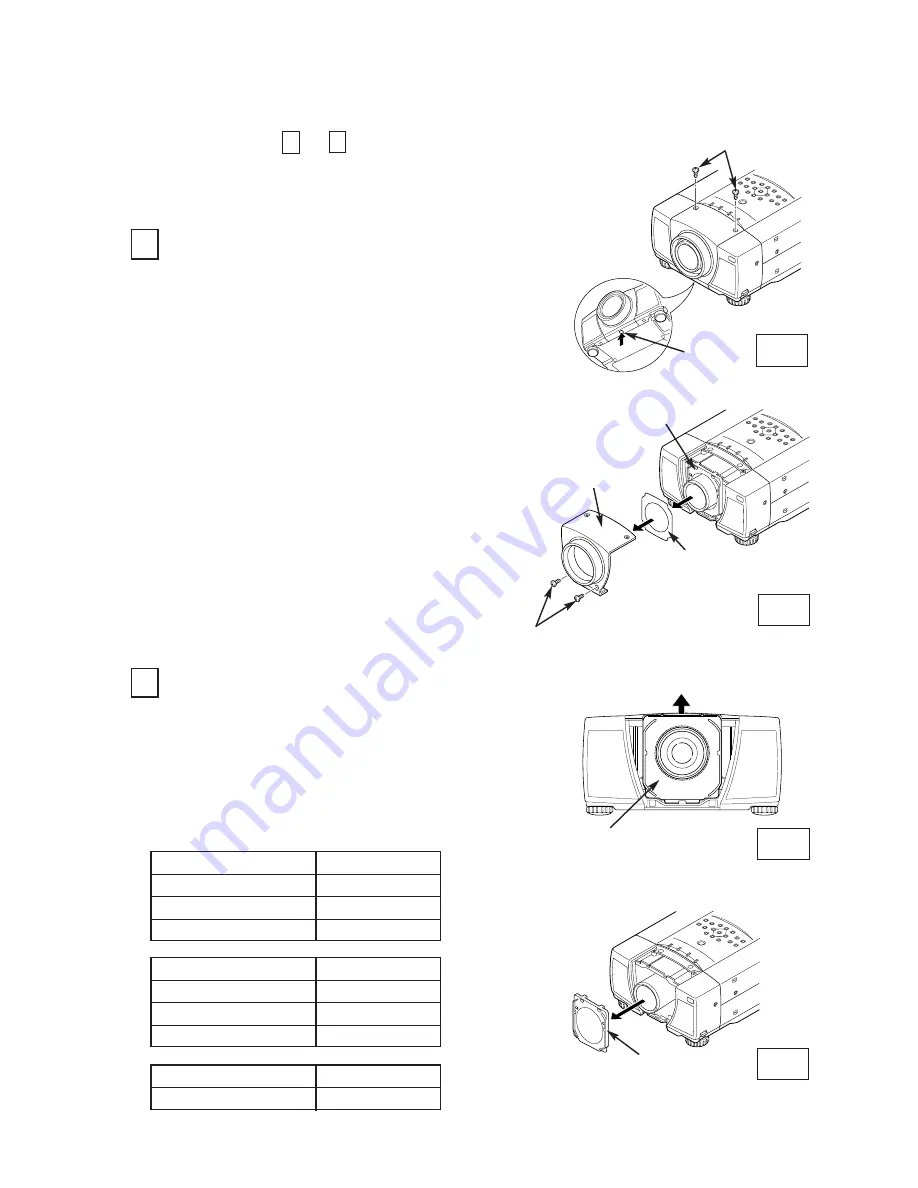
Fig-1

Fig-2

Fig-3

Fig-4

SCREW "A"

Remove 2 screws-A.

Press the button (or remove 2 screws-B) on

the lower of the lens cover and remove the

lens cover.

Remove the light-block sheet from the light-

block sheet base.

LENS REPLACEMENT PROCEDURE (FOR "A" TYPE )

REMOVE THE LENS COVER AND LIGHT-

BLOCK SHEET (See Figure-1 and 2)

1

1.

2.

2

REMOVE THE LIGHT-BLOCK SHEET BASE

(See Figure-3 and 4)

Perform the steps

to

for lens replacement.

1

6

BUTTON

LENS COVER

LIGHT-BLOCK
SHEET BASE

SCREW "B" (Some models)

LIGHT-BLOCK SHEET

LIGHT-BLOCK
SHEET BASE

First set the lens at the center position with lens

shift adjustment. 

3.

Slide the light-block sheet base upward.

Remove the light-block sheet base.

1.

2.

LIGHT-BLOCK
SHEET BASE

LENS MOTOR PARTS NO.
(LOCATED ON THE LENS)

-2-

Summary of Contents for LNS-T31A - Telephoto Zoom Lens

Page 1: ...e model number both the LCD projector and the lens and use the proper lens The lens cover is on the lens for protection Be sure to remove the lens cover before installation When installing or removing the lens be careful not to stain scratch or damage the lens If you have any questions contact the dealers Following parts are contained in the packing 1AA6P1P3188A ICYDA A PARTS LIST LENS LIGHT BLOCK...

Page 2: ...R AND LIGHT BLOCK SHEET See Figure 1 and 2 1 1 2 2 REMOVE THE LIGHT BLOCK SHEET BASE See Figure 3 and 4 Perform the steps to for lens replacement 1 6 BUTTON LENS COVER LIGHT BLOCK SHEET BASE SCREW B Some models LIGHT BLOCK SHEET LIGHT BLOCK SHEET BASE First set the lens at the center position with lens shift adjustment 3 Slide the light block sheet base upward Remove the light block sheet base 1 2...

Page 3: ...Mount the lens on lens mounting bracket with 4 screws locate motor on left side Use the driver 4 mm Yellow included with the lens to fasten the screws 1 2 After using save the driver for latter use Connect the lens motor lead to the connector K16J of the circuit board Connect the lens motor lead to the lead holder 3 4 Mount the light block sheet base to the projector Mount the light block sheet to...

Page 4: ...th lens shift adjustment 3 Slide the light block sheet base upward and remove it Remove the light block sheet from lens 1 2 Fig 2 LIGHT BLOCK SHEET BASE FRONT CABINET LENS COVER LIGHT BLOCK SHEET LENS REPLACEMENT PROCEDURE FOR B TYPE SCREW A SCREW A SCREW A Fig 1 1 Fig 1 2 Fig 1 3 Remove 2 Screws A Remove the front cabinet See Figure 1 2 and 2 1 2 Pull Lens Cover toward front and remove it Remove ...

Page 5: ...s motor connector to terminal See Figure 3 1 2 3 4 DRIVER IN THE LENS LENS MOUNTING BRACKET Fig 5 Fig 3 SCREW B LENS LOCK LATCHES CONNECTOR 3 REMOVE THE LENS See Figure 3 and 4 Remove the lens motor connector from terminal Loosen the screws B 2 screws which fastens the lens Use the driver 4 mm Yellow included with the lens to loosen the screws Slide the lens lock latches to UNLOCK position and rem...

Page 6: ...t no and mark TOP and BACK on Light Block Sheet and set them properly Mount the light block sheet base included with the lens 1 2 3 U P LIGHT BLOCK SHEET BASE FRONT CABINET LENS COVER LIGHT BLOCK SHEET Mount the front cabinet with 2 screws Mount the lens cover For the cabinet Fig 1 1 position the marked UP of Lens Cover on top and push in to the front cabinet and turn the Lens Cover fully clockwis...

Page 7: ...lide the light block sheet base upward and remove it Remove the light block sheet from lens 1 2 LIGHT BLOCK SHEET BASE FRONT CABINET LENS COVER LIGHT BLOCK SHEET SCREW A LENS COVER FRONT CABINET 3 REMOVE THE LENS Grasp the Lens Lock Lever and turn it fully upward Remove the Lens into the projector Disconnect the lens motor lead connector to the socket on the lens attachment Remove 4 Screws and rem...

Page 8: ...the peripheral focus may be out of focus in some localized areas If this happens insert the spacer in between the lens attachment and the lens to correct the focus Correcting the focus Spacer 1 Color Clear Thickness 0 1 mm 40 inch projection Screen Inserting the spacers corrects the distance for best diagonal focus at the screen The corrected distance is determined by the thickness of the spacers ...

Page 9: ...ed with the lens Make sure the mark TOP and BACK on Light Block Sheet and set them properly Mount the light block sheet base included with the lens 1 2 LIGHT BLOCK SHEET BASE FRONT CABINET LENS COVER LIGHT BLOCK SHEET Mount the front cabinet with 2 screws Mount the lens cover Position the marked UP of Lens Cover on top and push in to the front cabinet and turn the Lens Cover fully clockwise until ...

Reviews: