-20-
■
Lamp Replacement
WARNING:
- For continued safety, replace with a lamp assembly of the same type.
- Allow the projector to cool for at least 45 minutes before you open the lamp cover. The inside of the projector can
become very hot.
- Do not drop the lamp module or touch the glass bulb! The glass can shatter and cause injury.
Procedure
1. Turn off the projector and allow the projector to cool thoroughly.
2. Disconnect the AC cord from the projector.
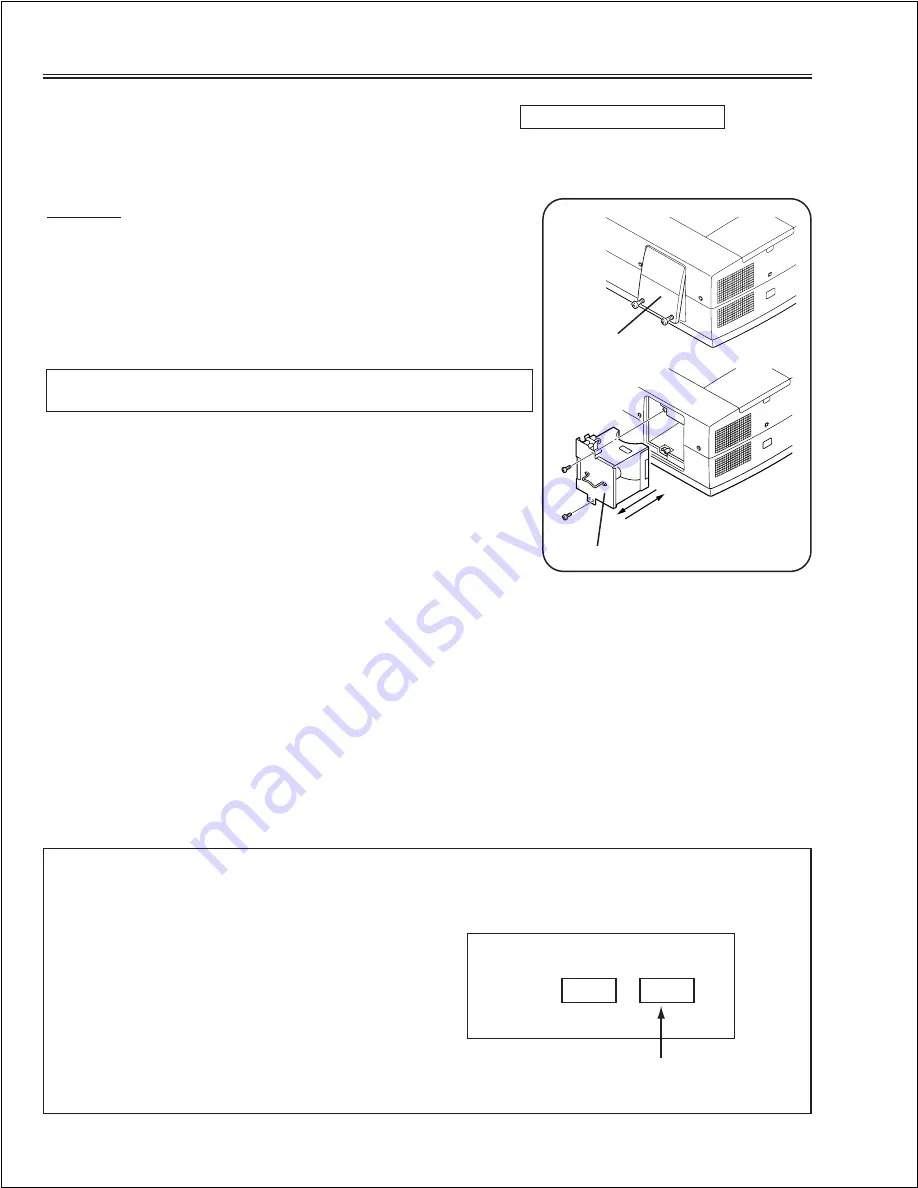
3. Loose a screw with a screwdriver and remove the lamp cover.
4. Remove 2 screws and pull out the lamp assembly by grasping the han-
dle.
5. Replace the lamp assembly securely and tighten 2 screws.
6. Place the lamp cover and tighten a screw.
7. Connect the AC cord to the projector.
Note:
- Do not reset the LAMP REPLACEMENT MONITOR TIMER, except
after the lamp is replaced.
- The projector can not be turned-on with the lamp cover removed,
because when the lamp cover is removed, the interlock switch is also
released to switch off the mains power for safety.
8. Reset the lamp replacement monitor timer, see below explanation.
Part No.: 610 270 6796
How to reset the lamp replacement monitor
timer
1. Turn the projector on. Press the “MENU” button on the
projector and display menu bar. Select setting menu and
select “Lamp age” on the setting menu of menu bar.
2. “Lamp replace monitor Reset?” is displayed for confirma-
tion.Select “Yes” to reset the lamp replace timer.
Please refer to the owners manual for further information.
Recommendation
Should the air filter become clogged with dust particles, it
will reduce the cooling fan’s effectiveness and may result in
internal heat build up and short lamp life. We recommend
cleaning the air filter after the projection lamp is replaced.
Refer to “Air Filter Cleaning”.
How to check the lamp illumination time
The LAMP REPLACE indicator will illuminate and the
LAMP REPLACE warning message will appear on the
screen when the total illumination time of lamp reach-
es to 600 hours. These are to indicate that lamp
replacement is necessary.
You can check the remaining time by following proce-
dure.
1. Press and hold the pointer
button for more than
20 seconds. The service mode window will be dis-
played on the screen as shown below.
2. You can see the remaining time to “600 hours”.
For example: “0567” means 567 hours remaining.
3. Press the POWER ON-OFF button to quit the ser-
vice mode.
>
Lamp cover
Lamp Assembly
Data No. Data
Service
Mode
037
0567
Remaining Time (hours)
Summary of Contents for PLC-EF10B
Page 56: ... 56 IC Block Diagrams AV9155C OSC IC3301 IC3321 CIP3250A Component Interface Processor IC102 ...
Page 59: ... 59 IC Block Diagrams ML60851ATB USB Controller IC3801 MPC948FA Clock Driver IC3341 ...
Page 60: ... 60 IC Block Diagrams M62358FP DAC IC1401 VPC3215C Digital Video Processor IC101 ...
Page 61: ... 61 IC Block Diagrams MB40988PFQ D A Converter IC1181 MSM54V16258 DRAM IC2301 IC2311 ...
Page 62: ... 62 IC Block Diagrams CXA2016S Sync Separator IC4141 TC4052BF Sync Separator IC4141 ...
Page 102: ...July 99 1300 SI Printed in Japan SANYO Electric Co Ltd ...


