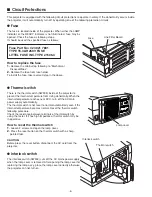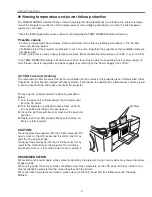
-8-
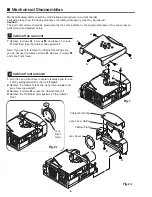
1
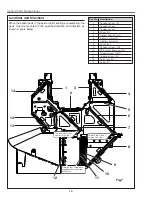
Remove 5 screws
A
, 2 screws
B
, and loosen 2 screws
C
, and then
take the Cabinet Top upward off.
Note: If you want to remove the Cabinet Front-Top only,
you do not need to remove screws
A
. Remove 2 screws
B
and Lens Front Cover.
■
Mechanical Disassemblies
Mechanical disassemble should be made following procedures in numerical order.
Following steps show the basic procedures, therefore unnecessary step may be ignored.
Caution:
The parts and screws should be placed exactly the same position as the original otherwise it may cause loss of
performance and product safety.
Fig.1
1
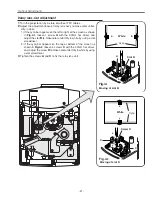
Turn the Lens Front Cover counter-clockwise and to take
it off by pulling forward as shown in
Fig.2-1.
2
Remove the Cabinet Front-Top, Lens Cover Holder and
Lens Cover upward off.
3
Remove 2 screws
D
to take the Cabinet Front off.
4
Remove the RC Board and speakers on the Cabinet
Front.
Fig.2
-2
Cabinet Top removal
1
Cabinet Front removal
2
UP
Fig.2
-1
C
B
A
A
A
A
B
A
D
D
Cabinet Front-Top
Lens
Front
Cover
Lens Cover Holder
Cabinet Front
Lens Cover
C
Summary of Contents for PLC-XP40
Page 50: ... 50 CXA2101AQ RGB Matrix IC4101 IC Block Diagrams BH3540 Volume Control IC1652 ...
Page 54: ... 54 LB1645 Motor Drive IC1601 LC863316 SUB CPU IC1851 IC Block Diagrams ...
Page 55: ... 55 ML60851 USB I F IC9801 M62393 D A IC212 IC2381 IC Block Diagrams ...
Page 56: ... 56 M62399 D A IC3501 IC3551 IC Block Diagrams PW365 System Control Scan Converter IC301 ...
Page 57: ... 57 STR Z2156 Power Switching IC651 IC Block Diagrams SII161ACT DVI I F IC8001 ...
Page 58: ... 58 TA1287 RGB YUV Converter IC4551 TB1274AF Video Decoder IC1101 IC Block Diagrams ...
Page 59: ... 59 IC Block Diagrams TDA7056 Audio Output IC1631 IC1632 ...
Page 88: ...MA8 XP4500 MB8 XP4000 Mechanical Parts List 88 51 a 51 42 42 51 b 21 a 21 b 21 ...
Page 92: ... MA8A Oct 2001 2000 Printed in Japan SANYO Electric Co Ltd ...

