background image

23

English

Main Window Elements and Their Functions


b

Tree List

When you monitor or record live video or perform a related configuration task, you can specify the 
camera or group you want to connect and operate by selecting from the tree list.

To select a camera as the target: 

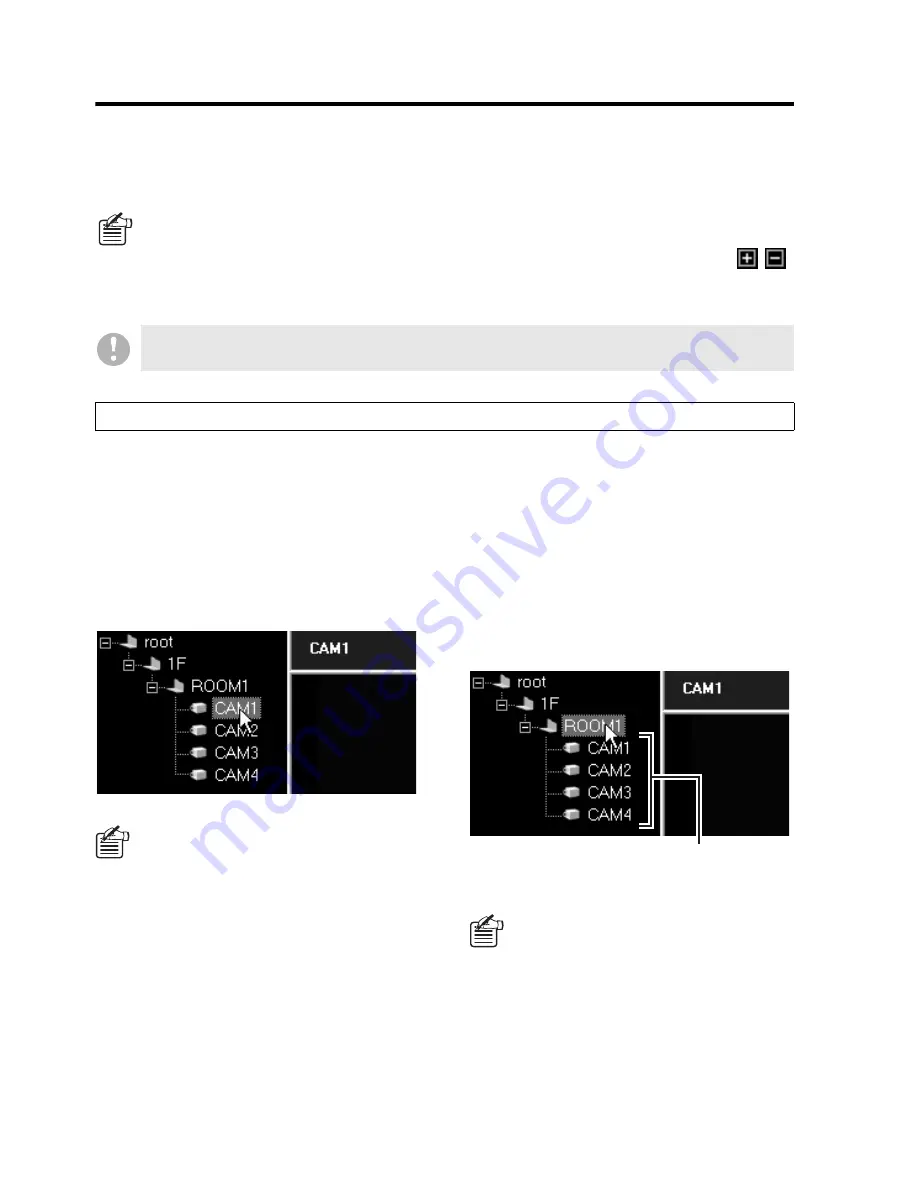
To select a camera, click the camera title node 
on the tree list. The clicked title is highlighted 
to indicate that it is currently selected. 

When you run a command by clicking a 
control panel button or menu item after 
selecting a camera, that command is applied 
to the selected camera. 

To select a group as the target:

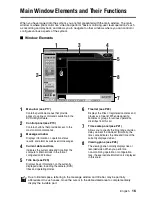
Clicking a group name will cause all the 
cameras belonging to that group to be 
selected.

When designating a group for execution of a 
command, right-click the group name to 
display the context menu, and select the 
command from the menu. Four tasks, i.e. 
"Expand/Collapse", "Live", "Play" and "Tree 
Edit" are possible (see P24). 

The tree uses camera titles, group titles, and hierarchical tree nodes as defined on the [Tree Edit] 
window accessible from the Initial Set menu. For more information, see P76. 

The tree list is hierarchical: lower level tree nodes can be opened and closed by clicking the 

/


buttons on the left.

The [DVR] button the control panel can be used to show or hide the tree list. 

When there is one or more video streams displayed on the viewing pane, the camera with a blue 
title bar is the target of an operation. 

Specifying the Target of the Command (by a Single-Click)

When connected to 4-channel DVRs, 
four cameras can be displayed per 
DVR. 

If using commands such as record and 
playback that are applicable to 
individual DVRs, executing the 
command to just one of the four 
cameras will cause the other three to 
automatically follow suit.

By designating the group and selecting 
either “Live” or “Play” from the context 
menu, videos will be automatically 
displayed in the multi-view layout.

If the number of cameras in a group 
exceeds the number of panes in the 
multi-view layout, videos will only be 
displayed from the top four cameras on 
the list.

Clicking a group name will cause all the cameras 
belonging to that group to be selected.

Summary of Contents for VA-SW8000

Page 1: ...INSTRUCTION MANUAL VA SW8000 VA SW8000LITE DVR Utility Software ...

Page 2: ...n Mode 35 b Sequential Switching Mode 36 Recording Monitored Video 37 b Manual Recording 37 b Timer Recording 39 b Alarm Recording 40 Playing Back Recorded Video 41 b Switching to Playback Mode 41 b Returning to Live Video 41 b Working in Playback Mode 42 Searching for Recorded Video 43 b Search Modes 43 b TIME DATE SEARCH 44 b ALARM SEARCH 45 Downloading Recorded Video 48 b Downloading Procedures...

Page 3: ... You can monitor video streamed from networked DVRs using a viewing pane that can be switched among three different layouts single view four view and multi view 4x4 All the functions of the DVR Utility Software can be operated via a simple graphical user interface that even novice users will find easy to use The DVR Utility Software supports four levels of user access When a user logs in the DVR U...

Page 4: ...as Up to four times the maximum number of DVRs Up to eight computers one master plus seven slaves For SANYO DVR models not listed above visit the SANYO Web site http www sanyosecurity com and check the latest information For the sake of simplicity this guide assumes the use of the DSR M804 or DSR M814 About Master and Slave Computers During initial setup you specify a single computer that is autho...

Page 5: ...ns VA SW800 804 814 80LITE 81LITE and therefore any Slave computers currently running an old version must be upgraded to the new version Note that the hardware key or serial number from a previous version can still be used after the software has been upgraded to the new version Computer IBM PC AT and compatibles Operating system Windows XP Professional SP2 CPU Pentium 4 3GHz or higher Memory 512MB...

Page 6: ...at IP address settings are configured in Auto configuration mode with the subnet mask set to the default of 255 255 252 0 NETWORK SET ADVANCED ADDRESS SET AUTO DVR NAME DVR1 IP ADDRESS 192 168 0 1 SUB NET MASK 255 255 255 0 DVRs 192 168 0 1 250 192 168 1 1 250 192 168 2 1 250 192 168 3 1 250 Computers 192 168 0 251 254 192 168 1 251 254 192 168 2 251 254 192 168 3 251 254 All the DVRs and computer...

Page 7: ...nd the General tab is selected by default 4 Make sure that Internet Protocol TCP IP is checked selected under This connection uses the following items O If Internet Protocol TCP IP is not checked select the check box 5 Click Properties R The Internet Protocol TCP IP Properties window opens and the General tab is selected by default 6 Select the Use the following IP address check box and type in th...

Page 8: ...ndow Read and accept the User License Agreement displayed on the screen 4 The Choose Destination Location screen appears Accept the default location or specify another location and click Next Accept the default installation folder unless your situation requires another location for example due to disk capacity limitation and click Next If you want to override the default installation folder for so...

Page 9: ...ith progress bars 8 Reboot the computer When the Installation completed message is displayed specify whether to reboot your computer right now or later by selecting the appropriate option and then click Finish If you choose the first option default your computer will be automatically rebooted after you exit from the Setup program 9 Make sure that shortcut icon has been created After rebooting your...

Page 10: ...Configure other initial settings see P73 Once you have registered the DVRs your computer starts receiving live video fed from the registered DVRs and you can watch the video on the computer screen In addition you can access the settings specific to the registered DVRs cameras through the computer screen Use the following menu items contained in the Initial Set menu to configure other settings as n...

Page 11: ...ay language and other options as needed 3 Log out of the system see P14 Now the Slave computer has its initial settings configured so that the end users can use it When Windows XP Firewall or some other firewall program is active on your computer the computer is blocked from communicating with the DVRs and thus the system fails to operate correctly This means that you must disable the firewall pro...

Page 12: ...default ID1 ID2 ID3 ID4 Password default 1111 2222 3333 4444 Menu items and functions Monitor live video F F F F Playback F F F Search Date Time Search F F F Alarm Search F F F Save Save print snapshot images F F F Download F F F Play back downloaded files F F F Record Manual recording F F Timer recording F F DVR management DVR configuration firmware update etc F Tool Timer download scheduled down...

Page 13: ...in window P14 Main window P16 Viewing pane layouts P25 1 Single view layout 2 Four view layout 3 Multi view 4x4 layout Alarm Search window P45 Time Date Search window P44 Play List P56 Dialog boxes for saving printing a still image P59 Clock Set window P95 System Update window P96 DVR Management menu DVR info window P97 INFORMATION 1 tab INFORMATION 2 tab DVR Set window P100 LANGUAGE D S TIME tab ...

Page 14: ...dow appears If you are using the Light Edition VA SW8000LITE which does not include the hardware key simply start the software When you have started VA SW8000LITE you are prompted to type in the serial number indicated on the CD ROM disc label Type in the correct number and the Login window appears Starting the software without the hardware key The dialog box that prompts you to type in the serial...

Page 15: ...tered user name and password are valid the main window appears b Logging Out of the System To log out open the System pull down menu from the menu bar and then click Log Out 5 The currently displayed window is closed and you are returned to the Login window If you fail to enter valid user name and password three times in succession an authentication error window appears In this case close the wind...

Page 16: ... use the User ID screen which is accessible from the Initial Set menu For more information see P89 When a timer download is scheduled but not yet started or while a timer download is ongoing a confirmation dialog is displayed if you try to log out of the system or exit from the software If you choose to log out or exit the timer download is canceled For more information see P67 Except for situatio...

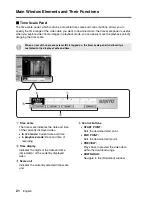
Page 17: ...the computer s internal clock in the format configured on Windows 5 Title bar see P29 Displays basic information on the currently displayed video including the camera DVR titles and operating modes 6 Tree list see P23 Displays the titles of registered cameras and groups as a tree list When designating cameras or groups for various operations click titles from this list 7 Time scale panel see P21 A...

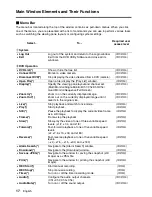
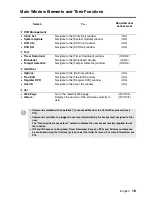
Page 18: ...displayed image ID1 2 3 4 Zoom Out Zoom out on the currently displayed image until it reverts to the original size ID1 2 3 4 Live Stop playback and switch to live mode ID2 3 4 Play Start playback ID2 3 4 Still Pause the playback to display the current video frame as a still image ID2 3 4 Frame Frame step the playback ID2 3 4 Slow Slow play the video at one of three variable speed levels x1 2 x1 4 ...

Page 19: ...D4 Tree Edit Navigate to the Tree Edit window ID4 Register DVR Navigate to the Register DVR window ID4 User ID Navigate to the User ID window ID4 6Ver Web Page Go to the relevant Web page ID1 2 3 4 About Displays the version of the software currently in use ID1 2 3 4 Commands marked with an asterisk are accessible from the Control Panel as well see P19 Commands available to a logged in user are de...

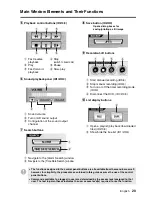
Page 20: ... indicator for timer download Program There is a scheduled timer download that has not been started yet Downloading A timer download is ongoing 2 Layout selector buttons ID1 2 3 4 1 Single view layout 2 Four view layout 3 Sequence auto switch mode 4 Multi view 4x4 layout 3 Channel selector buttons ID1 2 3 4 4 Zoom scale buttons ID1 2 3 4 1 Zoom in on the currently displayed image 2 Zoom out on the...

Page 21: ... 4 À List display buttons 1 Open a playlist play back downloaded files ID2 3 4 2 Show hide the tree list ID1 2 3 4 1 Fast reverse playback 2 Play 3 Fast forward playback 4 Stop switch to live mode 5 Pause 6 Slow play 1 2 3 4 5 6 1 2 3 1 2 Opens dialog boxes for saving printing a still image 1 2 3 4 1 2 The functions assigned to the control panel buttons are all available from the menu bar as well ...

Page 22: ...time of the currently displayed video In live mode Current date and time In playback mode Date and time of recording 2 Time display Indicates the digits of the date and time time stamp of the currently displayed video 3 Scale unit Indicates the currently selected time scale unit 4 Control buttons START POINT Sets the download start point END POINT Sets the download end point PREVIEW Plays back to ...

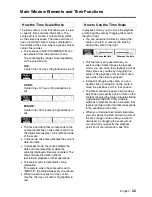
Page 23: ...set to MINUTE the scale slides every one minute When the scale spans two days or two months the day or month is highlighted in red In playback mode you can move the playback point along the scale by dragging the scale to the left or right You can advance the time by sliding the scale to the left or reverse the time by sliding the scale to the right This feature is very useful when you explore vide...

Page 24: ...hical tree nodes as defined on the Tree Edit window accessible from the Initial Set menu For more information see P76 The tree list is hierarchical lower level tree nodes can be opened and closed by clicking the buttons on the left The DVR button the control panel can be used to show or hide the tree list When there is one or more video streams displayed on the viewing pane the camera with a blue ...

Page 25: ...function as the buttons Live Displays live video in the single view layout when a camera is selected or Displays live video in the multi view layout when a group is selected Play Plays back recorded video in the single view layout when a camera is selected or Plays back recorded video in the multi view layout when a group is selected Menu Opens the DVR Set window Alarm Search Opens the Alarm Searc...

Page 26: ...ew that displays the video stream from only one camera at a time You can select one of the cameras connected to a DVR by specifying the corresponding channel number The viewing pane defaults to this layout when you have logged into the system Four view layout one DVR at a time The four view layout provides four views that can display up to 4 video streams from a single DVR When you are connected t...

Page 27: ...ayout is used Moreover by allocating the videos from a 4 channel DVR a maximum of 16 sub panes 4 channels x 4 sub panes can be viewed If you are using VA SW8000LITE you cannot access the multi view layout Whichever layout you use no video stream is displayed and a black placeholder with a specific message appears instead in the following situations The specified channels carries no input signal VI...

Page 28: ...R Operation menu CH1 DVR 1 CH2 CH3 CH4 CH1 CH1 CH1 DVR 1 CH2 CH3 CH4 Single view layout Four view layout Or double click the viewing pane Or double click the viewing pane Or double click the viewing pane Or double click the viewing pane Multi view layout The sub pane assigned to the DVR is displayed in the single view layout Multi view layout The sub pane assigned to the DVR is displayed in the fo...

Page 29: ...lable because when you try to display the four view layout for a single channel DVR the single view layout is displayed instead Alternatively you can select Display from the DVR Operation menu DVR 1 DVR 1 DVR 1 DVR 1 Single view layout Single view layout Or double click the viewing pane Or double click the viewing pane Or double click the viewing pane Or double click the viewing pane Multi view la...

Page 30: ...in the middle of the title bar D red Manual recording or timer recording is in progress C red Timer recording is active i e timer recording is either scheduled or ongoing Alarm status The title bar changes its color to indicate the alarm status Red An alarm condition has occurred with the currently monitored camera DVR Yellow The currently played back video contains an alarm condition Activating O...

Page 31: ...ut is initially displayed when you turn on live mode but you can switch to the four view or multi view layout as you like Switching the Video Channels Click one of the channel selector buttons on the control panel When you are connected to a 4 channel DVR the video stream from the camera that corresponds to your specified channel is displayed in the single view layout irrespective of the layout yo...

Page 32: ...o from your selected camera 4 Assign video streams to the remaining sub panes By repeating steps 2 and 3 above you can assign video streams to up to 4 sub panes When connected to a 4 channel DVR after selecting the sub pane by clicking the title bar a single view layout can be switched to a four view layout by conducting one of the following operations Clicking on the control panel Selecting DVR O...

Page 33: ... switches to the live video from the camera that has been selected during playback Switching from a Sub Window to Live Mode When you are working in a sub window accessible from the Initial Set DVR Management Tool or another menu you can switch to live mode by clicking a layout selector button or a channel selector button on the control panel ...

Page 34: ... of video streams and black placeholders appear in place of the video streams To turn on the video again double click the camera title on the tree list If a channel is feeding a masked video stream no sound is outputted whichever sound output setting is selected To listen to the sound part in the video go to the REC MODE SET tab of the DVR Set window and turn on AUDIO RECORDING Note that an error ...

Page 35: ...gle channel or 4 channle DVR in the four view layout Original size x2 x4 x8 x12 When you are viewing the video from a 4 channel DVR in the single view layout Original size x2 x4 x6 3 To zoom out on the video after zoom in Click 2 on the control panel The button turns red to indicate that you are in zoom out mode Each time you click the button the displayed video is scaled down incrementally until ...

Page 36: ...F Full Screen Operations Right clicking on the full screen displays the context menu in which the following operations can be made 1 Displaying live video stream 2 Playing back 3 Returning to normal mode 4 Switching between show hide of the title bar 2 How to Enlarge the Displayed Video By left clicking on the part of the video you want to enlarge the video image will be incrementally enlarged wit...

Page 37: ...ideo stream from each camera one after another This behavior loops until you exit from Sequential Switching mode 3 To exit from Sequential Switching mode Click again to exit from Sequential Switching mode You are returned to the layout you were working in before switching to Sequential Switching mode This feature is only available when you are connected to a 4 channel DVR You cannot use Sequential...

Page 38: ... whether or not to start recording This dialog is intended to prevent you from inadvertently recording an unwanted video stream b Manual recording required user access level ID3 4 You can manually record live video from monitored cameras Basic Operating Steps 1 Display live video When in the multi view layout specify the sub pane that is displaying the video you want to record by clicking its titl...

Page 39: ...er of DVRs To stop the recording for a DVR display the live video from that DVR and then stop the recording Live Video Recording Without Viewing It When you use manual recording mode to record live video you can also control the recording without displaying the live video on the viewing pane Simply select your desired camera from the tree list and click the appropriate control button to make the D...

Page 40: ...bols disappear and timer recording is canceled A C symbol is displayed in the title bar when timer recording is on standby When timer recording starts a D symbol appears next to the symbol mentioned above If the ALARM MODE is set to OLY AL REC ON TMR on the REC MODE SET tab of the DVR Set screen alarm recording is automatically triggered when the timer scheduled time is reached so you do not have ...

Page 41: ...es disables alarm recording B ALARM DURATION see 109 Determines how long recording should continue when an alarm condition is detected C ALARM TRIGGER see 109 Set the trigger condition for alarm recording D MOTION SENSOR see P118 Sets the alarm detection condition that should be applied to the camera s internal motion sensor To view alarm recorded video You can play back an alarm recorded video fi...

Page 42: ...m the second time onward however playback resumes at the point where you ended playback Operating mode indicator During playback the title bar indicates the operating mode and playback speed PLAY Video is being played back at the original speed If you change the playback speed this indicator is followed by the playback speed Example PLAYx2 STILL Playback is currently paused and a snapshot still im...

Page 43: ...to fast forward mode Speed increments x1 8 x1 4 x1 2 To frame step the playback You can frame step the playback by pausing the playback and repeatedly clicking 5 To stop the playback Click 4 to stop the playback and return to live mode To play back sound You can turn on or off the sound output by clicking 7 on the sound playback panel In playback mode you can use the sound playback panel the same ...

Page 44: ...ime 44 ALARM SEARCH ALARM LIST SEARCH T T F Searches for alarm events and displays an alarm list that lets you locate alarm events of interest and play back the video files associated with them 46 ALARM THUMBNAIL SEARCH T T F Searches for alarm events and displays a thumbnail view of alarm recorded video files from which you can pick any video files and play them back 47 You must have user access ...

Page 45: ...fied month year 2 Specify the desired date Click a date on the calendar Your specified date turns blue 3 Specify the desired time Specify the hours minutes and seconds parts of the time by selecting the appropriate number from each drop down list 4 Click The software starts playing back the video file s that matches your specified date and time criteria In this mode you can use the same playback c...

Page 46: ...se the LIST and THUMBNAIL buttons provided on this window The number of alarm event log entries that can be retained on a single hard disk is limited as follows Once the upper limit has been reached alarm event log entries are added to and deleted from the hard disk on a first in first out basis and deleted entries no longer appear on the alarm list or thumbnail view DSR M810 814 Max 49 999 entrie...

Page 47: ... mode you can use the same playback controls as in playback mode To switch the channels displayed on the list When you are connected to a 4 channel DVR you can switch the channels displayed on the list and preview pane by selecting one of the tabs ALL When you select the ALL tab the alarm list displays the alarm events from all the four channels and the preview pane displays the images for all the...

Page 48: ...ail view contains eight thumbnails You can display the previous or next page of the thumbnail view by clicking or 4 Click the thumbnail image whose associated video you want to play back The selected title bar is highlighted 5 Click You are brought to the main window and your selected video is played back in a single view layout In this mode you can use the same playback controls as in playback mo...

Page 49: ...u to choose from two download modes individual and batch In the default configuration the lowest user access level authorized to access the download mechanism is ID2 however you can use the Options window under the Initial Set menu to raise the lowest required access level so that users with user access levels ID2 and ID3 cannot access the download mechanism For more information see P73 If you wan...

Page 50: ...itle bar 2 Drag the scale 1 to define the start point When you drag the scale and release it at a position the playback point moves to that position and the playback continues from the new playback point Repeatedly drag the scale until the appropriate start point is found You can advance the time by sliding the scale to the left or reverse the time by sliding the scale to the right The playback po...

Page 51: ... marked with a red line that identifies the start point To reset the start point click START POINT again 4 Define the end point Define the end point in the same procedure as the start point Since the start point has already been determined you can only slide the scale to the left 5 Once you have determined the end point click END POINT 3 The download end point is established and the END POINT butt...

Page 52: ...the download range To do so follow these steps A Point to the target point with the mouse cursor Place the mouse cursor on a scale graduation B Click the right mouse button A context menu appears This menu contains the following options Download start point Download end point C Select the appropriate option depending on whether you are going to define the start or end point Your specified point is...

Page 53: ...s the still images of the video frames that correspond to the start and end points of the specified download range in the PREVIEW pane Download list and controls 5 Download list Displays the video files that will be batch downloaded You can add video files to this list by clicking the Add button List column headings DVRNAME DVR title FILE NAME DATE TIME START start point time stamp END end point t...

Page 54: ...art end points click 5 2 Specify the folder and file name of the download destination When a video file is downloaded the folder and file name of its destination are automatically assigned as shown below and the path name is displayed in FILENAME 2 You can accept this default destination unless your situation requires another location Default destination folder path C Program Files SANYO VA SW8000...

Page 55: ...d process If you want to add a video file to the download list rather than downloading it immediately click 4 This adds the video file to the download list The files contained in the download list can be later batch downloaded Proceed to Adding Video Files to the Download List for Batch Download A Download an individual video file B Add video files to the download list so that they can be later ba...

Page 56: ...view Then click 3 This displays the still images of the video frames that correspond to the start and end points of the specified video file in the PREVIEW pane To check the total combined size of the files contained in the list The total size indicator 4 below the list shows the total combined size of all the files contained in the download list To batch download all the files contained in the li...

Page 57: ... subgroup is displayed EXPAND Provides a detailed view by displaying the breakdown of all the split files in a group What is a group If a single source video file is larger than 600MB or contains any blank portions or any video data recorded by the alarm recording mechanism the source video file is automatically split into multiple files and saved as such while the download process is in progress ...

Page 58: ... to the play waiting list as shown below To select individual files and add them to the play waiting list On the available files list select a single file you want to play and then click 1 If you want to play more than one file repeat this step for all the remaining files To add all files to the available files list Click 3 All files contained in the available files list are added to the play wait...

Page 59: ...ted simply by directly double clicking the file The following two methods of association are available 1 When installing this software configure in advance on the File association screen see P8 File association is configured in the system folder 2 Configure mp2 file associate with MP2Viewer on the MP2 Viewer Option menu see P121 File association is configured on the MP2 Viewer that is currently ac...

Page 60: ...e bar 2 Click on the control panel You are presented with a window that allows you to save or print the still image The window provides a thumbnail view that displays all frame images within the one second range centered on the frame you have selected as the still image this includes the frames 0 5 second ahead of and 0 5 second behind your selected still image as well as all frames in between The...

Page 61: ...layed 1 Display a still image 2 Click on the control panel You are presented with a dialog that allows you to save or print the still image 3 Select the Overlay Time Date check box Select the Overlay Time Date check box if you want to overlay the image with the file name and time stamp 4 Click the appropriate command button Depending on whether you want to save or print the still image select eith...

Page 62: ...R basis and set up a timer schedule The video file within the range will then be automatically downloaded when the preset time is reached You can define up to eight timer schedules for one DVR Window Elements and Their Functions If you are using VA SW8000LITE you cannot access the Tool menu In the default configuration the lowest user access level authorized to download video files is ID2 however ...

Page 63: ...eature is useful when you define several timer schedules and choose from them depending on your need 7 NO The timer downloads are performed in ascending order of the timer schedule numbers 8 DVR NAME The title of the DVR to which the timer schedule is applied Since this window is intended to define timer schedules for a single DVR the same DVR name appears in all the rows 9 FROM WEEK TIME Specify ...

Page 64: ...he current context are grayed out disabled This button is used to activate the timer download When you click the button the timer download is put into standby and will automatically start when your start point conditions are met The indicator at the top of the control panel indicates the timer download status as either Program download scheduled but not started or Downloading download in progress ...

Page 65: ... your situation requires another location To override the default destination click Browse and select your desired folder from the browse list You can also create a new folder by clicking the NEW FOLDER button on the dialog 4 Define the download range by specifying the appropriate date time Depending on what you chose from the WEEK drop down list in the SCHEDULE section define by one of the follow...

Page 66: ...le so that the timer download is performed as scheduled select the check box in the SET section 7 Click Your schedule settings are applied and saved 8 Click The timer download is put into standby and will automatically start when your start point conditions are met The operating mode indicator at the top of the control panel indicates the timer download status as follows Message text Program displ...

Page 67: ...deo data to download and the date on which to perform the download i e for both the FROM WEEK drop down list and WEEK drop down list in the SCHEDULE section the system will download the video data recorded one week before When you select APPT from the FROM WEEK drop down list make sure that the download range end point is earlier than the time at which to start the download Otherwise an error is g...

Page 68: ... live video from the affected DVRs The timer download mechanism does not operate unless the DVR Utility Software is up and running with a user logged in You should not log out of the system or exit from the software while any download is in standby or in progress If you do so a confirmation dialog appears If there are multiple download ranges defined downloads are performed in the ascending order ...

Page 69: ...y Daily setting example selecting DLY from the WEEK drop down list in the SCHEDULE section In this example the system automatically downloads the recorded video data that meets the following criteria from DVR 2 at 20 00 everyday 1 Recorded within the time range of 4 00 to 18 00 on the day before 2 Recorded throughout the 24 hours 00 00 to 00 00 of the day before 3 Recorded within the time range of...

Page 70: ...cient disk space USER CANCELED The download was cancelled because the Stop button was clicked DOWNLOAD TIMEOUT The download timed out failing to complete before the start time of the next download DOWNLOAD TIME CHANGED The download range was changed because no video data were found between the specified start and end points DUPLICATION ERROR The download file name conflicted with an existing file ...

Page 71: ...p 2 RECORD required user access level ID3 4 Broadcasts the Record manual recording command equivalent to one that can be executed by clicking the Record button on the control panel You can instruct all the DVRs to simultaneously start or stop recording video data by clicking Start Recording or Stop Recording 3 TIMER RECORD required user access level ID3 4 Broadcasts the Timer Recording command equ...

Page 72: ...s equivalent to using the System Update window under the DVR Management menu by doing the following Note that this broadcasts firmware updates to all the DVRs 1 Click Browse Choose which button to click based on the model of the connected DVRs Types of button For DSR M800 DSR M804 DSR M810 and DSR M814 When you click the button a dialog opens that displays a list of referenced files 2 Select the f...

Page 73: ...d frames are found message appears in the dialog If altered frames are detected The ALTERED window appears that lists the time stamps of the altered frames You can display any altered frame by clicking the corresponding row on the ALTERED window If tampering of date and time information is detected The Found time stamp is altered message appears in the dialog You cannot load a video file mp2 unles...

Page 74: ...ime after installation On the menu bar click Initial Set to open the pull down menu and navigate to one of the windows by clicking the corresponding option b Options Window 1 LANGUAGE default ENGLISH Identifies the display language used throughout the user interface of the DVR Utility Software To change the display language select the appropriate radio button Available options English French Chine...

Page 75: ...erval of auto synchronization Available options 1 2 3 6 12 24 hours 6 SEQUENCE default 1 When you are connected to a 4 channel DVR you can use Sequential Switching mode to monitor in turn each of the cameras connected to the four channels Here you can set the switching interval using the spin button For more information see P36 Valid range 1 to 30 seconds If you have selected the SLAVE option be s...

Page 76: ...ou can specify the maximum number of DVRs When you open the drop down list it displays several choices for the number of DVRs that can be connected based on the value of the network interface card s subnet mask Choose the most suitable choice F Control buttons Before you click OK you can cancel your changes by clicking this button Applies and saves your changes Subnet mask value Number of DVRs con...

Page 77: ...ist the tree list you edit here is intended for end user windows and displayed on a camera by camera basis Similarly groups you create here are camera groups that are independent from DVR groups You can also access the Tree Edit window by selecting the Tree Edit option on the context menu of the tree list This window is editable on the master computer only Window Elements and Their Functions When ...

Page 78: ...gured on the Register DVR window 3 Tree list Cameras belonging to the selected group are displayed as a tree list All editing of titles and the tree structure is conducted on the tree 4 Control buttons Applies and saves your changes Before you click OK you can cancel your changes by clicking this button About the tree list hierarchy Depending on whether the connected DVRs are single channel or 4 c...

Page 79: ...p from the context menu A new group folder appears at the bottom of the tree list with the default name of New Group You can give the new group your own name by typing it into the name box After typing in the group name press the Enter key to add the new group to the list Editing the Tree List The name can contain any characters and symbols that can be typed in but its length must be within 246 ha...

Page 80: ...or move a group to a different position cut and paste the camera or group title using the Cut and Paste commands on the context menu Alternatively you can drag and drop a camera or group title to a new position The name can contain any characters and symbols that can be typed in but its length must be within 246 half size characters A camera can be placed on any hierarchical level in the tree even...

Page 81: ...elete from the context menu On the confirmation dialog that appears click OK You cannot add more than one instance of a camera to the same group When you remove a camera from the tree list the corresponding check box in the detail list is cleared If you want to add a previously removed camera to the tree list again select the camera on the detail list and drag and drop it onto the tree list You ca...

Page 82: ... exclusively for DVR registration and management purposes When you edit the tree list and groups actually displayed on the user interface you must use the Tree Edit window rather than the Register DVR window For more information see P76 By default the DVR Utility Software supports up to 1 000 DVRs connected to the network If you want to connect more DVRs to the network you can use the Options wind...

Page 83: ... group or DVR and then clicking this button 7 Command buttons Saves your change and updates the DVRs with the new settings Clicking OK will bring up the following dialog Select whether or not to reflect the contents configured in the Register DVR window on the user screen tree list Yes The current tree list is deleted and a new tree list reflecting the new settings is displayed No The configured c...

Page 84: ...f the last six digits XX XX XX of the MAC address but the title can be changed TYPE The DVR s model is automatically recognized and displayed IP ADDR The automatically allocated IP address is displayed MAC ADDR The DVR s own MAC address is automatically recognized and displayed 6 Click again The command buttons are enabled 7 If you have other DVRs you want to register repeat steps 1 to 6 above for...

Page 85: ...nformation of the new DVR and the command buttons are enabled Items displayed in the registration list are the same as in auto configuration mode For more information see P83 6 Editing the Tree List A newly registered DVR is given a default title and group which you can change as needed For more information see P86 7 Click Your changes are saved and uploaded to the DVR The last three digits of the...

Page 86: ...ion list Using a Registration List in an Updated Version If you have updated the DVR Utility Software from VA SW800 804 814 to VA SW8000 you can configure the system to use the registration list created in the previous version To do so use the Register DVR window and follow these steps 1Install VA SW8000 During the installation process you are prompted to choose whether to remove the old version s...

Page 87: ...t you can create new groups or rename existing groups so that you can monitor the DVRs more effectively To create a new group 1 Enter the new group name into the GROUP NAME box A group name can contain uppercase letters and numbers up to 10 characters in all It can also contain these special characters and space 2 Click The new group is added to the list and appears as the last group in the list b...

Page 88: ... you have other groups you want to rename repeat steps 1 to 2 above for each group 4 Click Your changes are saved and uploaded to the DVR To delete a group 1 Choose a group On the tree list or registration list select the group you want to delete The selected group is highlighted in blue 2 Click Your specified group is removed from the registration list Move at least one camera to a created group ...

Page 89: ...ree list select the DVR you want to move The selected DVR is highlighted in blue 2 Click or Your selected DVR moves up or down Rearranging Groups and DVRs You can also drag and drop a group to a new position The WORKGROUP group is fixed at the bottom and cannot be moved You can also drag and drop a DVR to a new position When you select the first DVR shown in a group and click the DVR leaves the cu...

Page 90: ...me and user access level of each registered user but does not display the password for security reasons When you want to change or deregister a user select the user from this list 5 Control buttons Changes the registration information of a registered user Registers a new user Deregisters a user 6 DVR access limitation button Accessible DVR groups and the broadcasting range can be configured for ea...

Page 91: ... level Select one of the four user access levels by clicking the corresponding radio button For more information see P11 Available options ID1 Monitoring user ID2 Playback user ID3 Recording user ID4 Administrative user 4 Click You are prompted to confirm the password by reentering it 5 Reenter the password Be sure to reenter the new password to the NEW box This must be identical to the one you sp...

Page 92: ... user registration list is immediately updated to reflect your changes If you change the password you are prompted to confirm the password by reentering it In this case proceed to step 4 4 Enter the current and new passwords On the dialog enter the currently defined password into the CURRENT box and reenter the new password to the NEW box The password entered into the NEW box must be identical to ...

Page 93: ...t the user you want to deregister The selected user is highlighted in blue and the user s registration information appears 2 Click You are prompted to choose whether to proceed Click Yes if you are sure you want to deregister the user 3 Click OK Your specified user is deregistered and removed from the user registration list Deregistering an Existing User 1 2 2 ...

Page 94: ...EDIT for Limit accessible DVRs The AUTHORIZED DVR ACCESS dialog box is displayed 3 Configure Limit accessible DVRs Select whether to limit the accessible DVRs or not Options All DVRs default DVR access is not limited All DVRs are accessible Limited DVRs DVR access is limited Configure the limitations by setting Authorized Accessible DVR Group step 4 and Broadcast Range step 5 DVR Access Limitation...

Page 95: ...step 4 It is also possible to limit the transmission destination to one group in configuration of Ranging Broadcast on the BROADCAST window see P70 All DVRs Broadcast is possible to all DVRs 6 Click OK Saves the DVR access limitation settings and closes the dialog box Broadcast is limited depending on the DVR model and firmware version DSR M810 P M814 P Broadcast is only possible when the DVR firm...

Page 96: ... this mode the DVR is automatically synchronized to your computer s internal clock MANUAL In this mode you manually set the DVR s internal clock 3 If you have selected MANUAL set the date and time manually Use the spin buttons to set the date and time 4 Click The DVR s clock is adjusted based on the mode you selected The DVR Management menu lets you select a camera from the tree list Settings conf...

Page 97: ...e whether to update the firmware If you click YES the system starts updating the firmware 4 Wait until the update process completes You are presented with a dialog that indicates that the update process is in progress and a green light flashes 2 3 The firmware file you plan to broadcast must be stored on your computer s hard disk before you can broadcast it Do not use any other firmware file than ...

Page 98: ...on tabs by clicking the tab index 2 Import the information To import the latest information from the DVR and activate the tab do the following From the tree list select a camera and click the button at the bottom of the window Alternatively double click a camera on the tree list and click Yes on the confirmation dialog that appears You can also access the DVR Info window by selecting the Status op...

Page 99: ...sk s You are prompted to choose whether to proceed Click Yes if you are sure to initialize the hard disk s What is mirroring You can create a redundant mirror of a hard disk by installing an additional hard disk This enables mirroring in which the same video data are recorded into two identical disks at the same time Mirroring provides a fault tolerance benefit because when one of the two disks ha...

Page 100: ...re occurred and when it was recovered as well as the total cumulative number of power failures 3 FIRMWARE VERSION Indicates the version of the DVR s firmware main sub 4 RECORDING TOP END Indicates when the first recording session started and when the last recording session stopped INFORMATION 2 tab 1 2 3 4 No firmware version is indicated if the DVR is DSR M800 P This information is displayed only...

Page 101: ...perform these configuration tasks easier through the DVR Set window Basic Configuration Steps When you have just navigated to the DVR Set window from another window all of its tabs are initially disabled and do not accept any entry Before you can configure settings on the window you must choose a camera and click the Import button on the first tab Then you can configure the DVR operating condition...

Page 102: ...en uploaded 6 To configure settings on other tabs as well Repeat the above procedure steps 3 to 5 When you make any change on a tab its tab index text turns yellow 7 Click when you are done Configuration information is uploaded from all the tabs to the DVR and the tab index text returns from yellow to black The DVR Set window lets you select a camera from the tree list Settings configured on each ...

Page 103: ...The system loads the saved information and overwrites the fields in all the tabs At this stage the configuration information has not yet been sent to the DVR The text on all the tab indexes is displayed in yellow indicating that the tabs contain changes that have not yet been uploaded Once the save information is loaded you can work with the window tabs as usual You cannot selectively save the con...

Page 104: ...n the system retrieves current configuration information from the DVR and activates all the tabs You can also import the configuration information by double clicking a camera title on the tree list instead of clicking this button When there are changes that have not been uploaded because you have clicked Apply you can use this button to cancel the upload and overwrite the tab with the imported inf...

Page 105: ...related to the DVR s display language and clock adjustment 1 LANGUAGE D S TIME SET Tab A The German DEUTSCH option for the display language is only selectable when the TV SYSTEM on the Options window is set to PAL B The REMOTE SET menu is only displayed when the connected DVR is the DSR M810 1 2 3 4 A B ...

Page 106: ...ows At a specified time a signal is supplied from the CLOCK ADJ OUT pin of the first base DVR to the CLOCK ADJ IN pin of the second DVR so that both of the clocks are synchronized then another signal is supplied from the second DVR to the third DVR if any for the synchronization In this manner all the DVRs are synchronized to the same time The adjustment is accurate to the second 4 REMOTE SET defa...

Page 107: ...ed Available options SUPER Super high quality plus 74 hours at minimum SUPER Super high quality 112 hours at minimum HIGH High quality 224 hours at minimum STANDARD Standard quality 448 hours at minimum 2 REC MODE SET Tab 1 2 3 4 5 6 7 8 9 The parenthesized values are a rough guideline for the length of time that can be recorded on a 160GB medium The SUPER option is only selectable if the DVR is D...

Page 108: ...on OFF When the disk runs out of free space the DVR s low space alarm lamp flashes and the system stops recording Turning off this setting unlocks the Disk Full Reset button TV SYSTEM video standard Image quality Resolution pixels NTSC 30 fps SUPER 720 x 480 SUPER 720 x 480 HIGH default 720 x 480 STANDARD 720 x 480 DSR M804 M814 352 x 480 DSR M800 M810 PAL 25 fps SUPER 720 x 576 SUPER 720 x 576 HI...

Page 109: ...lable options OFF Disables the alarm recording mechanism ENABLED Always enables the alarm recording mechanism independently of the timer recording settings AL REC ON TIMER Enables the alarm recording mechanism only when a timer recording is in progress AL REC OFF TIMER Enables the alarm recording mechanism only when the timer recording is not in progress OLY AL REC ON TMR Enables the alarm recordi...

Page 110: ...orresponding signal to the DVR s rear panel terminal OFF The system neither displays a message nor outputs a signal when a video stream is lost 9 AUTO DELETE default OFF You can turn on or off the Auto Delete feature which automatically erases obsolete video files that have exceeded a predetermined maximum storage period Available options ON Turns on the Auto Delete feature You have to specify the...

Page 111: ...n to start and end the timer recording 3 ON OFF default OFF You can turn on each timer schedule by selecting the ON radio button the OFF button is selected by default Leave the OFF radio button selected if you do not want to immediately activate the timer schedule after you have defined it This feature is useful when you define several timer schedules and choose from them depending on your need 4 ...

Page 112: ...a particular day of the week select DLY from the WEEK drop down list Example In this example a timer recording is scheduled to start at 10 00 and end at 20 00 everyday To schedule a timer recording that spans two days When you specify an end time that is earlier than the start time the system interprets the end time as a time on the next day and a T symbol appears This way you can schedule a timer...

Page 113: ...imer recording schedule On this tab you can only define timer recording schedules To have the timer recording mechanism actually work based on your defined schedules you have to click the timer recording button on the control panel The scheduled timer recording is put into standby and will automatically start when your start time conditions are met The title bar of the window shows the timer recor...

Page 114: ...onworking day Define holidays using the spin buttons You can define up to 20 holidays 4 HOLIDAY SET Tab If you select DLY for a timer schedule both Sunday and DLY timer schedules take effect When you have finished configuring the settings on this tab click and make sure that the tab index text turns yellow When you have finished your configuration task across all the tabs finally click Configurati...

Page 115: ... AUDIO default ON Quality and audio settings Marked with A if AUDIO RECORDING is set to ON 3 ALARM COUNT default ON Number of alarm events The system counts up to 99 999 alarm events after the maximum is reached the count is reset to 0 4 CAMERA TITLE default ON Depending on whether the connected DVRs are single channel or 4 channel either camera titles or DVR names are displayed as follows DSR M80...

Page 116: ...sed 8 WARNING default ON When any of the following has occurred Hard disk failure Fan failure Recording error VIDEO LOSS 9 NON REC default OFF When an ongoing recording session is stopped When the DVR s buzzer has sounded you can stop the buzzer by pressing any button on the front panel When you have finished configuring the settings on this tab click and make sure that the tab index text turns ye...

Page 117: ...anagement Menu Required user access level ID4 On this tab you can control how the DVR s user interface should display video 6 MONITOR SET Tab This tab is only displayed when you are connected to a 4 channel DVR 1 2 3 4 ...

Page 118: ...ns you can select one of the following options LAST Displays the most recent alarm video instead of the view that is being recorded FIRST Continues to display the video that is being recorded SWITCH Switches the alarm video streams at intervals of one second MASK SET 4 MASK SET default OFF When it is critical to ensure the privacy and confidentiality of the video from a particular channel you can ...

Page 119: ...cted DVR The motion sensor when enabled automatically detects an alarm condition based on the movement of a subject shot by the camera 7 TITLE MOTION SET Tab This tab is only displayed when you are connected to a 4 channel DVR To trigger the alarm recording mechanism with the motion sensor set ALARM TRIGGER to an option other than ALARM on the REC MODE SET tab 1 3 4 6 2 5 ...

Page 120: ...annel numbers 1 to 4 are used as camera titles CH1 1 CH2 2 CH3 3 CH4 4 6 Click This applies the motion sensor and camera title settings to your specified channel 7 Configure the motion sensor and camera title settings for other channels CH2 CH4 Repeat the above procedure steps 1 to 6 You can apply up to 20 sensing points to the middle area of the preview pane where 20 grid squares are displayed in...

Page 121: ...an on board graphic chip Requires the latest DirectX 9 0c compatible driver Operating system Windows 2000 Professional or higher Windows XP Professional recommended Sound Sound card with 48kHz stereo playback support A sound card is required to listen to the sound part in live or played back video b Installation When you install the DVR Utility Software the MP2 Viewer program is installed as well ...

Page 122: ...original size see P126 Full Screen Switches to Full Screen mode See P126 Overlay Time Date on JPEG image Allows you to overlay the video with the file name and time stamp when saving the video see P130 mp2 file associate with MP2Viewer Associates the MP2 file with the MP2 Viewer see P125 Tamper Det Mode Selects the tamper detection mode see P128 Language selection Allows you to change the display ...

Page 123: ...he file 7 Title Bar Displays the basic information on the displayed video including the file name playback mode and the date and time time stamp of recording 8 Playback pane The video is played back in this area Since the video files are played back on a DVR by DVR basis the playback pane layout differs depending on the model of the DVR used to record the video Single channel DVRs single view layo...

Page 124: ...subgroup is displayed EXPAND Provides a detailed view by displaying the details for all of the split files in a group What is a group If a single source video file is larger than 600MB or contains any blank portions or any video data recorded by the alarm recording mechanism the source video file is automatically split into multiple files and saved as such while the download process is in progress...

Page 125: ...ndividual files and add them to the play waiting list On the available files list select a single file you want to play and then click 1 If you want to play more than one file repeat this step for all the remaining files To add all files to the play waiting list Click 3 All files contained in the available files list are added to the play waiting list To remove a file from the play waiting list On...

Page 126: ...on playback fast forward fast reverse slow play or pause 2 STILL FRAME Pauses the current operation playback fast forward fast reverse or slow play and displays the current frame as a still image When a frame image is displayed you can step to the next frame by mouse clicks 3 SLOW When a still image is displayed and you click this button you can switch to slow play mode at the x1 8 speed Each time...

Page 127: ... opening the Option menu and selecting Full Screen When you switch to Full Screen mode the currently displayed video is maximized to cover the whole screen with all other user interface elements including the menu bar and control panel hidden from the screen Right clicking on the full screen brings up the context menu and the following operations can be performed apart from normal context menu com...

Page 128: ... box The tamper detection feature works on all the image files loaded into the Play List The slide bar at both ends indicates the start and end dates times of the video file You have to specify the search criteria within this range You can use the search feature only when you are in stop pause or normal playback mode This feature does not support other playback modes fast forward fast reverse and ...

Page 129: ...arts the title bar turns blue and remains blue until tampering is detected If the title bar is still blue when the playback ends it means that no tampering is found in the video file White The title bar turns white if any tampering is detected during the playback Green If a tampered frame is detected the title bar remains green and does not revert to blue even after the check moves past the tamper...

Page 130: ...mpering is detected A list of the file names and tampered dates and times is displayed If tampering of date and time information is detected Time stamp is displayed in the Remarks column By designating and highlighting a line a still image of the tampered area the top still image if date and time information has been tampered is displayed If video is played back after the appraisal the results are...

Page 131: ...ack 3 Click on the toolbar On the Save As dialog save the image as a JPEG file by specifying the folder and file name b Printing a Still Image You can print a still image through the following steps 1 Display a still image Click during playback 2 Click on the toolbar This button opens the Printing dialog and you can print the image at the full size by specifying the appropriate print options The p...

Page 132: ...1AC6P1P3121 L9EAR WA 0706KP SANYO Electric Co Ltd ...

Reviews: