background image

Summary of Contents for VWM-700

Page 1: ...ned that this product or product model meets the ENERGY STA guidelines for energy eHiclency VCR Plus and PlusCode are registered trademarks of Gemstar Development Corporation The VCR Plus system is manufactured under license from Gemstar Development Corporation Please read this manual carefully before connecting your VCR and operating it for the first time Keep the manual in a safe place for futur...

Page 2: ...e video taping of copyrighted materi als FCC WARNING This equipment may generate or use radio frequency energy Changes or modifica tions to this equipment may cause harmful interfer ence unless the modifications are expressly approved in the instruction manual The user could lose the authority to operate this equipment if an unauthorized change or modification is made This device complies with Par...

Page 3: ...emote Control 12 13 Multibrand Universal Remote Control 14 15 Onscreen Display OSD 16 Setting the Onscreen Display 17 Setting the Setup Menu 18 Channel Selection 19 20 Viewing TV Only 20 Video Cassette Tapes 21 Setting the Clock 22 23 PLAYBACK Normal Playback 24 Special Effects Playback 25 26 RECORDING Normal Recording 27 Timer Recording 28 30 Instant Timer Recording 31 Timer Recording with the VC...

Page 4: ...sory recom mended by the manufacturer 8 Transporting Product 4 A product and cart combination should be moved with care Quick stops excessive force and uneven surfaces may cause the product and cart combination to overturn PORTABLE CART WARNING 9 Attachments Do not use attachments not recommended by the product manufacturer as they may cause hazards 10 Ventilation Slots and openings in the cabinet...

Page 5: ...nto this prod uct through openings as they may touch dan gerous voltage points or short out parts that could result in a fire or electric shock Never spill liquid of any kind on the product 19 Servicing Do not attempt to service this product yourself as opening or removing covers may expose you to dangerous voltage or other hazards Refer all servicing to qualified service person nel 20 Damage Requ...

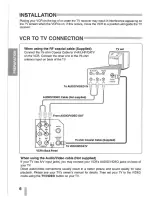
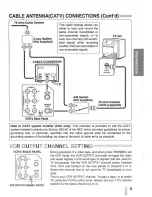
Page 6: ...r end to the 75 ohm antenna input on back of the TV To AUDIONIDEO IN AUDIONIDEO Cable Not supplied From AUDIONIDEO OUT 75 ohm Coaxial Cable Supplied To VHF UHF CATV VCR s Back Panel When using the AudioNideo cable Not supplied TV set If your TV has AN input jacks you may connect your VCR s AUDIONIDEO jacks on back of your TV Direct audio video connections usually result in a better picture and sou...

Page 7: ...ads from the rear of the TV receiver 300ohm twin lead 2 Identify the type of cable from your antenna If it is a round cable as illustrated it is a 75 ohm coaxial antenna cable This cable will connect directly to the connector marked ANT IN on your VCR If your antenna lead wire is a flat type antenna cable connect it to a Antenna Adaptor 300 ohm to 75 ohm not supplied and slip the Adaptor onto the ...

Page 8: ...he TV With this connection you can receive all midband super band and hyperband channels With Cable Box If a converter is required in your cable system follow the instruction below The cable hookup permits both TV and VCR operation To view or record CATV channel 1 Set the TV channel to the video output channel as located on the back of the VCR CH3 or CH4 2 Set the VCR channel selector to the outpu...

Page 9: ...ing and in particular specifies that the cable ground shall be connected to the grounding system of the building as close to the point of cable entry as practical VCR s BACK PANEL fYY i IN OUT L f 3 Y ANT IN VHF UHF CATV 0 VCR OUTPUT CHANNEL SWITCH During playback of a video tape and when press TVNCR to set the VCR mode the VCR OUTPUT converter changes the video and audio signals to the same type ...

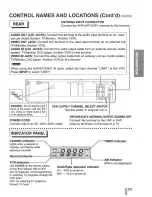
Page 10: ...NFRARED REMOTE SENSOR Receives the signal from the infrared remote control ll 1 1 i 0 0 PLAY m llll lll 000 eJ CHANNEL T To scan up or down through memorized channels page 19 or to adjust manually the tape s picture onscreen page 24 VCR Function Indicator Panel Details are on the next page VIDEO IN AUDIO IN UR JACKS Connect the audio video output cable from an external unit ex Camcorder Video game...

Page 11: ...l LINE1 at the VCR Press INPUT to select LINE1 WARNING Do not drop the tying band of the power cord into the unit Doing so might cause a fire or an electrical shock VCR OUTPUT CHANNEL SELECT SWITC Set this switch to channel 3 or 4 POWER CORD Connect only to an AC 120V 60Hz outlet VHF UHF CATV ANTENNA OUTPUT CONNECTOR Connect this terminal to the VHF or UHF antenna terminals on the back of a TV IIN...

Page 12: ...ner or by the TV tuner page 9 27 7 1 11T i Ad JUMP To fast forward picture search through 30 seconds of recording page 26 __ SP SLP Use to select recording speed page 27 ENTER CLKICOUNT Accesses the onscreen menu page 17 Displays functions on the TV screen Switches among the clock tape counter and tape remaining modes on the display page 16 38 VCR Plus To display the program menu on the TV screen ...

Page 13: ...E CONTROL Aim the remote control unit at the sensor on the front panel of the VCR HOW TO INSTALL THE BATTERIES 1 Slide the battery compartment cover in the direction of arrow 2 Insert 2 AA size batteries in the correct direction 3 Replace the cover NOTES The remote control will not operate properly if something comes between the VCR and the remote control If the range is short try new batteries An...

Page 14: ... The remote control is now set to your device TV MODE OPERATION To use the remote control with your TV press TV You can use POWER 100 ENTER INPUT CH TRACK A f VOL I and number 0 9 buttons to control the TV CATV MODE OPERATION To use the remote control with your cable CATV converter decoder or DSS Digital Satellite System receivers press CATV You can use POWER 100 ENTER INPUT CHITRACK A f and numbe...

Page 15: ...22 Cable converter decoder SPRUCER 08 19 21 Brands Code STARGATE OS 11 22 ARCHER 00 01 06 29 SYLVANIA 38 39 CABLE CINEMA 01 32 TEKNIKA 30 CABLETENNA 01 32 TELECAPTION 26 CABLEVIEW 01 32 TELEVIEW 20 22 39 CENTURY 00 29 TEXSCAN 38 39 CITIZEN 00 24 29 TOCOM 01 07 10 11 CURTIS 19 25 32 UNIKA 00 11 29 DIAMOND 01 32 UNIVERSAL 00 24 27 29 EAGLE 15 20 36 40 41 VIDEOWAY 02 03 14 EXPLORER 19 32 VIEWSTAR 15 ...

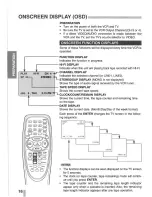
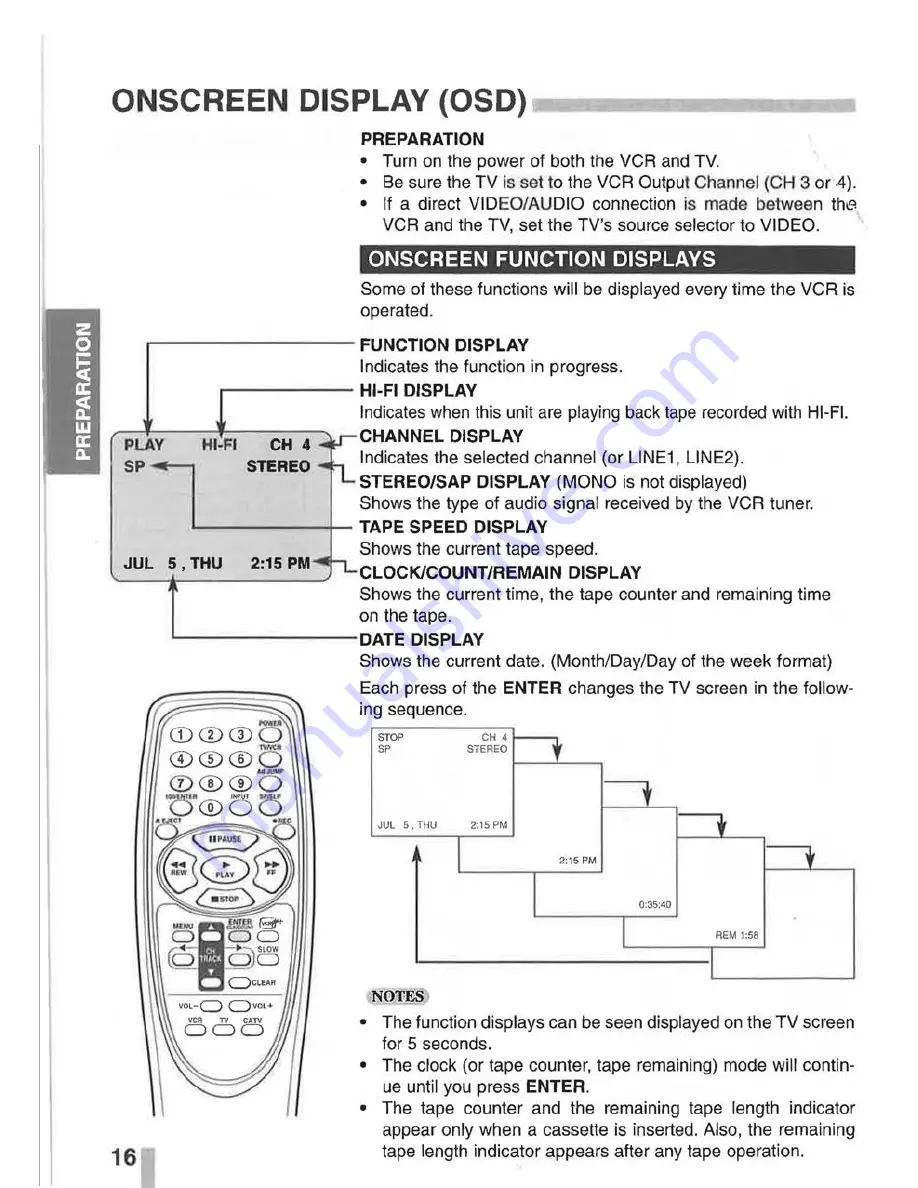
Page 16: ...DISPLAY MONO is not displayed Shows the type of audio signal received by the VCR tuner 1 TAPE SPEED DISPLAY JUL S THU Shows the current tape speed CLOCK COUNT REMAIN DISPLAY Shows the current time the tape counter and remaining time on the tape DATE DISPLAY Shows the current date Month Day Day of the week format Each press of the ENTER changes the TV screen in the follow ing sequence STOP CH 4 SP ...

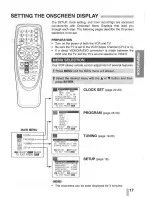
Page 17: ...e desired menu with the J or button and then press ENTER 11j Jtli wt1JIII61 W DAY I MON YEAR 2001 TIM 12 00 AM AUTO CLOCK SET ON DAYLIGHT SAVING AUTO TIME ZONE AUTO DD SELECT CCI ADJUST TO EXIT PRESS l ml l fril JfAtM DAY START STOP CHANNEL SPEED REPEAT DD SELECT CCI ADJUST TO EXIT PRESS l ml l CLOCK SET page 22 23 PROGRAM page 28 30 CLOCK t PROGRAM I TUNI NG I SETUP I t l lliieli t Jd i l 11 TUNI...

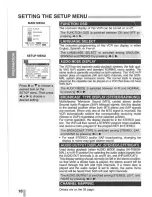
Page 18: ... 41111 or BROADCAST TYPE DISPLAY STEREO SAP MONO Multichannel Television Sound MTS carries stereo and or Second Audio Program SAP bilingual signals Set this display to the desired position when both MTS stereo and SAP signals are received When only one of the MTS signal is received the VCR automatically selects the corresponding receiving mode Stereo or SAP regardless of the selected position For ...

Page 19: ...the VCR output channel CH 3 or 4 AUTO CHANNEL PROGRAMMING 1 Press MENU and the MAIN menu will appear 2 Press A or Y to select the TUNING menu then press ENTER The TUNING menu will appear 3 Press to choose the SOURCE SELECT item then press or to select TUNER Press or repeatedly to switch among TUNER LINE1 and LINE2 4 Press A or Y to choose the AUTO CHANNEL SET item then press or to set the channel ...

Page 20: ...channel Repeat steps 3 and 4 to add or erase channels 5 Press MENU to return to the TV screen VIEWING TV ONLY Switch on the TV and set it to the channel that you wish to watch 0 Set POWER to OFF 20 You don t need to disconnect the VCR from the TV to watch TV separately When the VCR s power is OFF or when the VCR s power is ON and the TVNCR selector is set to TV the TV will operate as if it were co...

Page 21: ...anism Do not touch the tape with your fingers Always store an unused cassette in its case LOADING Hold the cassette with the arrow side up top Insert the cassette gently into the slot in the direction of the arrow on the cassette until the loading mechanism automatically pulls the cassette into the unit Make certain that the cassette is inserted correctly If the cassette is not loaded correctly th...

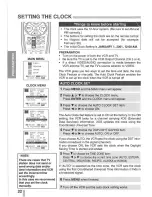
Page 22: ...ce selector to VIDEO The VCR gives you two ways to set the time and date the Auto Clock Feature or manually The Auto Clock Feature enables the VCR to set up the clock when the VCR is turned off AUTO CLOCK SET 1 Press MENU and the MAIN menu will appear 2 Press _ or to choose the CLOCK menu Press ENTER and the CLOCK menu will appear 3 Press T to choose the AUTO CLOCK SET item Press or to choose ON T...

Page 23: ...ELECT I ICI ADJUST TO EXIT PRESS l lll1 l MONTH JULY DAY 5 THU YEAR 2001 TIME 2 15 AM am liD SELECT I ICI ADJUST TO EXIT PRESS mill MANUAL CLOCK SET Example July 5 2001 2 15 AM 1 Press MENU and the MAIN menu will appear 2 Press or T to choose the CLOCK menu Press ENTER and the CLOCK menu will appear 3 Press or to choose the month 4 Press T to choose the DAY item Press or to choose the day The day ...

Page 24: ...TVNCR selector switches to VCR mode auto matically 3 Press STOP to stop playback The STOP appears in the VCR indicator panel and TV screen If the tape reaches the end before STOP is pressed the VCR will automatically stop rewind eject and it will turn itself off TRACKING CONTROL AUTO TRACKING The automatic tracking function adjusts the picture to remove snow or streaks The AUTO TRACKING function w...

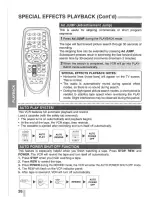
Page 25: ...kly and visually search for a desired tape section in either direction forward and reverse During PLAYBACK mode 1 Press desired search button FF or REW The VCR will be activated in the SEARCH mode and SCH or SCH will appear on the VCR indicator panel If the VCR is left in the SEARCH mode for more than 3 min utes the VCR will automatically enter the PLAY mode to pro tect the tape and video heads 2 ...

Page 26: ...re search modes a short period is needed to stabilize tape speed when re entering the PLAY mode Slight interference may be observed during this period This VCR features full automatic playback and rewind Load a cassette with the safety tab removed The power turns on automatically and playback begins At the end of the tape the VCR stops then rewinds The cassette is ejected after rewinding and turn ...

Page 27: ... SLP by pressing SP SLP This VCR is not designed to record in LP mode 4 Set the MTS mode as desired See page 18 37 5 Press REC once Recording will start The REC will appear If a cassette with no safety tab is loaded the cassette will be ejected automatically 6 Press STOP to stop recording If the tape reaches the end before STOP is pressed the VCR will automatically stop rewind eject and it will tu...

Page 28: ...or a moment and then CLOCK menu appears on the TV screen Set the time and date before proceeding The display contents will be automatically replaced by TV programs after 3 minutes Make sure a tape is in the VCR and the safety tab is in place or the tape will be automatically ejected PREPARATION Turn on the power of both the VCR and the TV Be sure the TV is set to the VCR output channel 3 or 4 Make...

Page 29: ...red stop time Example 7 30 PM 9 Press to choose the CHANNEL item Press IIIII or to choose the desired channel Channel LINE1 or LINE2 Example CH 4 Cable Users If you have CABLE TV and used Cable Box in Cable Antenna Connections pages 8 9 using a cable box con verter you must set the channel in this step to match the cable box output channel usually CH 3 or 4 Change channels on the cable box instead...

Page 30: ...u can program multiple recordings only on the converter box out put channel This is because the converter determines what channel you view through your VCR If you are finished programming and you want to set the VCR to record the programs you have entered A MAKE SURE YOU HAVE INSERTED A TAPE INTO THE VCR B YOU MUST TURN OFF THE VCR BEFORE IT WILL RECORD ANY TIMER PROGRAMS TIMER indicator lights Th...

Page 31: ...INE1 or LINE2 3 Set the TAPE SPEED item to desired speed SP or SLP by pressing SP SLP The tape speed will appear on the TV screen and indicator panel 4 Press REC twice The menu as illustrated will appear on the TV screen Recording will start The TIMER indicator will light 5 Press REC repeatedly to select the recording time length At the end of recording the display will read OHOO the VCR will stop...

Page 32: ...et channel positions match the guide channels which are assigned to the TV channels channel mapping If they do not match you have to channel mapping before starting timer record ing using the VCR Plus system ANTENNA CABLE CONNECTIONS The Channel Mapping set up depends on the specific antenna or cable TV connection that you have used to hook up your VCR in your home Look left to determine the conne...

Page 33: ... CH3 or4 If a direct VIDEO AUDIO connection is made between the VCR and the TV set the TV s source selector to the VIDEO 1 Press MENU and the MAIN menu will appear 2 Press or T to select the SETUP menu then press ENTER The SETUP menu will appear 3 Press T to choose the CHANNEL MAPPING item then press or to display the CHANNEL MAPPING display The CHANNEL MAPPING display appears On the left the VCR ...

Page 34: ... on the TV screen 2 Press number 0 9 to enter the PlusCode number you want to record If you press the wrong number press CLEAR Then input the correct PlusCode number 3 Press ENTER and the PROGRAM menu appears 4 The SPEED item may be selected automatically Press IIIII or to choose the desired tape speed AUTO SP or SLP Example SP The AUTO mode determines how much tape is left and switches speed from...

Page 35: ... AUDIONIDEO Input 1 Connect the camcorder s or another VCR s AN outputs to your VCR as illustrated above 2 Set the input channel LINE2 Press INPUT to select LINE2 If you have connected your VCR to the AN input jacks on the rear of VCR you should select the input channel LINE1 by pressing INPUT twice 3 Play the tape in the camcorder or another VCR If you have a TV attached to your VCR you can see t...

Page 36: ...NIDEO OUT jacks to the AUDIO R L NIDEO INPUT jacks on back your TV or another AN system using the AN cable PLAYBACK WITH Hi Fi STEREO AUDIO SOUND A stereo TV with AUDIONIDEO input jacks or a stereo audio sys tem is required for true stereo playback To experience the full and rich stereo sound available with Hi Fi recorded tapes we recom mend the connection of this unit to a home stereo audio syste...

Page 37: ...e TV screen The VCR can record in stereo onto the VHS Hi Fi audio tracks when the BROADCAST TYPE item is in the STEREO position The VCR will also record mono audio onto the mono audio track If only the SAP appears on the TV screen Select the BROADCAST TYPE item to SAP If both the STEREO SAP appears on the TV screen Use the BROADCAST TYPE item to select the desired record ing mode STEREO or SAP SAP...

Page 38: ...tely after recording or if you want to return to the same point several times 1 Begin recording or playing a tape 2 Press CLK COUNT repeatedly to display the real time counter appears on the TV screen 3 At the point that you want locate later reset the real time counter to 0 00 00 by pressing CLEAR 4 Continue to play or record 5 Press STOP when recording or playback finishes 6 Press REW The tape a...

Page 39: ...Place the cassette in its protective sleeve to protect it from dust It is not necessary to rewind the cassette before removing it but it you do it will be ready to play or record the next time you use it Be sure the VCR Channel Selector is on the correct channel you wish to record The channel that is being recorded can always be checked by setting the television on the VCR channel 3 or 4 and press...

Page 40: ... on the back of the VCR Output Channel Try a different cassette tape No picture but audio is clear The heads may require cleaning Take VCR to a qualified Service Center for service Interference on playback Adjust fine tuning knob on television set to obtain best picture picture Adjust the tracking control Take VCR to Service Center for service The VCR cannot be remotely Weak or dead batteries cont...

Page 41: ... Watts 360 X 94 5 X 230 mm 14 3 X 3 8 X 9 2 5 C 35 o c 41 F 95 F Less than 80 RH 12 hour display type with AM PM Approx 3 2 kg 7 lbs 33 35 mm sec 16 67 mm sec 11 12 mm sec 12 7 mm 2 HOURS T 120 6 HOURS T 120 8 HOURS T 160 about 3 minutes T 120 75 ohms 15 ohms Channel 3 or 4 Switchable 2 13 14 69 1 125 4A A W W 1 W 84 A 5 A 1 EIA Standard 525 lines 60 fields NTSC type color signal 1 0 Vp p 75 ohms ...

Page 42: ...shall not apply to the cabinet or cosmetic parts broken or damaged video heads baHeries or routine maintenance J This warranty does not apply to uncrating setup installation removal or the product for repair or reinstallation ol the product aner repair 4 This warranty does not apply to repairs or replacements necessitated by any couso boyond tho ccntr ol of SANYO Including but nol Umltod to M malf...

Reviews: